


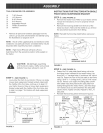
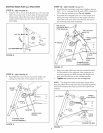
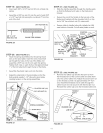


STEP 19: (SEE FIGURE 20)
, insert each 3/8" x 3ol/2" hex bolt (H) into a blade trip
spring.
Assemble a 3/8" hex nut (X) onto the end of each 3/8"
x 3-1/2" hex bolt (H) leaving the nut about 2" from the
end of the bolt.
3/8" HEX NUT (X)
3/8" X 3-1/2"
HEX BOLT (H)
BLADE TRmP SPRING
FIGURE 20
STEP 20: (SEE FIGURE 21)
, Hook the spring assemblies into the spring mount
ears on the pivot plate, Insert the end of each bolt
up through the hobs in the top of the blade and
assemble a 3/8" hex nut (X) onto each trip spring,
Tighten both nuts on each bolt so that approximately
1" of the bolt extends through the top of the blade,
Assemble the plastic caps (JJ) onto the bolts.
Adjust the stop bolts in the pivot plate so that the
bolts extend equally 1ol/2" above the pivot plate,
creating tension on the spring assemblies.
HEX NUT (X)
BOLT
_PRmNG
MOUNT EAR
FIGURE 21
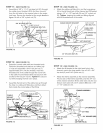
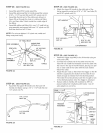
STEP 21: (SEE FIGURE 22)
Slide the handle assembly through the handle guide
so that the flattened end rests on the blade pivot
bracket,
Secure the end of the handle to the top side of the
blade pivot bracket with the shoulder bolt (I) on top
and a 3/8" hex whiz!ock nut (S) underneath.
Secure cable to handle tube with a plastic tie (HH)
near bottom of handle. Cut off extra plastic on end.
\
TIE (HH)
CONTROL
CABLE
3/8"HEX
BLADE
NUT (S)
/ PIVOT HANDLE
BRACKET TUBE
FIGURE 22
STEP 22: (SEE FIGURE 23)
, Remove the rubber cap and the first jam nut from
the threaded end of the control cable and slide them
onto the control cable wire, Adjust the second jam nut
on the threads so that it is approximately 3/4" from
end, Assemble threaded end of cable through the
cable mount ear and secure it with the first jam nut,
Reinstall the rubber cap onto the threaded cable end,
HANDLE
ASS'Y.
HANDLE
GUIDE
FIGURE 23
11