


14
MAINTENANCE
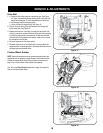
Changing Oil
Change engine oil after first two hours of operation and every 25 hours
thereafter.
In order to change oil, you will have to first drain the used engine oil
from the engine and then refill with fresh oil.
1. Drain oil while engine is warm. Remove oil drain plug located at
the bottom of the recoil starter of the engine. Catch oil in a suitable
container.
2. When engine is drained of all oil, replace drain plug securely.
3. Remove the dipstick from the oil fill. Pour fresh oil slowly through
the plug. Replace dipstick.
4. Check and make sure that the level of oil is up to the FULL mark on
the dipstick.
NOTE: Although multi-viscosity oils (5W30, 10W30, etc.) improve
starting in cold weather, they could also result in higher oil consump-
tion when used above 32˚ F. Check your snow thrower’s engine oil
level more frequently to avoid possible engine damage from running
low on oil.
Check Chute Cables
Once a season or every 25 hours of operation, whichever is earlier,
check whether chute cables have slackened. Adjust if necessary,
following instructions on page 17.
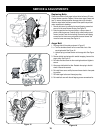
Check Spark Plug
Check spark plug yearly or every 100 operating hours.
1. Clean area around the spark plug base.
2. Remove and inspect the spark plug.
3. Replace the spark plug if electrodes are pitted, burned, fouled with
deposits or the porcelain is cracked.
4. Check electrode gap with a feeler gauge and set gap to .030
(0.76mm) if necessary.
NOTE: A resistor spark plug must be used for replacement. Contact a
Sears Parts and Repair Center for a replacement spark plug.
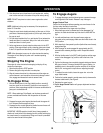
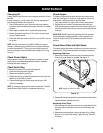
Check Augers
The augers are secured to the spiral shaft with two shear pins and
cotter pins. See Figure 10. If you hit a foreign object or ice jam, the
snow thrower is designed so that the pins may shear.
1. If the augers do not turn, check to see if the pins have sheared.
2. Replace the pins if needed. Two replacement shear pins and
cotter pins have been provided with the snow thrower. Spray an oil
lubricant into shaft before inserting new pins and securing with new
cotter pins.
IMPORTANT: NEVER replace the auger shear pins with standard
pins. Any damage to the auger gearbox or other components, as
a result of doing so, will NOT be covered by your snow thrower’s
warranty.
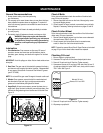
Check Shave Plate and Skid Shoes
The shave plate and skid shoes on the bottom of the snow thrower are
subject to wear. Check these periodically and replace as necessary.
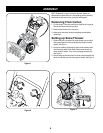
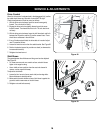
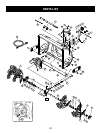
Replacing Skid Shoe
1. Remove four carriage bolts and lock nuts which attach two skid
shoes to the snow thrower on two sides. See Figure 12.
2. Reassemble new skid shoes with the same hardware. Make certain
the skid shoes are adjusted to be level.
Replacing Shave Plate
1. After removing both skid shoes, remove four carriage bolts and lock
nuts which attach shave plate to the snow thrower housing. See
Figure 12.
2. Reassemble new shave plate, making sure heads of the carriage
bolts are to the inside of the housing. Tighten securely. Re-install
skid shoes.
Figure 12
./4%!UGErSNOTSHOWNFORCLARITY