


13
MAINTENANCE
General Recommendations
1. Always observe safety rules when performing
any maintenance.
2. The warranty on this snow thrower does not cover items that have
been subjected to operator abuse or negligence. To receive full
value from warranty, operator must maintain the snow thrower as
instructed here.
3. Some adjustments will have to be made periodically to maintain
your unit properly.
4. Periodically check all fasteners and make sure these are tight.
WARNING: Always stop engine and disconnect
spark plug wire before performing any maintenance
or adjustments. Always wear safety glasses during
operation or while performing any adjustments or
repairs.
Lubrication
1. Drive Mechanism: Once a season or after every 25 hours of
operation, remove rear frame cover and lubricate any chains,
sprockets, gears, bearings, and shafts with engine oil or lubricant
spray.
IMPORTANT: Avoid oil spillage on rubber friction wheel and aluminum
drive plate.
2.
Gear Case: The gear case is lubricated with grease at the factory
and does not require regular lubrication. However, if disassembled
for any reason, lubricate with 2 ounces of Shell Alvania™ grease
(part # 737-0168).
NOTE: Do not overfill the gear case. Damage to the seals could result.
3.
Wheels: Once a season, remove the bolt from each wheel and
take the wheel off the axle. Apply a multipurpose automotive
grease on the shaft before putting back the wheels.
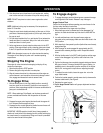
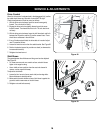
4.
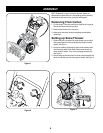
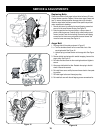
Auger Shaft: At least once a season, remove the shear pins on
auger shaft. Spray lubricant inside shaft, around the spacers. Also
lubricate the flange bearings found at either end of the shaft. See
Figure 10.
Check V-Belts
Follow instructions below to check the condition of the drive belts
every 50 hours of operation.
1. Remove the plastic belt cover on the front of the engine by remov-
ing two self-tapping screws.
2. Visually inspect for frayed, cracked, or excessively worn out belts.
Replace, if necessary, following instructions on pages 15 and 16.
Check Friction Wheel
Follow instructions below to check the condition of the friction wheel
rubber every 50 hours of operation.
1. Remove the self-tapping screws from the frame cover underneath
the snow thrower. Refer to Figure 19.
2. Visually inspect the friction wheel rubber for excessive wear,
cracks, or loose fit on the friction wheel drive hub.
NOTE: Contact the nearest Sears Parts & Repair Center as instructed
on page 2 if your friction wheel rubber needs to be replaced.
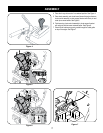
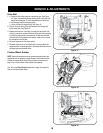
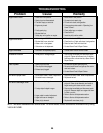
Checking Oil Level
1. Be sure engine is upright and level
2. Unscrew oil fill cap from oil filler tube and wipe dipstick clean.
3. Screw oil fill cap back into oil filler tube. Tighten securely.
4. Unscrew and remove oil fill cap from oil filler tube. Note oil level. If
oil reading on dipstick is below “ADD” mark, slowly add oil to reach
“FULL” level. See Figure 11.
5. Screw oil fill cap back into oil filler tube. Tighten securely.
6. Wipe away any spilled oil.
Figure 10
Figure 11
&5,,
!$$
-AINTAIN/IL,EVEL
"ETWEEN&5,,AND!$$
3HEAR0IN
"EARING
3PACERS