


25
example, if you are observing from a mountainous location where the horizon is partially obscured, you can set your
minimum altitude limit to read +20º. This will make sure that the hand control only displays objects that are higher
in altitude than 20º.
If you want to explore the entire object database, set the maximum altitude limit to 90º and the minimum limit to –
90º. This will display every object in the database lists regardless of whether it is visible in the sky from your
location.
Direction Buttons –The direction a star appears to move in the eyepiece changes depending on which side of the
Meridian the telescope tube is on. This can create confusion especially when guiding on a star when doing
astrophotography. To compensate for this, the direction of the drive control keys can be changed. To reverse the
button logic of the hand control, press the MENU button and select Direction Buttons from the Utilities menu. Use
the Up/Down arrow keys (10) to select either the azimuth (right ascension) or altitude (declination) button direction
and press ENTER. Select either positive or negative for both axes and press ENTER to save. Setting the azimuth
button direction to positive will move the telescope in the same direction that the telescope tracks (i.e. towards the
west). Setting the altitude buttons to positive will move the telescope counterclockwise along the DEC axis.
Goto Approach - lets the user define the direction that the telescope will approach when slewing to an object.
This allows the user the ability to minimize the affects of backlash when slewing from object to object. Just like
with Direction Buttons, setting GoTo Approach to positive will make the telescope approach an object from the
same direction as tracking (west) for azimuth and counterclockwise in declination. Declination Goto approach will
only apply while the telescope tube is on one side of the Meridian. Once the tube passes over to the other side of the
Meridian, the Goto approach will need to be reversed.
To change the Goto approach direction, simply choose Goto Approach from the Scope Setup menu, select either
Altitude or Azimuth approach, choose positive or negative and press ENTER.
In order to minimize the affect of gear backlash on pointing accuracy, the settings for Button Direction should
ideally match the settings for GoTo Approach. By default,
using the up and right direction buttons to center alignment
stars will automatically eliminate much of the backlash in
the gears. If you change the Goto approach of your
telescope it is not necessary to change the Button Direction
as well. Simply take notice of the direction the telescope
moves when completing it final goto approach. If the
telescope approaches its alignment star from the west
(negative azimuth) and clockwise (negative altitude) then
make sure that the buttons used to center the alignment
stars also move the telescope in the same directions.
Autoguide Rate – Allows the user to set an autoguide
rate as a percentage of sidereal rate. This is helpful when
calibrating your telescope to a CCD autoguider for long
exposure photography.
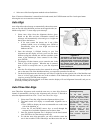
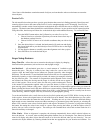
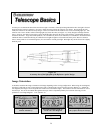
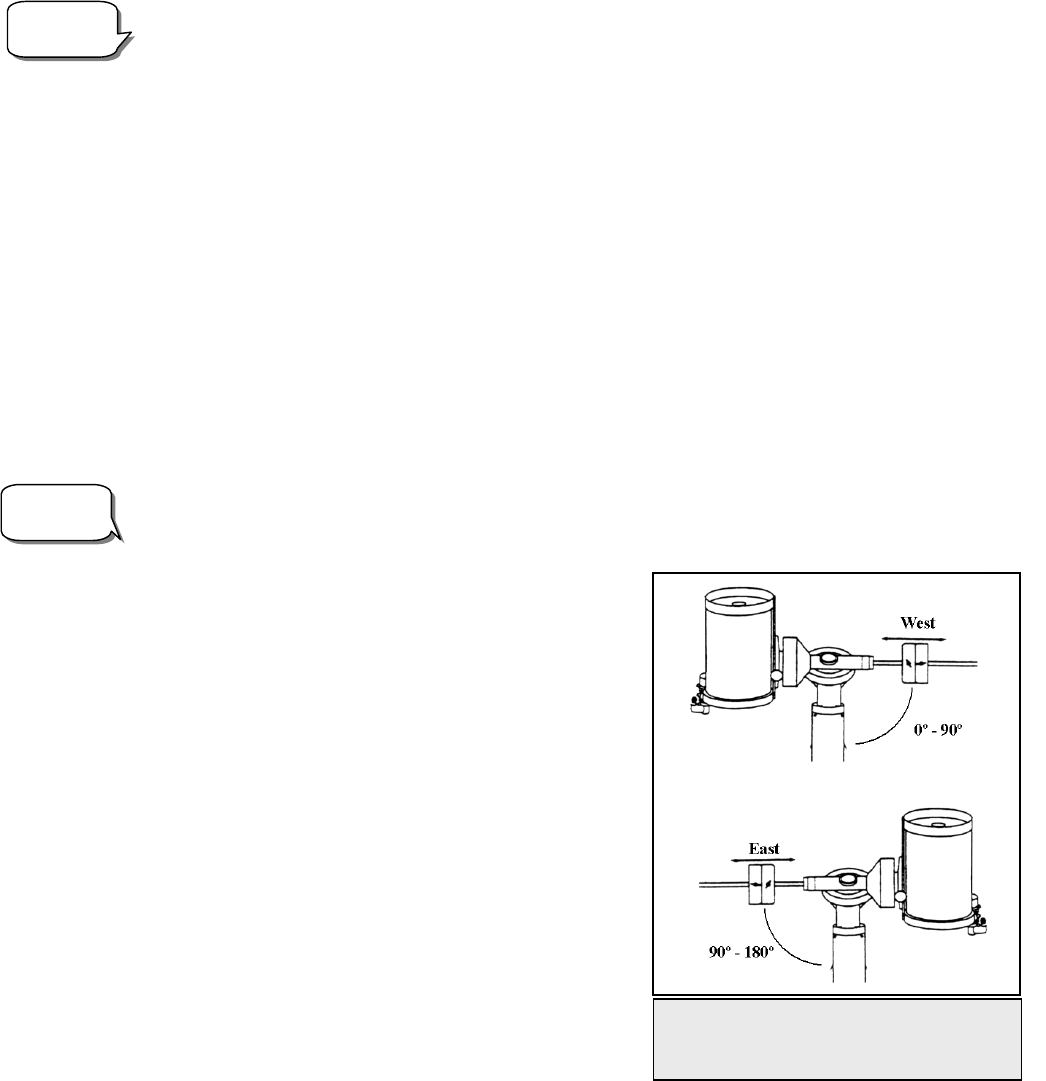
Azimuth Limits - Sets the limits that the telescope can
slew in azimuth (R.A.) The slew limits are set to 0º to
180º; with zero being the position of the telescope when the
counterweight bar is extended out towards the west and 180º
being the position when the counterweight bar is extended out
toward the east (see Fig 3-3). However, the slew limits can
be customized depending on your needs. For example, if you are using CCD imaging equipment that has cables
that are not long enough to move with the telescope as it slews across the sky, you can adjust the azimuth slew limit
on the side of the mount that is restricted by the cables. Using the example above, the user could slew the telescope
Observing
Tip!
Helpful
Hint!
Fig 3-3 – Azimuth Slew Limits- This
figure shows the full range of motion
for the R.A.
(
azimuth
)
axis