


18
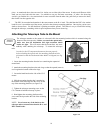
4. Select one of the four alignment methods as described below.
Note: If incorrect information is entered into the hand control, the UNDO button acts like a back space button
allowing the user to re-enter the correct data.
A
A
u
u
t
t
o
o
A
A
l
l
i
i
g
g
n
n
Auto Align allows the telescope to automatically choose three stars
(two on one side of the Meridian, and one on the opposite side) on
which to align itself. To Auto Align your telescope:
1. Select Auto Align from the alignment choices given.
Based on the date and time information entered, the
telescope will automatically select and go to a bright star
that is above the horizon.
• If for some reason the chosen star is not visible
(perhaps behind a tree or building) press UNDO to
automatically select the next bright star from the
database star list.
2. Once the telescope is finished slewing to your first
alignment star, the display will ask you to use the arrow
buttons to align the selected star with the crosshairs in the
center of the finderscope. Once centered in the finder,
press ENTER.
3. The display will then instruct you to center the star in the
field of view of the eyepiece. When the star is centered,
press ALIGN to accept this star as your first alignment
star.
4. After the first alignment star has been entered the telescope will automatically select a second alignment
star on the same side of the Meridian and have you repeat this procedure for that star.
5. For the third alignment star, the telescope will select a bright star on the opposite side of the Meridian and
slew to it. Once again center the star in the crosshairs of the finderscope and then center the star in the
eyepiece, pressing ENTER when complete.
When the telescope has been aligned on all three stars the display will read Alignment Successful, and you are
now ready to find your first object.
A
A
u
u
t
t
o
o
T
T
h
h
r
r
e
e
e
e
-
-
S
S
t
t
a
a
r
r
A
A
l
l
i
i
g
g
n
n
Auto Three-Star Alignment works much the same way as Auto Align, however
instead of automatically slewing to the alignment stars, the user is allowed to
select the alignment stars from a list. To use Auto Three-Star Align:
1. Select Auto Three Star Align from the alignment choices given.
2. The hand control will display a recommended alignment star to
begin.
• Press UNDO to display the next recommended star on the same
side of the Meridian, or
• Press the UP and DOWN arrows keys to scroll through the
compete list of available alignment stars to choose from.
3. Once the desired alignment star is displayed on the hand control
press ENTER to slew the telescope to the star.
4. As with the Auto Align procedure, you will be asked to center the
star in the crosshairs of the finderscope and then center the star in
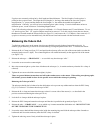
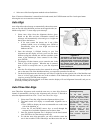
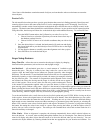
Figure 3-2
The Meridian is an imaginary line in the sk
y
that starts at the North celestial pole and
ends at the South celestial pole and passes
through the zenith. If you are facing South,
the meridian starts from your Southern
horizon and passes directly overhead to the
North celestial pole.
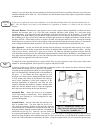
Pointing Accuracy
For the best possible
pointing accuracy, always
center the alignment stars
using the up arrow button
and the right arrow button.
A
pproaching from this
direction when looking
through the eyepiece will
eliminate much of the
backlash between the
gears and assures the
most accurate alignmen
t
possible.