


17
A
A
l
l
i
i
g
g
n
n
m
m
e
e
n
n
t
t
P
P
r
r
o
o
c
c
e
e
d
d
u
u
r
r
e
e
s
s
In order for the telescope to accurately point to objects in the sky, it must first be aligned to three known positions
(stars) in the sky. With this information, the telescope can create a model of the sky, which it uses to locate any
object with known coordinates. There are many ways to align your telescope with the sky depending on what
information the user is able to provide: Auto Align allows the telescope to select three stars and uses the entered
time/location information to align the telescope; Auto Three Star Align involves the same process as Auto Align,
however it allows the user to select which star to use to align the telescope. Quick-Align will ask you to input all the
same information as you would for the Auto Align procedure. However, instead of slewing to the alignment stars
for centering and alignment, the telescope bypasses this step and simply models the sky based on the information
given. Finally, Last Alignment restores your last saved star alignment and switch position. Last Alignment also
serves as a good safeguard in case the telescope should lose power.
S
S
t
t
a
a
r
r
t
t
u
u
p
p
P
P
r
r
o
o
c
c
e
e
d
d
u
u
r
r
e
e
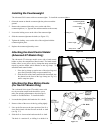
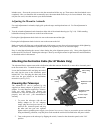
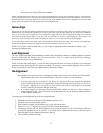
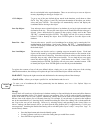
Before any of the described alignments are performed, the telescope mount needs to be positioned so that the index
marks are aligned on both the right ascension and declination axes (see Fig 2-8).
First index its switch position so that each axis has an equal amount of
travel to move in either direction. Once the index position has been set,
the hand control will display the last entered date and time information
stored in the hand control. Once the telescope is powered on:
1. Press ENTER begin the alignment process.
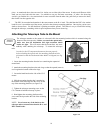
2. The hand control will ask the user to set the mount to its index
position. Move the telescope mount, either manually or with
the hand control, so that the index marked in both R.A. and
Dec are aligned (see Fig 2-8). Press Enter to continue.
3. The hand control will then display the last entered local time,
date, time zone, longitude and latitude.
• Use the Up/Down keys (10) to view the current
parameters.
• Press ENTER to accept the current parameters.
• Press UNDO to enter current date and time
information into the hand control. The following
information will be displayed:
Time - Enter the current local time for your area. You can
enter either the local time (i.e. 08:00), or you can enter
military time (i.e. 20:00 ).
• Select PM or AM. If military time was entered,
the hand control will bypass this step.
• Choose between Standard time or Daylight
Savings time. Use the Up and Down scroll buttons
(10) to toggle between options.
• Select the time zone that you are observing from. Again, use the Up and Down buttons (10) to
scroll through the choices. Refer to Time Zone map in Appendix for more information.
Date - Enter the month, day and year of your observing session.
• Finally, you must enter the longitude and latitude of the location of your observing site. Use
the table in Appendix C to locate the closest longitude and latitude for your current observing
location and enter those numbers when asked in the hand control, pressing ENTER after each
entry. Remember to select "West" for longitudes in North America and "North" for latitudes in
the North Hemisphere. For international cities, the correct hemisphere is indicated in the
Appendix listings.
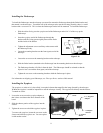
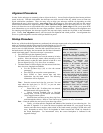
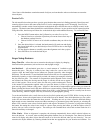
Mount Calibration
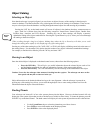
A
fter an Auto Align is successfully
completed, the hand control will
display the message, Calibrating...
This automatic calibration routine is
necessary to calculate and
compensates for "cone" erro
r
inherent in all German equatorial
mounts. Cone error is the
inaccuracy that results from the
optical tube not being exactly
perpendicular to the mounts
declination axis as well as various
other inaccuracies such as backlash
in the mounts gears. The telescope
is able to automatically determine
the cone error value by always using
alignment stars on both sides of the
Meridian (see Figure 3-2).
Mechanical errors can be reduced
further by always centering
alignment stars using the up and
right arrow buttons as described in
the Pointing Accuracy box below.