


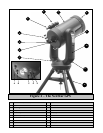

9
The NexStar comes completely pre-assembled and can be operational in a matter of minutes. The NexStar and its accessories are
conveniently packaged in one reusable shipping carton while the tripod comes in its own box. Included with your NexStar are the
following:
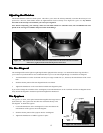
• 40mm Eyepiece – 1¼"
• 1¼" Star Diagonal
• 9x50 Finderscope and Mounting Bracket
• 1¼" Visual Back
• AC adapter (car battery adapter is included with some models)
•
•
Heavy Duty Tripod
•
•
Vibration Suppression Pads
•
•
Bolt Pack
A
AA
A
A
AA
A
s
ss
s
s
ss
s
s
ss
s
s
ss
s
e
ee
e
e
ee
e
m
mm
m
m
mm
m
b
bb
b
b
bb
b
l
ll
l
l
ll
l
i
ii
i
i
ii
i
n
nn
n
n
nn
n
g
gg
g
g
gg
g
t
tt
t
t
tt
t
h
hh
h
h
hh
h
e
ee
e
e
ee
e
N
NN
N
N
NN
N
e
ee
e
e
ee
e
x
xx
x
x
xx
x
S
SS
S
S
SS
S
t
tt
t
t
tt
t
a
aa
a
a
aa
a
r
rr
r
r
rr
r
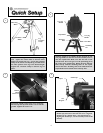
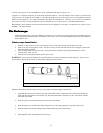
Start by removing the telescope and tripod from their shipping cartons and set the telescopes round base on a sturdy flat surface.
Always carry the telescope by holding it from the lower portion of the fork arm on the hand control side and from the handle on
the opposite side. Remove all of the accessories from their individual boxes. Remember to save all of the containers so that they
can be used to transport the telescope. Before attaching the visual accessories, the telescope should be mounted on the tripod and
the tube should be positioned horizontal to the ground.
S
SS
S
S
SS
S
e
ee
e
e
ee
e
t
tt
t
t
tt
t
t
tt
t
t
tt
t
i
ii
i
i
ii
i
n
nn
n
n
nn
n
g
gg
g
g
gg
g
U
UU
U
U
UU
U
p
pp
p
p
pp
p
T
TT
T
T
TT
T
h
hh
h
h
hh
h
e
ee
e
e
ee
e
T
TT
T
T
TT
T
r
rr
r
r
rr
r
i
ii
i
i
ii
i
p
pp
p
p
pp
p
o
oo
o
o
oo
o
d
dd
d
d
dd
d
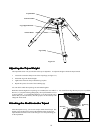
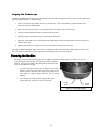
For maximum rigidity, the Celestron Heavy Duty Tripod has a leg support bracket. This bracket fits snugly against the tripod
legs, increasing stability while reducing vibration and flexure. However, the tripod is shipped with each arm of the leg support
bracket in between the legs so the tripod legs can collapse. To set up the tripod:
1. Hold the tripod with the head up and the legs pointed toward the ground.
2. Pull the legs away from the central column until they will not separate any further. A small stop on the top of each tripod
leg presses against the tripod head to indicate maximum separation.
3. Rotate the tension knob (located underneath the support bracket on the central column) clockwise until it is close to the
bottom of the central column.
4. Turn the leg support bracket until the cups on the end of each bracket are directly underneath each leg.
5. Rotate the tension knob counterclockwise until the bracket is secure against the tripod legs. Do not over tighten.
The tripod will now stand by itself. Once the telescope is attached to the tripod, readjust the tension knob to ensure that the leg
support bracket is snug. Once again, do not over tighten!