


18
6. After the first alignment star has been recorded, the NexStar will automatically slew to a second alignment star
and have you repeat the alignment process for that star. When the telescope has been aligned to both stars, the
display will read "Alignment Successful" and you are now ready to find your first object.
For the best possible pointing accuracy, always center the alignment stars using the up arrow button and the right arrow
button. Approaching the star from this direction when looking through the eyepiece will eliminate much of the backlash
between the gears and assure the most accurate alignment possible.
A
A
u
u
t
t
o
o
-
-
A
A
l
l
i
i
g
g
n
n
Alternatively, if you are observing at a location where it is difficult to establish a link with the proper satellites, AutoAlign
will allow the user to input the necessary information needed to align the telescope. After choosing AutoAlign and moving
the telescope into the north and index position, the NexStar will ask you to input first the date and time information then it
will ask for your location. Just like with GPS align, once this information is received, NexStar will automatically choose a
bright alignment star and automatically slew to it. Follow the steps below to AutoAlign the NexStar:
1. Once the NexStar is powered on , Press ENTER to begin alignment.
2. Use the Up and Down scroll keys (10) to select AutoAlign and press ENTER.
3. The hand control will display the last time and location information that was entered or downloaded from the
GPS. Use the Up and Down buttons to scroll through the information. If any of the parameters need to be
updated, press the UNDO button and edit the displayed information. If all the information is correct, press
ENTER to accept the displayed information. The following information will be displayed:
Time - Enter the current local time for your area. You can enter either the local time (i.e. 08:00), or you can
enter military time (i.e. 20:00 ).
• Select PM or AM. If military time was entered, the hand control will bypass this step.
• Choose between Standard time or Daylight Savings time. Use the Up and Down scroll buttons (10) to toggle
between options.
• Select the time zone that you are observing from. Again, use the Up and Down buttons (10) to scroll through
the choices. Refer to Time Zone map in Appendix E for more information.
Date - Enter the month, day and year of your observing session.
If the wrong information has been input into the hand control, the UNDO button will act as a backspace allowing the user to
re-enter information.
4. Finally, you must enter the longitude and latitude of the location of your observing site. Use the table in Appendix
C to locate the closest longitude and latitude for your current observing location and enter those numbers when
asked in the hand control, pressing ENTER after each entry. Remember to select "West" for longitudes in North
America and "North" for latitudes in the North Hemisphere. For international cities, the correct hemisphere is
indicated in the Appendix listings.
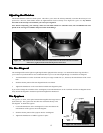
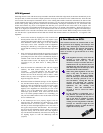
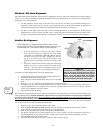
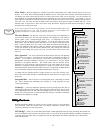
5. The hand control will then prompt you to move the optical tube to its north and index position:
• Use the up and down arrow keys (3) keys to rotate the
telescope tube until the index marker that moves with the
optical tube is lined up with the stationary index marker
on the fork arm. See figure 4.2
• Use the left and right arrow keys to point the front of the
telescope towards north. North can be found by finding
the direction of the North Star (Polaris) or by using a
compass. You do not need to point at the North Star, only
the north horizon. Alignment only needs to be
approximate, however a close alignment will make the
auto alignment more accurate. Once the telescope is in the
North and Index position, press ENTER
Hel
p
ful
Hint
O
bserving
T
T
i
i
p
p
Figure 4-2 – The Altitude Index Marker