


13
To remove the eyepiece, loosen the thumbscrew on the star diagonal and slide the eyepiece out.
Eyepieces are commonly referred to by focal length and barrel diameter. The focal length of each eyepiece is printed on the
eyepiece barrel. The longer the focal length (i.e., the larger the number) the lower the eyepiece power or magnification; and the
shorter the focal length (i.e., the smaller the number) the higher the magnification. Generally, you will use low-to-moderate
power when viewing. For more information on how to determine power, see the section on “Calculating Magnification.”
Barrel diameter is the diameter of the barrel that slides into the star diagonal or visual back. The NexStar uses eyepieces with a
standard 1-1/4" barrel diameter.
T
TT
T
T
TT
T
h
hh
h
h
hh
h
e
ee
e
e
ee
e
F
FF
F
F
FF
F
i
ii
i
i
ii
i
n
nn
n
n
nn
n
d
dd
d
d
dd
d
e
ee
e
e
ee
e
r
rr
r
r
rr
r
s
ss
s
s
ss
s
c
cc
c
c
cc
c
o
oo
o
o
oo
o
p
pp
p
p
pp
p
e
ee
e
e
ee
e
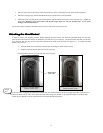
The NexStar GPS comes with a 9x50 finderscope which has an 5.8° field-of-view. The specifications for a finderscope stand
for the magnification and the aperture, in millimeters, of the scope. So, a 9x50 finder magnifies objects nine times and has a
50mm objective lens
F
F
i
i
n
n
d
d
e
e
r
r
s
s
c
c
o
o
p
p
e
e
I
I
n
n
s
s
t
t
a
a
l
l
l
l
a
a
t
t
i
i
o
o
n
n
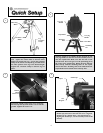
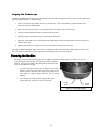
1. Find the two holes in the rear cell of the telescope on the top left, when looking from the back of the tube.
2. Remove any tape covering the two holes. The tape is there to prevent dust and moisture from entering the optical tube
before the finder is installed.
3. Place the finder bracket over the two holes. Orient the bracket so that the rings that hold the finder are over the
telescope tube, not the rear cell.
4. Insert the screws through the bracket and into the rear cell.
WARNING: If you remove the finderscope, do not thread the screws back into the rear cell of the telescope. The screws are
long enough to obstruct the movement of, and possibly damage the primary mirror.
With the bracket firmly attached to the telescope, you are ready to attach the finder to the bracket.
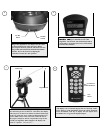
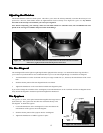
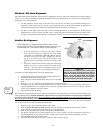
1. Thread the three nylon screws into the front ring of the finder bracket. Tighten the screws until the nylon heads are
flush with the inner diameter of the bracket ring. Do NOT thread them in completely or they will interfere with the
placement of the finder.
2. Slide the eyepiece end of the finderscope into the front of the bracket.
3. Slide the O-Ring over the back of the finder and position it on the finderscope body toward the eyepiece end.
4. Push the finder back until the O-Ring is snug inside the back ring of the finder bracket.
5. Hand tighten the three nylon thumbscrews until snug.
Figure 3-6 Mounting the Finderscope in the Bracket