


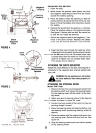
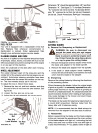

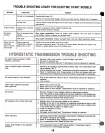

BATTERY REMOVAL OR INSTAllATION
WARNING: When removing the battery,
follow this order of disassembly to prevent
your wrench from shorting against theframe.
lubricant is available, Order part number 737-0170.
Engine oil may also be used,
When replacing blades, be sure to install the blade with
the side of the blade marked "Bottom" (or with part
number) facing the ground when the mower is in the
operating position.
Blade Mounting Torque
3/8" Dia. Bolt 375 in, lb. min., 450 in. lb. max.
5/16" Dia. Bolt 150 in. lb. min., 250 in, lb. max,
To insure safe operation of your unit, all nuts and bolts
must be checked periodically for correct tightness.
1. Remove the Negative cable.
2. Remove the Positive cable.
To install a battery:
1. Attach the Positive cable.
2. Attach the Negative cable.
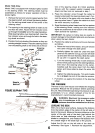
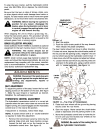
JUMP STARTING
1. Attach the first jumper cable from the Positive ter-
minal of the good battery to the Positive terminal
of the dead battery.
2. Attach the second jumper cable from the Negative
terminal of the good battery to the FRAME OF THE
UNIT WITH THE DEAD BATTERY.
A WARNING: Failure to use this starting pro-
cedure could cause sparking, and the
gases in either battery could explode.
MAINTENANCE OF BATTERY
1. Check electrolyte level periodically (at least every
two weeks). Keep the level to the split rings. Use
only distilled water or a good quality drinking water.
Never add acid or any other chemicals to the bat-
tery after initial activation.
2. The battery should be checked with a hydrometer
after every 25 hours of operation. If the specific
gravity is less than 1 .225, the battery should be
recharged. For Model 704F, maximum charge rate
5 AMPS.
3. Coat the terminals and exposed wire with a thin
coat of grease or petroleum jelly for longer service
and protection against corrosion.
4. The battery should be kept clean. Any deposits of
acid should be neutralized with soda and water.
Be careful not to get this solution in the cells.
5. Avoid tipping the battery. Even a "sealed" battery
will leak electrolyte when tipped.
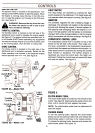
TIRES
Recommended operating tire pressure is approximately
12 p.s.i. (check sidewall of tire for tire manufacturer's
recommended pressure). Maximum tire pressure under
any circumstances is 30 p.s.i. Equal tire pressure
should be maintained on all tires.
When installing a tire to the rim, be certain rim is clean
and free of rust. Lubricate both the tire and rimgenerously.
Never inflate to over 30 p.s.i. to seat beads.
WARNING: Excessive pressure (over 30p.s.i.)
when seating beads may causetire/rim
assembly to burst with force suf-
ficient to cause serious injury.
DECK BELT REPLACEMENT
When replacing the deck belt, disconnect the spring
from transaxle, inside the right rear wheel (step 5).
Refer to the separate deck manual packed with your
unit.
STORAGE OF THE BATTERY
1. Charge battery using normal methods. NEVER
store discharged battery as it will not recover.
2. When storing battery for extended periods, discon-
nect battery cables. Removing battery from unit is
recommended.
3. Store in cold, dry place.
4. Recharge battery whenever the specific gravity is
less than 1.225, before returning to service, or
every two months, whichever occurs first.
COMMON CAUSES FOR BATTERY FAILURE
1. Overcharging
2. Undercharging
3. Lack of water
4. Loose hold downs and/or corroded connections
5. Excessive loads
6. Battery electrolyte substitutes
7. Freezing of electrolyte
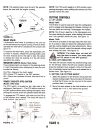
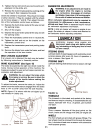
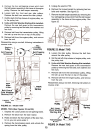
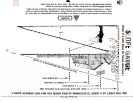
DRIVE BELT REPLACEMENT
MODEL 704F (See Figure 22)
1. Depress the clutch pedal and set parking brake.
2. Remove the deck from the lawn tractor.
3. Raise and block the front wheels of the lawn trac-
tor so you can work under it.
4. Remove the transmission panel, and unhook the
spring from the rear idler pulley.
NOTE: These failures do not constitute warranty.
14