


!
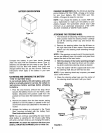
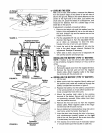
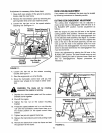
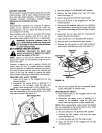
FIGURE 2.
Screws
7
\
_- ATI'ACHING THE SEAT
Remove the four screws which secure the seat to the
seat pivot bracket. Turn the seat around and place in
position against the seat pivot bracket, lining up the
slotted holes in the pivot bracket with the holes in the
seat. Select desired position for the seat, and secure
with the four screws. See figure 2.
NOTE: Your seat may have been shipped in a box.
Remove the four screws from the bottom of seat and
place seat in position against the seat pivot bracket.
Follow the directions above to attach the seat.
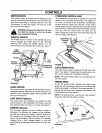
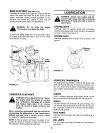
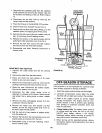
FIGURE 3.
H .=xNuts
(:upped
'ashers
ATTACHINGTHE CHUTE DEFLECTOR
The chute deflector must be attached to the right side
of the deck so that it covers the chute opening.
_hb ARNING: Do not operate your unit
unless the chute deflector has been
properly installed.
1. Make certain deck is raised to its highest position
(lift lever pulled all the way back).
NOTE: Your mowing deck may be equipped with a
optional mulching plug. Remove the mulching plug by
removing the wing nut on top of the deck. Grasp the
mulching plug and pull out of the deck.
2. Remove the hex head cap screws, cupped
washers and hex nuts which are attached to the
deck next to the chute opening.
Place the chute deflector in position as shown in
figure 3. Secure with hardware just removed.
Cupped sides of washers go against the chute
deflector.
.
If you wish to mulch, lift up the chute and insert
optional mulching plug through chute opening.
Line up the bolt on mulching plug with the hole in
the top of deck. Push up on the end of the mulch-
ing plug and secure with the wing nut.
TIRE PRESSURE
The tires on your unit may be over-inflated for shipping
purposes. Reduce the tire pressure before operating
the unit. Recommended operating tire pressure is
approximately 12 p.s.i.
_ ARNING: Maximum tire pressure under
any circumstances is 30 p.s.i. Equal tire
pressure should be maintained on all
tires.