


14 Operation
MAN0884 (08/15/2011)
3. Before going to the work site, review "Transporting"
section, page 15.
4. Position snowblower in a level area and lower into
working position.
5. Starting Snowblower:
■ Be sure area is clear of all bystanders.
■ Run engine at low idle.
■ Slowly engage PTO control to start machine.
■ Slowly bring engine to rated PTO speed. Never
exceed rated speed
6. Stopping Machine:
■ Slowly decrease engine speed to low idle.
■ Wait until PTO drive and snowblower have
slowed to low engine idle speed before disengag-
ing PTO drive.
Before dismounting power unit or performing
any service or maintenance, follow these steps:
disengage power to equipment, lower the 3-point
hitch and all raised components to the ground,
operate valve levers to release any hydraulic pres-
sure, set parking brake, stop engine, remove key,
and unfasten seat belt.
Before performing any service or maintenance,
disconnect driveline from tractor PTO.
7. Do not operate with bystanders in area. The
machine can pick up stones, sticks, wire and other
debris and throw it out with enough force to cause
severe injury or death to bystanders. Shut down
machine and wait for moving parts to stop before
approaching machine.
8. Ground Speed: Travel speed can vary between 1.5
and 8 mph depending on material and terrain con-
ditions. It is the responsibility of the operator to
note the condition of the job being done and set the
speed to obtain proper feeding rate and maintain
safe control of machine.
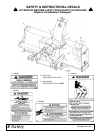
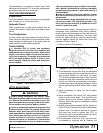
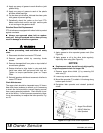
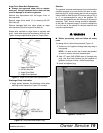
9. The PTO driveline is equipped with a shear bolt,
Figure 7, that protects drive system components
from shock loads if machine strikes an obstruction.
See parts section for bolt size and grade.
Figure 7. Shear Bolts
10. Operating Requirements:
Never direct discharge toward people, animals,
or property.
A. Know where you are operating. Remove all
unwanted trash and debris before starting. It can
wrap around auger or be thrown out of machine
during operation.
B. Keep auger and fan in good condition. Do not
operate with a damaged fan or auger.
C. Do not allow the auger to hit and scalp ground
during operation. Hitting ground will pick up soil or
rocks that can be thrown out of machine.
D. To change direction of snow discharge, rotate
the discharge chute. It will rotate 200°. It will not
rotate a full 360°.
NOTE: For hydraulic rotator, if chute turns too
quickly, adjust flow control on tractor hydraulics.
NOTE: Operating hydraulic deflector cylinder
requires low tractor flow rates. When initially oper-
ating cylinder reduce tractor hydraulic flow rate to
prevent deflector damage and improve resolution
of deflector adjustment.
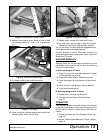
Adjusting Discharge Chute Position
■ The height of snow discharge is controlled by
position of chute deflector on discharge chute (8),
Figure 8. Remove clevis pin (5), and slide adjust-
ment strap (9) to selected discharge height. Rein-
stall clevis pin (5).
NOTE: If possible, blow snow with the wind.
Beware of people or buildings in the area.