


12 Operation
MAN0884 (08/15/2011)
dimension. If it is still less than 37.5", extend the
hitch to mounting hole C.
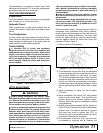
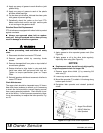
7. Move the snowblower to the highest and lowest
points of its operating range. Measure the distance
between the lock groove on the tractor PTO shaft
and the cross hole in the snowblower gearbox
shaft at each point. The distance must not exceed
45.68". This dimension ensures a minimum of five
inches of driveline telescoping engagement, which
is required to prevent driveline failure and
separation.
8. If the snowblower is pitched toward the auger (not
level), the cutting edge is likely to dig. If you cannot
adjust this out (level the unit) with the top link, you
need to assemble the upper hitch to the second
hole in the snowblower frame (closest to the fan).
This will pitch the top of the hitch toward the
snowblower and help level the frame while
mounted to the tractor.
9. If you cannot obtain the above dimensions using
these adjustment instructions, contact your dealer.
Do not operate until the above dimensions are
obtained.
ATTACHING SNOWBLOWER TO TRACTOR
1. Move the tractor into position in front of the snow-
blower. Move back slowly and carefully, not allow-
ing anyone to be between the tractor and the
snowblower.
2. Turn off tractor engine.
3. Attach two lower arms of 3-point hitch with the two
hitch-pin assemblies.
4. Attach tractor top link to upper hitch point of snow-
blower. Adjust length of top link until the top edge
of the frame ends are parallel to ground.
5. Adjust tractor lower 3-point arm anti-sway devices
to prevent snowblower from swinging side to side
during transport.
6. Attach front PTO driveline from snowblower to
tractor. (Slide front section of PTO driveline into
back section. Slide PTO shaft onto rear PTO output
of tractor.
7. Swing PTO driveline holder up and out of the way
during operation.
NOTICE
■ If the PTO driveline is too long, severe driveline
and gearbox damage is possible when hooking up
the PTO driveline from the snowblower to the trac-
tor. The front PTO driveline is long enough to fit a
variety of tractors. It is possible that the front PTO
driveline will need to be cut. There will be NO bene-
fit by cutting only one telescoping section. Both
sections of the driveline must be cut. DO NOT
FORCE THE PTO TO FIT.
■ If attaching with quick hitch, the distance
between the tractor PTO and gearbox input shaft
will increase. Please follow the steps as you would
for a 3-point hitch to insure proper engagement.
■ When attaching snow blower to multiple trac-
tors consider the drive length needed for each trac-
tor and whether the drive line will work in all
combinations.
■ WARRANTY IS VOID IF THE PTO DRIVELINE IS
TOO LONG, resulting in gearbox, PTO, yoke or
cross bearing damage.
NOTE: The PTO driveline, when attached to the
tractor and gearbox, must not extend so there is
less than 11-3/4” (bilobe) of overlap within the PTO
driveline.
DRIVELINE ATTACHMENT
Attach snowblower to tractor 3-point hitch (or quick
hitch if available). Do not attach driveline the first time
you attach the snow blower to the tractor. Raise and
lower snowblower to determine maximum and mini-
mum distance between tractor PTO shaft and gearbox
input shaft. If distance is too large, driveline will be too
short for proper engagement. If distance is too small,
driveline may bottom out in operation and damage
snowblower or tractor.
If driveline is too short, please call your Woods dealer
for a longer driveline.
If driveline is too long, please follow instructions for
shortening driveline.
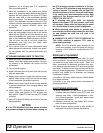
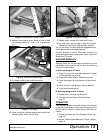
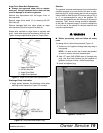
SHORTENING DRIVELINE
1. Move snowblower up and down to get shortest
possible distance between tractor PTO shaft and
gearbox input shaft. Leave snowblower in mini-
mum distance position. Install jack stands under
snowblower for support.
2. Separate driveline into two halves and connect
them to tractor and gearbox.
3. Place driveline halves parallel to one another to
determine how much to shorten the driveline.