


14 Operation
MAN0869 (04/13/2011)
prevent deflector damage and improve resolution
of deflector adjustment.
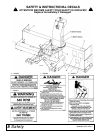
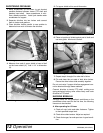
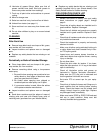
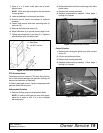
Adjusting Discharge Chute Position
■ The height of snow discharge is controlled by
position of chute deflector on discharge chute (8),
Figure 7. Remove clevis pin (5), and slide adjust-
ment strap (9) to selected discharge height. Rein-
stall clevis pin (5).
NOTE: If possible, blow snow with the wind.
Beware of people or buildings in the area.
Figure 7. Discharge Chute Position
■ Keep bystanders away from equipment.
■ Wear appropriate hearing protection.
11. Depth of cut can be controlled with the skid shoes
or by tilting the blower forward or backward. Exces-
sive forward or backward tilt may cause U-joint to
flutter resulting in PTO shear bolt failure. Do not
run the PTO shaft at more than a 15° angle.
12. Allow the snowblower to work its way through the
snow rather than forcing it.
13. In deep snow it may be necessary to raise the
snowblower for the first pass through and clean up
the remainder with a second pass.
14. Do not feed snow through snowblower when rais-
ing or lowering.
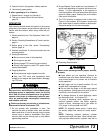
TRANSPORTING
A minimum 20% of tractor and equipment
weight must be on the tractor front wheels when
attachments are in transport position. Without this
weight, front tractor wheels could raise up result-
ing in loss of steering. The weight may be attained
with front wheel weights, ballast in tires or front
tractor weights. Weigh the tractor and equipment.
Do not estimate.
Never allow riders on power unit or attachment.
Do not operate PTO during transport.
Always comply with all state and local lighting
and marking requirements.
NOTICE
■ Do not exceed 20 mph (32km/h). Reduce speed
on rough roads and surfaces.
When transporting snowblower, review and follow this
procedure:
■ Be sure all bystanders are clear of machine.
■ Be sure that machine is securely attached to
tractor and all retainer pins are installed.
■ Raise machine.
■ Do not allow riders.
STORAGE
Block equipment securely for storage.
Keep children and bystanders away from stor-
age area.
After season's use, machine should be thoroughly
inspected and prepared for storage. Repair or replace
any worn or damaged components to prevent any
unnecessary down time at start of next season.
To insure a long, trouble free life, this procedure should
be followed when preparing unit for storage.
1. Clear area of bystanders.
2. Thoroughly wash machine to remove all dirt, mud,
debris or residue.
3. Check auger, fan and drivelines for damage or
entangled material. Repair or replace damaged
parts. Remove the entangled material.
4. Inspect all hydraulic hoses, fittings, lines and cou-
plers. Tighten any loose fittings. Replace any hose
that is cut, nicked or abraded or is separating from
crimped end of fitting.
5. Change oil in gearbox.
5. Clevis Pin
8. Discharge Chute
9. Adjustment Strap
CAUTION