


Operation 9
15148 (Rev. 2/9/2007)
Side Skid Adjustment
When properly adjusted, side skids are designed to
carry mower over uneven ground to minimize scalping.
Set side skids 1/2" above ground after cutting height
has been established. This should allow skids to clear
level ground but hit when passing over rough or
uneven areas. Take into consideration that when cast-
ers are used, they will sink into the turf. Adjust skids to
carry mower when casters drop into depressions.
Never operate with full weight of mower on side skids
constantly.
Mower Attitude
Position front of mower level with or slightly below the
rear. Mowing with the front end high will produce
ragged cuts with a scalloped look, excessive shredding
and will require extra power. See instructions in
Optional Equipment section, page 26, when using leaf
mulcher.
Adjustment
For best mowing results, dimension “A” should not be
more than 1/2" higher, and never lower, than dimension
“B”.
Dimension “B” is set by adjusting casters or lift chains.
Dimension “A” is set by raising or lowering push chan-
nel arms in idler bracket.
NOTICE
■ Any adjustment to either dimension “A” or “B”
will require adjustment to the other.
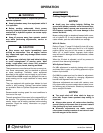
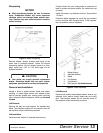
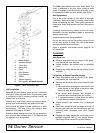
Check cutting height and attitude by placing a straight-
edge along the outside edge of mower frame as shown
in Figure 1.
Measure from bottom edge of straightedge at the front
and rear at least 32" apart. The front measurement
should be approximately 1/2" lower than the rear.
To determine cutting height, it is necessary to subtract
the distance the blade is below the mower frame from
the front measurement. On the L59, the blade is 4-5/8"
below the mower frame. On the L306, it is 4-7/8" below.
When checking cutting height, be sure to take mea-
surements on both sides of mower. Make sure mower
is level from side-to-side using these measurements.
When changes are made to cutting height or attitude,
be sure to check belt alignment and tension.
NOTICE
■ Improper belt alignment or tension can cause
premature belt failure.
Figure 1. Attitude Adjustment
STARTING AND STOPPING MOWER
NOTICE
■ Mower vibration tends to loosen bolts during
operation. All hardware should be checked regu-
larly to maintain proper torque. It is a good practice
to check mower before each operation to ensure all
hardware is secure.
Power for operating the mower is supplied from the
tractor power-take-off (PTO). Refer to your tractor man-
ual for instructions for engaging and disengaging the
PTO. Always operate engine at full rated PTO rpm.
Learn how to stop tractor and mower quickly in case of
an emergency.
Should mower become plugged, causing belt to slip for
over two seconds, raise mower just enough to clear
plug and continue running for at least two minutes,
allowing pulleys to cool. Stopping the mower with belt
in contact with a very hot pulley will bake and ruin belt.
Do not raise mower higher than necessary; this will
reduce the risk of thrown objects.
■ A minimum 20% of tractor and equipment
weight must be on tractor front wheels with mower
in transport position. Without this weight, tractor
could tip over causing personal injury or death.
The weight may be attained with front wheel
weights, ballast in tires or front tractor weights.
When attaining the minimum 20% weight on the
front wheels, you must not exceed the Roll Over
Protection Structure (ROPS) weight certification.
Weigh the tractor and equipment. Do not estimate.
PRE-OPERATION CHECK LIST
(Owner Responsibility)
____ Review and follow safety rules and safety
decals on page 5 through page 7.
____ Do not operate mower unless discharge
chute or side shield is installed.
____ Check that mower is properly and securely
attached to tractor.
A WARNING