


22
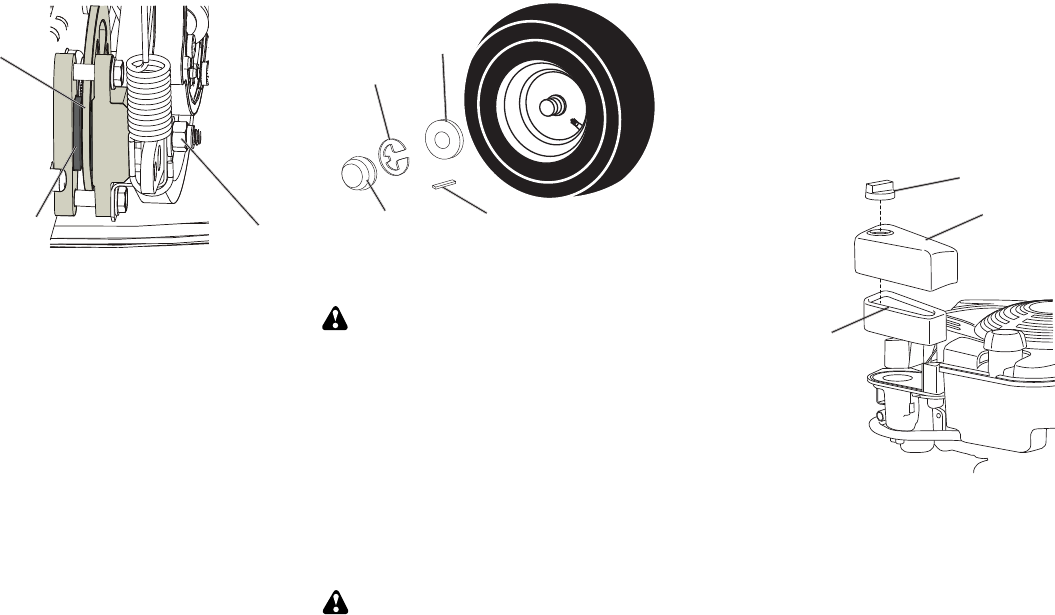
TO ADJUST BRAKE
Your riding mower is equipped with an
adjustable brake system which is mounted
on the right side of the transaxle. If riding
mower requires more than (4) feet stop-
ping distance in highest gear on a lever dry
concrete or paved surface, then brake must
be adjusted.
1. Park riding mower on a level surface.
2. Release brake/parking pedal.
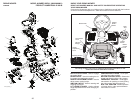
3. Measure distance between rotor and
brake pad if distance between rotor and
brake pad is more than .02" gap brake
needs to be adjusted.
4. Tighten caliper nut until .02" gap is
reached.
TO ADJUST STEERING WHEEL
ALIGNMENT
If steering wheel crossbars are not horizontal
(left to right) when wheels are positioned
straight forward, move steering wheel
and reassemble per instructions in the
"INSTALL STEERING COLUMN"section of
this manual.
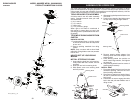
TO REMOVE WHEEL FOR REPAIRS
FRONT WHEEL
1. Block up front axle securely.
2. Remove dust cover, retaining ring, and
washer to allow wheel removal.
3. Repair tire and reassemble.
4. Replace washer and retaining ring
securely in axle groove.
NOTE: To seal tire punctures and pre vent
flat tires due to slow leaks, purchase and
use tire sealant. Tire sealant also pre vents
tire dry rot and corrosion.
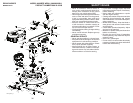
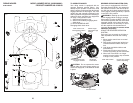
Retaining
Ring
Dust
Cover
Washer
Square Key
(rear wheel only)
Rotor
Nut
Brake
Pad
NOTE: Feeler gauge may be necessary to
get correct measurement.
REAR WHEEL
1. Block up Rear axle securely.
2. Remove dust cover, retaining ring, wash-
er, and square key while pulling tire off.
3. Repair tire and reassemble.
4. Replace square key while putting tire back
on, then replace washer and retaining ring
securely in axle groove ,when pushing
tire back onto shaft reach under and pull
chain sprocket toward you to ease tire
replacement.
TO START ENGINE WITH A WEAK
BAT TERY
CAUTION: Lead-acid batteries gen er-
ate ex plo sive gases. Keep sparks, flame
and smoking ma te ri als away from bat ter ies.
Always wear eye pro tec tion when around
batteries.
If your battery is too weak to start the engine,
it should be recharged. (See "BATTERY" in
the Maintenance section of this man u al).
NOTE: This unit is equipped with an engine
recoil starting system that can be used if the
battery is too weak to start. See “RECOIL
STARTING SYSTEM” in operation section
of this manual.
REPLACING BATTERY
WARNING: Do not short bat tery ter mi-
nals by al low ing a wrench or any other object
to contact both terminals at the same time.
Before con nect ing battery, remove metal
bracelets, wrist watch bands, rings, etc.
Positive terminal must be connected
first to prevent spark ing from ac ci den tal
grounding.
19
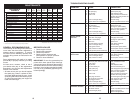
MUFFLER
Inspect and replace corroded muffler and
spark arrester (if equipped) as it could create
a fire hazard and/or dam age.
SPARK PLUG(S)
Replace spark plug(s) at the beginning of
each mowing season or after every 100
hours of operation, whichever occurs first.
Spark plug type and gap setting are shown
in “PROD UCT SPEC I FI CA TIONS” section
of this manual.
CLEANING
• Clean engine, battery, seat, finish, etc. of
all foreign matter.
• Keep finished surfaces and wheels free
of all gasoline, oil, etc.
• Protect painted surfaces with au to mo tive
type wax.
We do not recommend using a garden hose
or pressure washer to clean your riding
mower unless the engine and transmission
are covered to keep water out. Water in en-
gine or transmission will shorten the useful
life of your riding mower. Use compressed
air or a leaf blower to remove grass, leaves
and trash from riding mower and mower.
CLEAN AIR INTAKE/COOL ING AREAS
To ensure proper cooling, make sure the
grass screen, cooling fins, and other exter-
nal surfaces of the engine are kept clean
at all times.
Every 100 hours of operation (more often
under extremely dusty, dirty conditions),
remove the blower housing and other
cooling shrouds. Clean the cooling fins
and external surfaces as necessary. Make
sure the cooling shrouds are re in stalled.
NOTE: Operating the engine with a
blocked grass screen, dirty or plugged
cooling fins, and/or cooling shrouds
re moved will cause engine damage due to
overheating.
CLEAN AIR SCREEN
Air screen must be kept free of dirt and chaff
to prevent engine dam age from overheating.
Clean with a wire brush or compressed air to
re move dirt and stub born dried gum fibers.
AIR FILTER
Your engine will not run properly using a
dirty air filter. Replace the air filter every
100 hours of operation or every season,
whichever occurs first. Service air cleaner
more often under dusty conditions.
1. Remove cover knob and cover.
2. Carefully remove cartridge.
3. Clean base carefully to prevent debris
from falling into carburetor.
4. Clean by gently tapping on a flat sur-
face.
5. Re in stall cartridge, cover and secure with
cover knob.
NOTE: If very dirty or damaged, replace
cartridge.
IMPORTANT: Petroleum solvents, such as
kerosene, are not to be used to clean the
cartridge. They may cause de te ri o ra tion of
the cartridge. Do not oil cartridge. Do not
use pressurized air to clean cartridge.
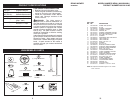
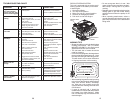
Cover Knob
Air Filter
Cover
4. Refill engine with oil through oil fill dipstick
tube. Pour slowly. Do not overfill. For
approximate capacity see “PRODUCT
SPEC I FI CA TIONS” section of this man u al.
5. Use gauge on oil fill cap/dipstick for
checking level. For accurate reading,
tighten dipstick cap securely onto the
tube before removing dipstick. Keep oil
at “FULL” line on dipstick. Tighten cap
onto the tube securely when finished.