


12
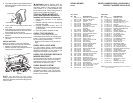
The op er a tion of any riding mower can result in foreign objects thrown
into the eyes, which can result in severe eye dam age. Al ways wear
safety glass es or eye shields while op er at ing your riding mower or
per form ing any ad just ments or repairs. We rec om mend a wide vi sion
safe ty mask over spec ta cles or stan dard safety glass es.
00155
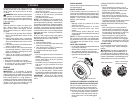
HOW TO USE YOUR RIDING
MOWER
TO SET PARKING BRAKE
Your riding mower is equipped with an opera-
tor presence sens ing switch. When engine
is running, any attempt by the op er a tor to
leave the seat without first setting the parking
brake will shut off the engine.
1. Depress brake pedal all the way down
and hold.
2. Depress parking brake lever and re lease
pres sure from brake pedal. Pedal should
re main in brake position. Make sure
parking brake will hold riding mower
secure.
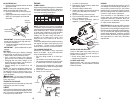
TO MOVE FORWARD AND BACK WARD
The direction and speed of movement is
controlled by the motion control lever.
1. Start riding mower with clutch/brake pedal
depressed and motion control lever in
neutral (N) position.
2. Move motion control lever to desired
po si tion.
3. Slowly release clutch/brake pedal to start
movement.
IMPORTANT: Bring riding mower to a com-
plete stop before shifting or changing gears.
Failure to do so will shorten the useful life of
your transaxle.
TO ADJUST MOWER CUT TING HEIGHT
The po si tion of the mower height deck lift
le ver de ter mines the cut ting height.
• Grasp lift le ver.
• Press lift lever plunger with thumb and
move lever to desired position.
The cutting height range is ap prox i mate ly
1-1/2 to 4". The heights are measured from
the ground to the blade tip with the engine
not running. These heights are approximate
and may vary depending upon soil condi-
tions, height of grass and types of grass
being mowed.
• The average lawn should be cut to ap-
proximately 2-1/2" during the cool season
and to over 3" during hot months. For
healthier and better looking lawns, mow
often and after moderate growth.
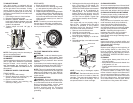
• For best cutting performance, grass over
6" in height should be mowed twice. Make
the first cut relatively high; the second to
de sired height.
STOPPING
MOWER BLADE -
• To stop mower blade, move deck clutch
lever to disengaged po si tion.
GROUND DRIVE -
• To stop ground drive, depress brake pedal
all the way down.
ENGINE -
• Turn ignition key to “STOP” position and re-
move key. Always remove key when leaving
riding mower to prevent un au tho rized use.
IMPORTANT: Leaving the ignition switch in
any position other than "STOP" will cause
the battery to discharge and go dead.
NOTE: Under certain conditions when riding
mower is standing idle with the engine run-
ning, hot engine exhaust gases may cause
“browning” of grass. To eliminate this pos-
sibility, always stop engine when stopping
riding mower on grass areas.
CAUTION: Always stop riding mower
com plete ly, as described above, before
leav ing the operator's position.
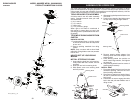
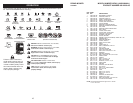
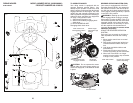
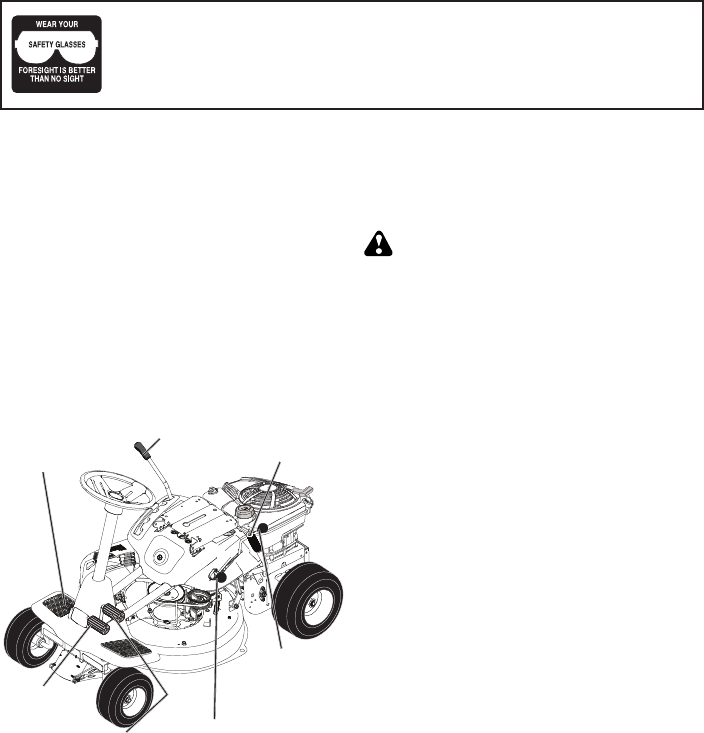
Motion
Control
Lever
Mower Height
Adjustment
Brake Pedal
"Engaged"
Position
Deck Clutch
Lever
"Engaged"
Position
Deck Clutch
Lever
"Disengaged"
Position
Brake Pedal
"Drive"
Position
Parking Brake
Pedal-Push Down
to "Engage"
29
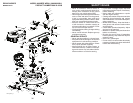
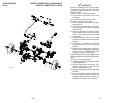
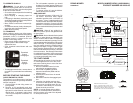
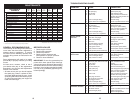
1 532 43 70-70 BATTERY
2 532 42 54-16 FOAM, POLYURETHANE
3 532 19 33-50 SWITCH, IGN, DLTA, P-IN, ROS
4 532 41 19-33 KEY/CHAIN
5 532 43 33-30 FUSE, 5A
6 532 42 59-37 FUSE, 40A
7 532 16 07-84 SWITCH, PLUNGER, NO, OLIVE
8 532 43 15-42 RELAY, 40A
9 532 10 95-53 SWITCH, INTLK,CL, MWR, GRY
10 532 17 61-38 SWITCH, INTERLOCK, NONC,GRAY
11 532 43 18-46 MODULE, STARTING, RECOIL, LRV
12 532 19 27-49 SWITCH, SEAT, DP, ROS
13 532 42 84-77 HARNESS, IGN, ELECTSTART, LRV
14 532 10 97-48 RELAY
KEY PART
NO. NO. DESCRIPTION
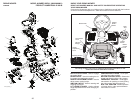
NOTE: All component dimensions given in U.S. inches
1 inch = 25.4 mm
RIDING MOWER MODEL NUMBER WE261 (96022000801)
ELECTRICAL
PRODUCT NUMBER 960 22 00-08