


F
R
A
N
C
A
I
S
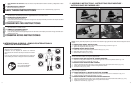
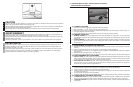
6-1. REMPLACEMENT DE LA BOBINE DE FIL DE NYLON
1. Débranchez le coupe-herbe.
2. Demontez l'ensemble bobine du coupe-herbe. Pour ce faire, tenez la partie exterieure cannelée de l'ensemble d'une
main, puis poussez vers le bas et faites tourner la tête de bobine de l'autre main pour la déverrouiller. (Fig.6-1A &
6-1B) Le support de bobine et la bobine devraient maintenant se demonter facilement.
REMARQUE : Il y a un ressort dans la tête de fil ; faites attention de ne pas le perdre. Veillez à le placer en lieu sûr.
3. Enlevez le support transparent. Sortez tout le fil.
4. Utilisez un fil de remplacement de 0,065'', d'une longueur d'environ 14'. Pliez le fil en deux et placez la boucle ainsi
obtenue dans l’orifice du diviseur de bobine. (Fig. 6-1C)
5. Enroulez le fil de façon serrée et propre sur la bobine. Le fil devrait s’enrouler dans le sens de la flèche (A) imprimée
sur le bobine, chaque moitié étant séparée par le diviseur. Continuez à enrouler et serrer jusqu’à ce que le fil reste
environ 6” de longueur.
E
N
G
L
I
S
H
6-1. REPLACE THE SPOOL OF NYLON LINE
1. Unplug the trimmer.
2. Remove the spool assembly from the trimmer. To do so, hold the outer ribbed part of the assembly with one hand,
while pushing down and turning the spool head with the other to unlock it. (Fig. 6-1A & 6-1B) The spool carrier and
spool will now disassemble easily.
NOTE: There is a spring inside the spool head that could easily be lost. Ensure that it is put in a safe place.
3. Remove the clear plastic line retaining ring. Remove any existing line from the spool.
4. Using 0.065" replacement line measure off approximately 14' of line. Double over the cutter line into two equal
lengths and place loop in slot of the spool divider (Fig 6-1C).
5. Wind the line onto the spool by turning the spool. The line should go on in the direction of the arrow (A) on the spool
(Fig 6-1D). Line should be wrapped tightly around the spool. The line is wound with each half separated by the
divider. Tightly wind it until there is about 6" of line left (Fig. 6-1E).
E
S
P
A
Ñ
O
L
6-1. SUSTITUCIÓN DEL CARRETE DEL CABLE DE NYLON
1. Desconecte la recortadora.
2. Retire el conjunto del rotor de la podadora. Para hacerlo, sostenga la parte acanalada exterior del conjunto con una
mano, mientras empuja hacia abajo y gira la cabeza del rotor con la otra mano para separarla (Fig. 6-1A & 6-1B).
El portador del rotor y el rotor ahora se separarán fácilmente.
NOTA: Hay un resorte dentro de la cabeza del rotor que se podría perder fácilmente. Asegúrese de colocarlo en un
lugar seguro.
3. Retire el anillo de retencion de plastico transparente. Retire cualquier linea existente del rotor.
4. Usando la linea de reemplazo 0.065”, mida aproximadamente 14’ de línea. Doble sobre la línea del cortador en dos
longitudes iguales y coloque el rotor en la ranura del divisor del rotor (Fig 6-1C)
5. Enrolle la línea en el rotor girando el mismo. La línea debe ir en la dirección de la flecha (A) en el rotor (Fig 6-1D)
La línea se debe enrollar fuertemente alrededor del rotor. La línea se enrolla con cada mitad separada por el divi-
sor. Enrolle fuertemente hasta que queden aproximadamente 6” de línea (Fig. 6-1E)
6 - MAINTENANCE INSTRUCTIONS - ENTRETIEN - INSTRUCCIONES DE
MAINTENIMIENTO
6-1A 6-1B
6-1D 6-1E
6-1C
A
15
F
R
A
N
C
A
I
S
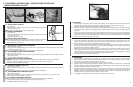
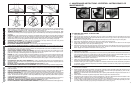
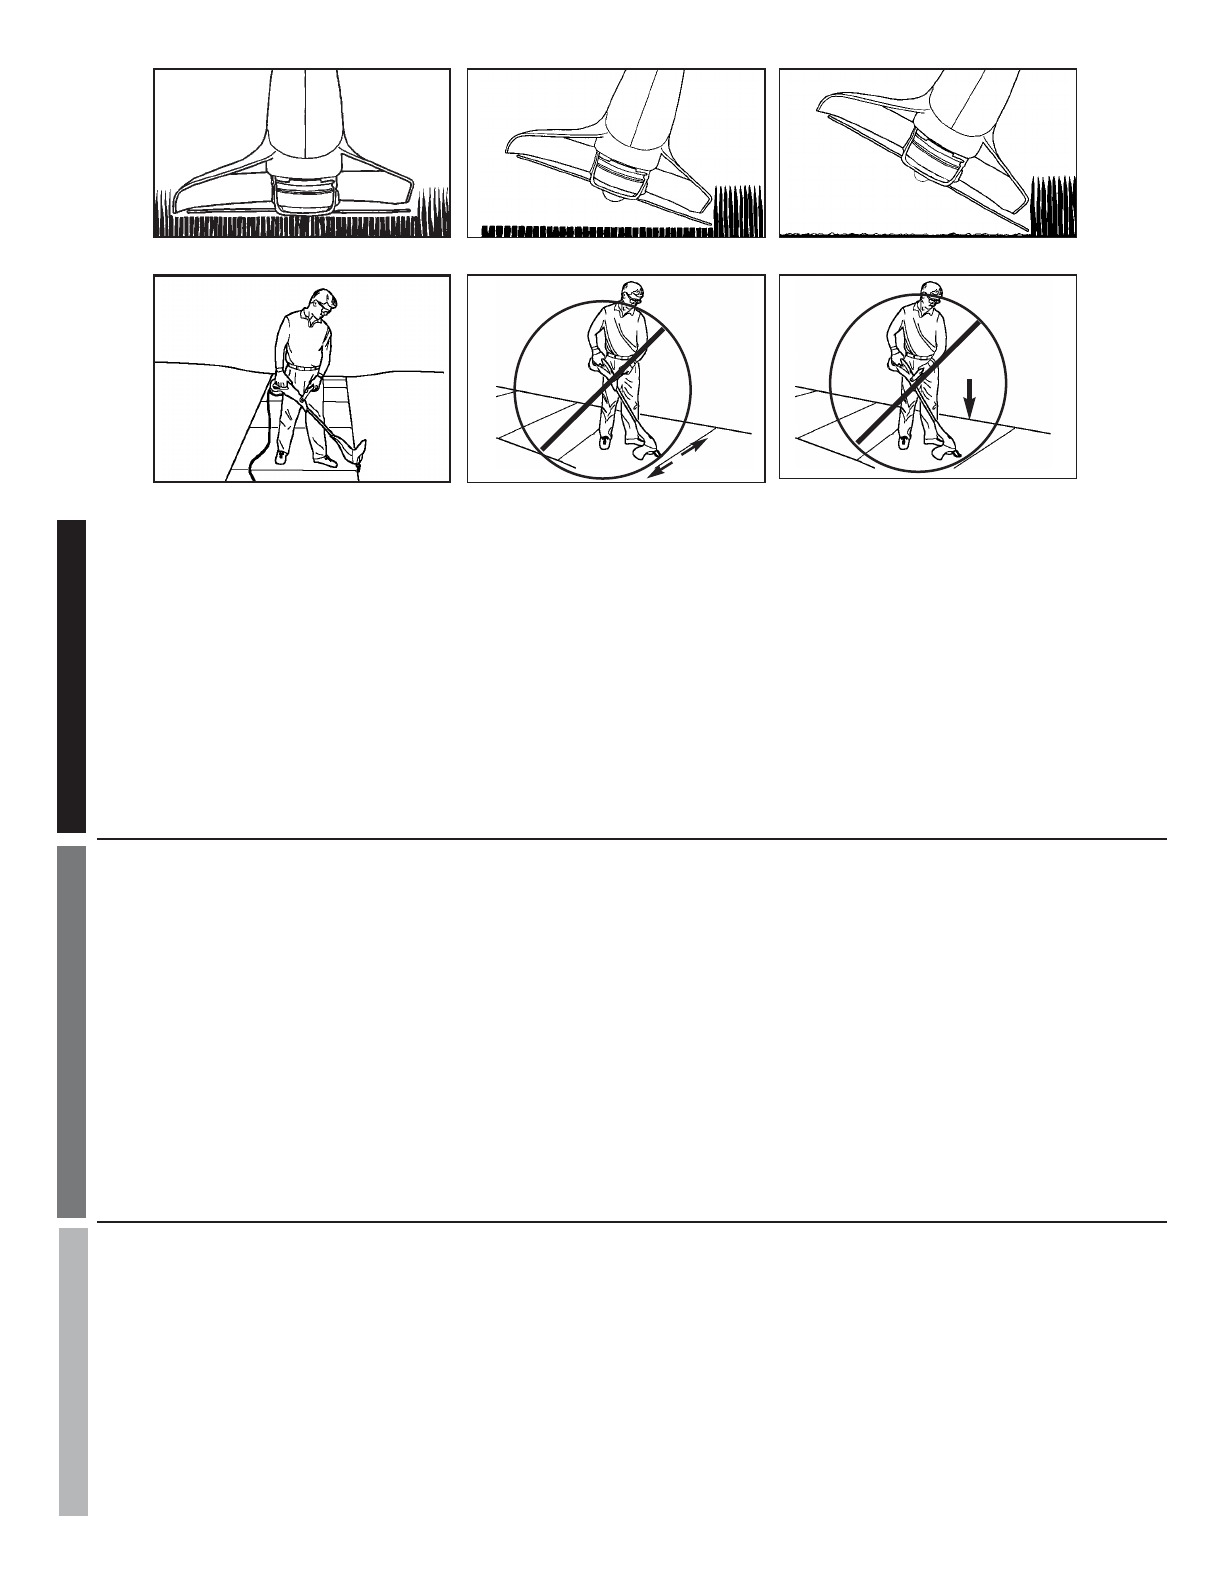
3. POUR COUPER L’HERBE AUTOUR DES CLÔTURES ET DES FONDATIONS. Pour couper l’herbe autour des clô-
tures grillagées, des palissades, des murs et des fondations, avancer lentement de manière à couper l’herbe au ras
de l’obstacle sans que le fil de coupe vienne le fouetter, ce qui risquerait de casser le fil ou l’effilocher. Si le fil vient
en contact avec une clôture grillagée, il cassera.
4. POUR COUPER L’HERBE AUTOUR DES ARBRES. Approacher lentement de arbres, de manière que le fil de
coupe ne fouette pas l’écorce. Faire le tour des arbres dans le sens des aiguilles d’une montre. Couper avec la
pointe du fil de coupe en inclinant légèrement le coupe-herbe vers l’avant.
5. RASAGE (Fig. 5-2C). Le rasage consiste à couper la végétation au ras du sol. Pour ce faire, incliner la tête de coupe
à gauche à un angle d’environ 30 degrés. Le réglage de la poignée permettra de mieux contrôler le coupe-herbe
pendant cette opération. S’assurer qu’aucune personne ou qu’aucun animal ne soit présent dans un rayon de 15
mètres. Ne jamais essayer de raser une zone où des débris risquent d’être projetés et causer des dommages cor-
porels ou matériels.
6. UTILISATION EN TANT QUE TAILLE-BORDURE(Fig. 5-2D). L’appareil étant réglé en tant que taille-bordure, le
maintenir de façon que le moteur soit à gauche pour que les débris soient projetés vers l’arrière. Toujours porter des
lunettes de sécurité.
7. BALAYAGE - NE PAS UTILISER LE COUPE-HERBE POUR BALAYER (Fig. 5-2E)
8. NE PAS HEURTER LE BETON AVEC LE COUPE-HERBE. Cela risquerait d'endommager la tête de fil (Figure 5-2F).
E
N
G
L
I
S
H
3. FENCE/FOUNDATION TRIMMING. Approach trimming around chain link fences, picket fences, rock walls and foun-
dations slowly to cut close without whipping string against the barrier. If the string comes in contact with rock, brick
walls, or foundations, it will break or fray. If string snags fencing, it will snap off.
4. TRIMMING AROUND TREES. Trim around tree trunks with a slow approach so string does not contact bark. Walk
around the tree trimming from left to right. Approach grass or weeds with the tip of the string and tilt stringhead slight-
ly forward.
5. SCALPING (Fig. 5-2C). Scalping refers to removal of all vegetation down to the ground. To do this, tilt the stringhead
to about a 30 degree angle to the left. By adjusting the handle you will have better control during this operation.
Always keep a distance of 50 feet (15 meters) from other people and animals when scalping. Do not attempt this pro-
cedure if there is any chance flying debris could injure operator, other people or cause damage to property.
6. OPERATING AS AN EDGER (Fig. 5-2D). With the unit configured as an edger, hold it so the motor is to your left
side so that debris is thrown to the rear. Always use eye protection.
7. SWEEPING - DO NOT SWEEP WITH TRIMMER (Fig. 5-2E)
8. DO NOT BUMP TRIMMER ON CONCRETE. This can damage the stringhead (Figure 5-2F).
E
S
P
A
Ñ
O
L
3. CORTE EN ORILLAS. Acerque el cabezal a las orillas que desea cortar, inicie el proceso de corte acercando poco
a poco a el objeto conde quiere cortar las orillas de pasto , corte pero no acerque tanto que toque el objeto ya que
el hilo se romperá.
4. ORILLAR ALREDEDOR DE ARBOLES. Corte alrededor de arboles sin tocar la corteza del árbol, utilice la guÌa de
corte para que por ningún motivo toque el árbol, puede dañar al árbol si le llega a cortar la corteza del mismo.
5. REMOVER VEGETACIÓN (Fig. 5-2C). Gire la unidad 30 grados hacia la izquierda. Ajustando el maneral tendrá
mejor control de esta operación. Siempre mantenga una distancia de 50 pies (15 metros) de cualquier persona o
animal . No intente hacer esta operación si existe la posibilidad de que alguna partÌcula pudiera dañar al operador,
a otras personas o pueda dañar objetos .
6. OPERACIÓN COMO ORILLADOR (Fig. 5-2D). Con la unidad configurada como orillador, sujétela con el motor a la
izquierda, de tal forma que las partÌculas sean lanzadas hacia atrás. Siempre utilice protector para los ojos.
7. BARREDOR - NUNCA UTILICE SU UNIDAD PARA ESTE TRABAJO (Fig. 5-2E)
8. NO HAGA FUNCIONAR EL RECORTADOR SOBRE HORMIGÓN. Esto podría dañar el cabezal de cuerdas (Figura 5-2F).
5-2A 5-2B 5-2C
5-2D 5-2E
5-2F
16