


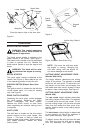

SIDE DISCHARGE GRASS CLIPPINGS
This mower can also side dis charge grass
clip pings. Fol low steps 1 and 2 to ready this
mower for side dis charge op er a tion.
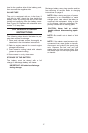
1. Re move mulch ing baf fle or grass bag
adapter. See Fig ure 10.
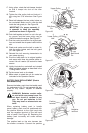
2. At tach dis charge chute with wing nuts. See
Fig ure 14.
ADJUSTMENT
CAU TION: DO NOT AT ANY TIME MAKE
AD JUST MENTS TO LAWNMOWER WITH -
OUT FIRST STOPPING THE ENGINE AND
DIS CON NECTING THE SPARK PLUG
WIRE
CAUTION: Before changing mowing
height, stop mower and disconnect
spark plug cable.
MODELS WITH SINGLE LEVER HEIGHT
ADJUSTERS:
Re fer to “Con trols Sec tion” and Figure 5.
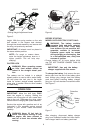
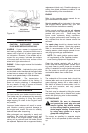
DRIVE CLUTCH CONTROL ADJUSTMENT
Use the ad just ment wheel lo cated on the un -
der side of the clutch con trol hous ing to
tighten the drive belt if mower does not
self-pro pel with the drive clutch con trol en -
gaged, or if drive belt is slip ping (unit
hes i tates while en gine main tains the same
speed). See Fig ure 15.
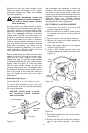
In ad di tion, the ad just ment wheel may also
be used to de ter mine the po si tion in which
the drive clutch con trol is en gaged. If it is
more com fort able to have the drive en gaged
with the le ver fur ther away from the han dle,
tighten the drive belt.
Make cer tain to re test the unit for neu tral as
in structed in the op er a tion Sec tion. Move the
ad just ment wheel in the op po site di rec tion to
loosen the drive belt if nec es sary.
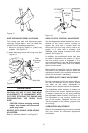
SIX SPEED SHIFT CABLE ADJUSTMENT
Pe ri odic ad just ment of the six speed shift ca -
ble may be re quired due to nor mal stretch
and wear on the ca ble. Ad just ment is
needed if all six speeds can not be ob tained.
The ad just able ca ble bracket is lo cated on
the left side of the mower, be side the en gine.
To ad just, loosen the hex nut which se cures
the ad just able ca ble bracket. See Fig ure 16.
Pull back ward on the bracket (to ward the
rear of the mower). Retighten the hex nut.
Test the speeds on the mower (en gine must
be run ning).
CARBURETOR ADJUSTMENT
Re fer to the sep a rate en gine man ual packed
with your mower for car bu re tor ad just ment
in for ma tion.
12
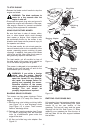
Figure 14
Side
Discharge
Chute
Wing Nut
Figure 13
Figure 15
n
eso
o
L
n
eth
g
iT
BOT TOM
VIEW