


15
Section 5: Maintenance
damage caused by overspeeding. Do not
tamper with the governor settings. Seek
authorized service if you think an adjust-
ment is required.
Throttle Control Adjustment
If the engine does not shut off when the
throttle lever is moved to the stop posi-
tion, or if the engine does not respond
to various throttle settings, refer to the
Engine Owner’s Manual for service in-
formation.
OFF-SEASON STORAGE
When storing the trimmer/mower for
extended periods, follow these proce-
dures to ensure that the unit will be in
good condition for future use.
• Store machine on a level surface.
• Thoroughly inspect the machine for
any loose, broken or missing parts.
Repair or replace parts as necessary.
• Perform recommended engine mainte-
nance by following the engine
storage instructions found in the
Engine Owner’s Manual. Be sure to
protect the fuel lines, carburetor and
fuel tank from gum deposits by remov-
ing fuel or by treating fuel with a fuel
stabilizer (follow engine manufacturer’s
recommendations).
• Change engine oil.
• Clean any dirt, grass or chaff from the
air cooling system intake area and
other parts of the engine.
• Check nuts, bolts, other hardware for
tightness. Replace missing hardware.
• On an electric start model, remove key
from keyswitch. Charge battery for 24
hours before and after storage.
• Disconnect spark plug wire from spark
plug. Prevent wire from touching
spark plug by placing wire away from
spark plug.
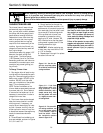
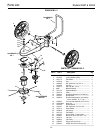
BATTERY RECHARGING (Models
with electric start feature)
Recharge the battery before and after
storing the unit for more than three
weeks.
The engine must be stopped and the
area in which recharging will take place
must be dry.
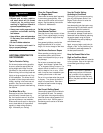
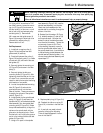
1. Connect the small plug on the bat-
tery charger cord (A, Figure 5-8) to the
wire harness plug (B) located near the
keyswitch.
2. Plug the recharger box (C, Figure 5-
8) into a grounded 120-Volt wall
outlet.
3. Charge the battery for 24 hours.
After charging, unplug the recharger box
(C, Figure 5-8) from the wall outlet first,
then disconnect the recharging line
plugs (A and B, Figure 5-8).
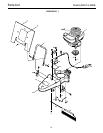
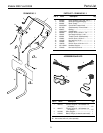
BATTERY REPLACEMENT
If the battery no longer takes a charge,
or if it is leaking or otherwise damaged,
it must be replaced.
1. Tilt the debris shield forward.
2. Disconnect the negative (–) black
wire first; then the positive (+) red wire.
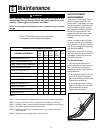
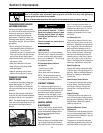
3. A clamp secured with two screws
holds the battery to the deck. Remove
screw (D, Figure 5-9), then lift the bat-
tery from under the battery clamp.
4. Position the new battery under the
clamp and replace screw (D).
5. Connect the red wire to the positive
(+) red-coded battery terminal. Then,
connect the black wire to the negative
(–) black-coded battery terminal.
NOTE: Discard battery properly, as
required by regulations in your area.
6. Close the debris shield.
• Never perform maintenance when
engine is running or spark plug wire
is connected, except when
instructed to do so.
• Never store mower with fuel in fuel
tank inside a building where fumes
can reach an open flame or spark,
or where ignition sources are pre-
sent such as hot water and space
heaters, furnaces, clothes dryers,
stoves, electric motors, etc. Make
sure engine is cool before storing.
• Drain gasoline outdoors into an
approved container.Do not smoke
and keep fuel away from open
flame.
Failure to follow these instructions
will result in serious personal injury
or property damage.
WARNING
• Wet conditions can cause an elec-
tric shock hazard during battery
charging. Avoid wet conditions
when charging.
• Recharging the battery with
improper equipment could cause a
battery explosion. Use only the bat-
tery charger shipped to you. All
parts must be fully stopped and the
spark plug wire disconnected and
moved away from the spark plug.
Failure to comply could result in per-
sonal injury or property damage.
DANGER
Figure 5-8: Use recharger supplied with
unit.
A
C
B
Figure 5-9: Battery replacement.
D