


8
PRE-START CHECKLIST
1. Review Section 1: Safety and also
Section 3: Features and Controls.
2. Check for loose or missing hard-
ware. Tighten or replace as needed.
3. Check the engine oil level*. It must
be up to the “FULL” mark on the oil
dipstick. (See the Engine Owner’s
Manual for instructions.)
4. Check the fuel level* in the fuel
tank. (See the Engine Owner’s Manual
and this page for instructions.)
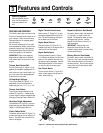
5. Check the Trimmer Head Control
Bail and the Engine Throttle Control
Lever for freedom of movement.
6. Select the cutting height (see Adjust
Line Cutting Height in this Section).
7. Check handlebar height position.
8. On electric start models, check the
wire harness connections.
9. Carefully check the area to be
trimmed and remove any debris.
10. Install the correct diameter trim-
mer line (see Use the Correct Diameter
Trimmer Line in this Section).
11. Check that the spark plug wire is
securely attached to the spark plug.
* Clean debris from around fuel cap,
oil dipstick, and engine debris guard
before checking oil level or adding
gasoline, in order to keep dirt out of
engine.
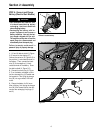
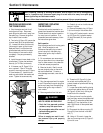
FILL FUEL TANK
1. Lift and tilt plastic debris shield (E,
Figure 3-1) forward.
2. Clean fuel fill area and engine debris
guard each time before fuel is added.
3. Fill the fuel tank with gasoline ac-
cording to the directions in the sepa-
rate Engine Owner’s Manual. Follow all
instructions and safety rules carefully.
4. Securely replace the fuel tank cap
and the fuel container cap. Promptly
wipe up any fuel spills.
5. Lift and tilt the debris shield back,
then push it down to secure it.
ADJUST HANDLEBAR HEIGHT
To adjust handlebar height, refer to
Install Handlebars in the Assembly
Section of this Manual.
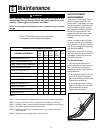
ADJUST LINE CUTTING HEIGHT
The cutting height of the trimmer line
adjusts from 1-1/2"-to-4-1/2" high in
infinite increments. The cutting height
has been factory-set at one of the
higher settings – we recommend that
you start at this higher setting and
make adjustments as needed.
In general, use higher height settings
to handle taller material and to cope
with tougher cutting conditions. For
less demanding situations, use any
trimming height desired. To adjust the
cutting height:
1. The cutting line height can be
changed when the wear cup is in con-
tact with the ground. If necessary, you
may tip the unit back slightly for a
better view (do not tip unit all the way
back or motor oil may flow to the ex-
haust area and the engine may smoke
for several seconds when started).
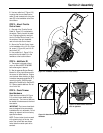
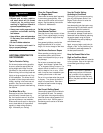
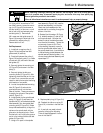
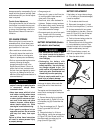
2. Use a 1/2" wrench to loosen both
bolts (A, Figure 4-1) securing the trim-
mer head.
3. The cutting heights are marked on
the side of the spindle head (Figure
4-2). Move the top of the trimmer
head to the desired setting.
4. Tighten both trimmer head bolts
securely (to 75 in/lbs.) and evenly.
INTRODUCTION
Read this Section thoroughly before
you start the engine. As with any piece
of outdoor power equipment, getting
the “feel” for how your machine oper-
ates and knowing the best techniques
for particular jobs are important to
overall good performance.
NOTE: All references to LEFT, RIGHT,
FRONT and REAR of the machine are
determined by standing in the opera-
tor’s position.
Before adjusting handlebar height,
stop engine and wait for all moving
parts to stop, disconnect spark plug
wire and prevent it from touching
spark plug.
Failure to comply could result in
personal injury or property damage.
CAUTION
Before adjusting the cutting height,
shut off the engine, wait for all mov-
ing parts to stop, allow the engine to
cool, disconnect the spark plug wire
and prevent it from touching the
spark plug.
Failure to comply could result in per-
sonal injury or property damage.
CAUTION
GASOLINE IS HIGHLY FLAMMABLE
AND ITS VAPORS ARE EXPLOSIVE.
Follow gasoline safety rules in this
Manual (see Section 1) and in the
separate Engine Owner’s Manual.
Failure to follow gasoline safety rules
and instructions can result in serious
personal injury and property damage.
DANGER
Before operating your machine, care-
fully read and understand all safety
(Section 1), controls (Section 3) and
operating instructions (Section 4) in
this Manual, in the separate Engine
Owner’s Manual, and on the decals
on the machine.
Failure to follow these instructions
can result in serious personal injury.
WARNING
Operation
4
Section
Figure 4-1
A
A