


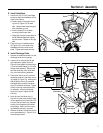
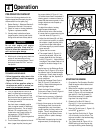

AUGER DRIVE ENGAGEMENT
1. Remove any debris from inside the
collector (auger/impeller) housing.
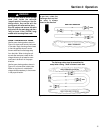
2. Adjust the discharge chute deflector
cap (D, Figure 4-3) angle with adjust-
ment lever. The deflector cap should
usually be adjusted to a low angle, so
it is not pointing at any persons, ani-
mals, buildings or vehicle, especially
in windy conditions.
NOTE: If the auger does not start or stop
rotating as described in Steps 3 and 4
below, an adjustment is required. Refer to
Auger Drive Belt Adjustment in the
Maintenance section.
3. Engage the auger drive by squeezing
the Auger Drive Control Lever (F, Figure
4-3) against the handlebar. The auger
should immediately begin to rotate.
4. Disengage the auger drive by releasing
the Auger Drive Control Lever (F). The
auger should stop within five (5)
seconds.
WHEEL DRIVE ENGAGEMENT
1. Clear all obstructions from in front of
the unit.
2. Stand behind the unit in the operating
position.
3. Move the Gear Shift Lever (H, Figure
4-3) into the first “1” gear position.
NOTE: If the wheels do not start or stop
rotating as described in Steps 4 and 5
below, an adjustment is required. Refer to
Wheel Drive Disc Adjustment in the
Section 5 of this manual.
4. Engage wheel drive by squeezing the
Wheel Drive Control Lever (G, Figure
4-3) against the handlebar. The unit
should immediately move forward.
5. Disengage the wheel drive by releasing
the Wheel Drive Control Lever. The
wheels should stop.
NOTE: To move the unit without throwing
snow, engage only the Wheel Drive
Control Lever.
AUGER DRIVE/WHEEL DRIVE
INTERLOCK FEATURE
The auger drive/wheel drive interlock fea-
ture allows the auger and the wheels to be
operated with just one hand, thus freeing
the other hand to operate the Discharge
Chute Control Rod. To engage both func-
tions, squeeze both the Auger Drive and
the Wheel Drive levers all the way down.
Holding just the Wheel Drive Control Lever
will keep both levers down in the drive po-
sition. To disengage, release the Wheel
Drive Control Lever.
NOTE: If the Auger Drive Control Lever
does not disengage when you release the
Wheel Drive Control Lever, an adjustment
is required. Refer to Auger Drive Belt
Adjustment in the Section 5.
SHIFTING GEARS
1. Release both the auger and wheel
drive control levers (F and G, Figure 4-
3). Wait for the unit to come to a
complete stop.
2. Move the Gear Shift Lever (H, Figure
4-3) into the desired position.
3. Re-engage the control levers (F and G),
as required.
NOTE: There should be full forward travel
in gear position “5” and full reverse travel
in gear position Reverse “R2”. If not, refer
to Gear Shift Rod Adjustment in Section 5.
Reverse
The two reverse settings are used to ma-
neuver the snow thrower. Observe the
“WARNING” statement before operating
the snow thrower in reverse.
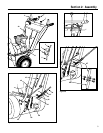
TRANSPORTING THE UNIT
Release the Auger Drive Control Lever to
disengage the auger drive whenever the
unit is being moved to and from the work
site.
The unit is extremely heavy. Have at least
one other person help you when loading
or unloading the unit into a truck or trailer.
Use ramps when loading or unloading the
unit onto a trailer or truck. Securely tie
the unit to prevent shifting while in transit.
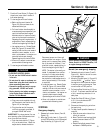
SNOW THROWING TIPS
• Remove snow as soon as possible
after a snowfall.
• Run the engine at full throttle (the “”
position).
• Apply silicone spray onto the inside of
the collector (auger/impeller) housing,
the discharge chute, the deflector cap,
and also on the augers to help prevent
snow from sticking. (Do not spray sili-
cone on rubber or plastic: damage will
result).
• Direct discharge downwind.
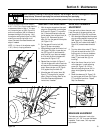
• If a smooth area is being cleared, ad-
just the skid shoes so the scraper
blade is approximately 1/8" (3mm)
from the ground.
• If a rough or gravel area is being
cleared, adjust the skid shoes so the
scraper blade clears the rough or
gravel surface.
• Use slow travel speeds for safety and
to prevent overloading the unit.
Section 4: Operation
CAUTION
Transmission damage could occur if the
Gear Shift Lever is moved when the unit
is in motion. Carefully follow the shift-
ing instructions.
Use extreme caution when operating the
unit in reverse. Clear all obstacles away
from the unit before operating in re-
verse. Be prepared for the unit to move
toward you when the Gear Shift Lever is
in the reverse position.
WARNING
Thoroughly inspect the area where the
unit will be used before the first snow-
fall. Remove all doormats, sleds,
boards, wires and other debris to pre-
vent injury from thrown objects.
WARNING
Stop the engine and remove the spark
plug wire from the spark plug before re-
moving any debris from the collector
(auger/impeller) housing.
WARNING
14