


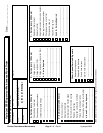
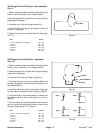
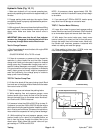
SAE Straight Thread O-Ring Port - Non-adjustable
(Fig. 4)
1. Make sure both threads and sealing surfaces are free
of burrs, nicks, scratches, or any foreign material.
2. Always replace the O-ring seal when this type of fitting
shows signs of leakage.
3. Lubricate the O-ring with a light coating of oil.
4. Install the fitting into the port and tighten it down full
length until finger tight.
O-Ring
5. Tighten the fitting to the correct flats from finger tight
(F.F.F.T.).
Figure 4
Size F.F.F.T.
4 (1/4 in. nominal hose or tubing) 1.00 ± .25
6 (3/8 in.) 1.50 ± .25
8 (1/2 in.) 1.50 ± .25
10 (5/8 in.) 1.50 ± .25
12 (3/4 in.) 1.50 ± .25
16 (1 in.) 1.50 ± .25
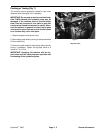
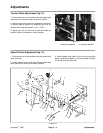
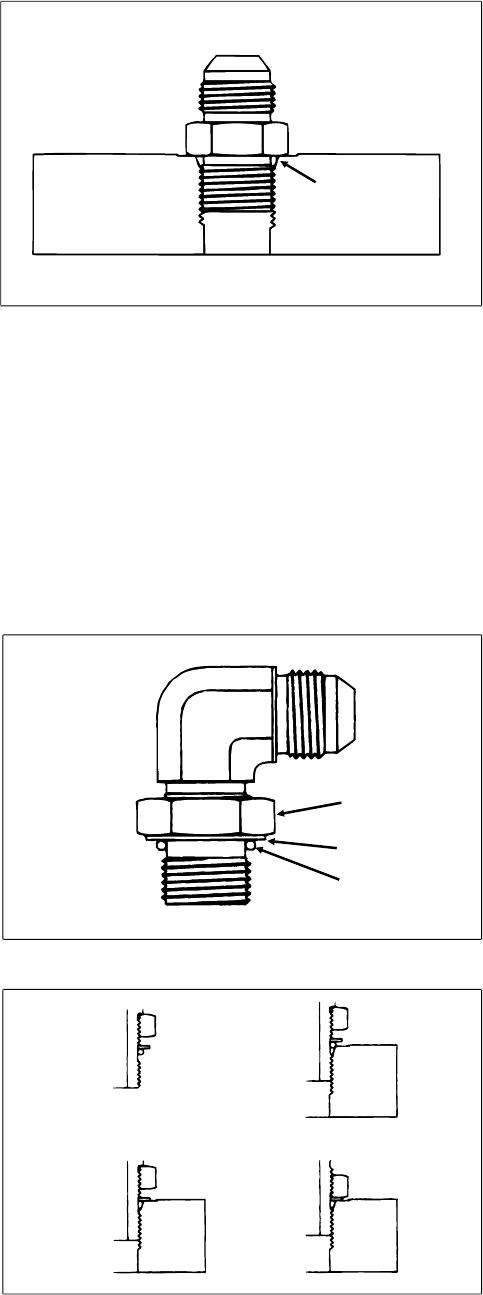
SAE Straight Thread O-Ring Port - Adjustable
(Fig. 5, 6)
1. Make sure both threads and sealing surfaces are free
of burrs, nicks, scratches, or any foreign material.
2. Always replace the O-ring seal when this type of fitting
shows signs of leakage.
Lock Nut
3. Lubricate the O-ring with a light coating of oil.
Back-Up Washer
4. Turn back the jam nut as far as possible. Make sure
O-Ring
the back up washer is not loose and is pushed up as far
as possible (Step 1).
5. Install the fitting into the port and tighten finger tight
Figure 5
until the washer contacts the face of the port (Step 2).
6. To put the fitting in the desired position, unscrew it by
Step 3
Step 1
the required amount, but no more than one full turn
(Step 3).
7. Hold the fitting in the desired position with a wrench
and turn the jam nut with another wrench to the correct
flats from finger tight (F.F.F.T.) (Step 4)
Step 4
Step 2
Size F.F.F.T.
4 (1/4 in. nominal hose or tubing) 1.00 ± .25
6 (3/8 in.) 1.50 ± .25
8 (1/2 in.) 1.50 ± .25
10 (5/8 in.) 1.50 ± .25
Figure 6
12 (3/4 in.) 1.50 ± .25
16 (1 in.) 1.50 ± .25
General Information Page 4 - 4 HydroJect
™
3000