


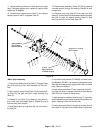

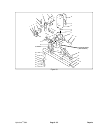

Nozzle Service and Replacement
NOTE: See Specifications section of this chapter for
more information.
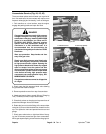
1. Park machine on a level surface, stop the engine, en-
gage the parking brake, open the hood and disconnect
the spark plug wires from the engine.
2. Inspect nozzle configuration and diameter. Nozzles
are stamped with numbers indicating the drill size of the
orifice. Nozzle orifice can be inspected by inserting
shank end of drill bit matching size stamped on orifice.
If drill bit fit is loose, the nozzle is worn. If nozzles are
worn or incorrect, replace with new nozzles in correct
configuration.
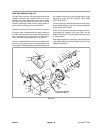
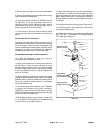
3. The nozzle check valves and seats are located in the
nozzle drops and are easily replaced if they wear. Occa
-
sionally inspect the springs especially if one nozzle
leaks water after the machine is shut down.
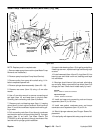
4. For normal operation, install nozzle springs with the
narrow spiral pointing up and the check ball on top of the
spring. To block the flow for different nozzle configura
-
tions, install the narrow spiral pointing down with the
check ball below the spring.
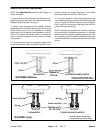
NOTE: Nozzles are stamped with numbers indicating
drill size of orifice. Standard configuration is 11 nozzles,
which will produce depths of approximately 4 to 6 inch
-
es, depending on soil conditions. Blocked nozzle loca-
tions are obtained by reversing nozzle check valve and
spring.
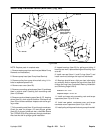
Tighten to
OPEN NOZZLE
60 ft–lb
CLOSED (BLOCKED) NOZZLE
S/N 29999 & Below
Aluminum washer (P/N 80–6680)
is required with any nozzle change.
CLOSED (BLOCKED) NOZZLEOPEN NOZZLE
Spring
Spring
70 – 80 ft–lb
S/N 30001 & Up
Aluminum washer (P/N 86–8150)
is required with any nozzle change.
Check Valve Ball
Check Valve Ball
Tighten nut to
Hydroject 3000
Page 6 – 31
Rev. B
Repairs