


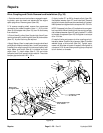
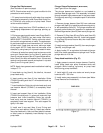
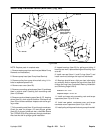
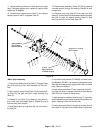


Water Pump Crankcase Service (Model 09800) (Fig. 38a)
31
32
33
1
2
3
5
6
7
8
9
10
16171819
20
21
22
23
24
25
26
27
28
29
30
11
12
13
14
15
1
4
10
13
14
6
34
35
8 ft–lb
Loctite 271
10 ft–lb
10 ft–lb
Apply grease to
O.D. of plunger
before installing
pump head
18 ft–lb
Figure 38a
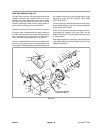
NOTE: Replace parts in complete sets.
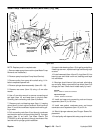
1. Remove water pump from machine (see Water Pump
Removal and Installation).
2. Remove pump head (see Pump Head Service).
3. Remove pulley from pump drive shaft using 1/4 in.
bolts to separate tapered hub.
4. Remove plunger sleeve assembly (Items 25 – 30).
5. Remove rear cover (Item 19) using a 5 mm allen
wrench.
6. Use a 5 mm allen wrench to remove connecting rod
end caps (Item 10) and keep them in original order.
Carefully push connecting rods (Item 9) forward.
7. Remove crank rod bearing caps (Item 1), keeping
shims (Item 2) in their original locations. Slide crank rod
(Item 11) out of the crankcase. Inspect crank rod for gall
-
ing or wear.
8. Pull connecting rods (Item 9) out through crankcase
and check for wear on plunger guides (Item 3). If plunger
guides (Item 3) are worn, use Wear Sleeve Tool
(TOR4015) to drive guides out through crankcase. Also
use this tool for plunger guide installation.
9. Inspect roller bearings (Item 13) for galling and pitting.
If bearings are worn, replace bearings and bearing cups
as a set.
10. Install new seals (Item 14) and O–rings (Item 31) into
bearing caps and install crank rod, bearings and caps
into crankcase.
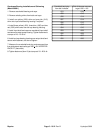
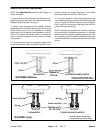
11. Bearings should have a light pre–load, eliminating
any end play. Add or remove end cap shims (Item 2) to
change pre–load. Shaft should rotate easily by hand..
Preload:
0.015 – 0.020 in. aluminum crankcase
Capscrew torque:
10 ft–lbs aluminum crankcase
12. Install end caps onto connecting rods and torque
capscrews (Item 21) to 18 ft–lbs.
13. Install new gasket, crankcase cover, and torque
crankcase cover capscrews (Item 15) to 8 ft–lb.
14. Rebuild plunger sleeves (see Plunger Sleeve Re-
placement.
15. Install pulley with tapered hub onto pump drive shaft.
Repairs
Page 6 – 26 Rev. B
Hydroject 3000