


17
4.5. BATTERY SERVICE
4.5.1. NEW BATTERY PREPARATION
1. Remove battery from carton.
2. Place battery in a well ventilated area on a level
non-concrete surface.
3. Test battery. Refer to Section “Battery Testing”. If
battery needs charging, charge battery. Refer to
Section “Battery Charging”.
4. Connect positive (+) lead (red) first, from battery
harness to the positive terminal (+) on battery using
bolt and nut plate supplied with battery. Connect neg-
ative (-) lead (black) last, to negative terminal (-) on
battery using bolt and nut plate. Apply a small amount
of grease over terminals to prevent corrosion. NOTE:
Battery may come with harness already connected. If
so, simply check to be sure terminal hardware is
securely tightened.
5. Install battery into power unit.
6. Plug main harness battery harness connector.
4.5.2. BATTERY SERVICE
1. Remove rear cover from mower. Refer to Section
“Rear Cover Removal”.
2. Test battery. Refer to Section “Battery Testing”. If
battery needs charging, charge battery. Refer to
Section “Battery Charging”.
3. If battery will not accept charge or is partially
charged after charging per instructions, replace with
new battery.
4.5.3. BATTERY STORAGE
If Walk Behind is to be stored out of season on its rear
bumper, it is recommended the battery be removed,
charged and stored.
1. Remove battery.
2. Perform battery service. Refer to Section “Battery
Service”.
3. Store battery in an area away from the Walk Behind
on a wood surface. DO NOT STORE BATTERY ON A
CONCRETE SURFACE.
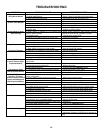
4.5.4. BATTERY TESTING
Check the battery’s state of charge using a voltmeter.
Remember to hook the positive lead to the battery’s
positive terminal, and the negative lead to the negative
terminal. Check reading against chart below. If volt-
age reads less than 12.80 volts, charge battery. Refer
to Section “Battery Charging”.
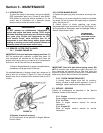
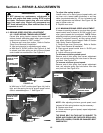
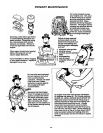
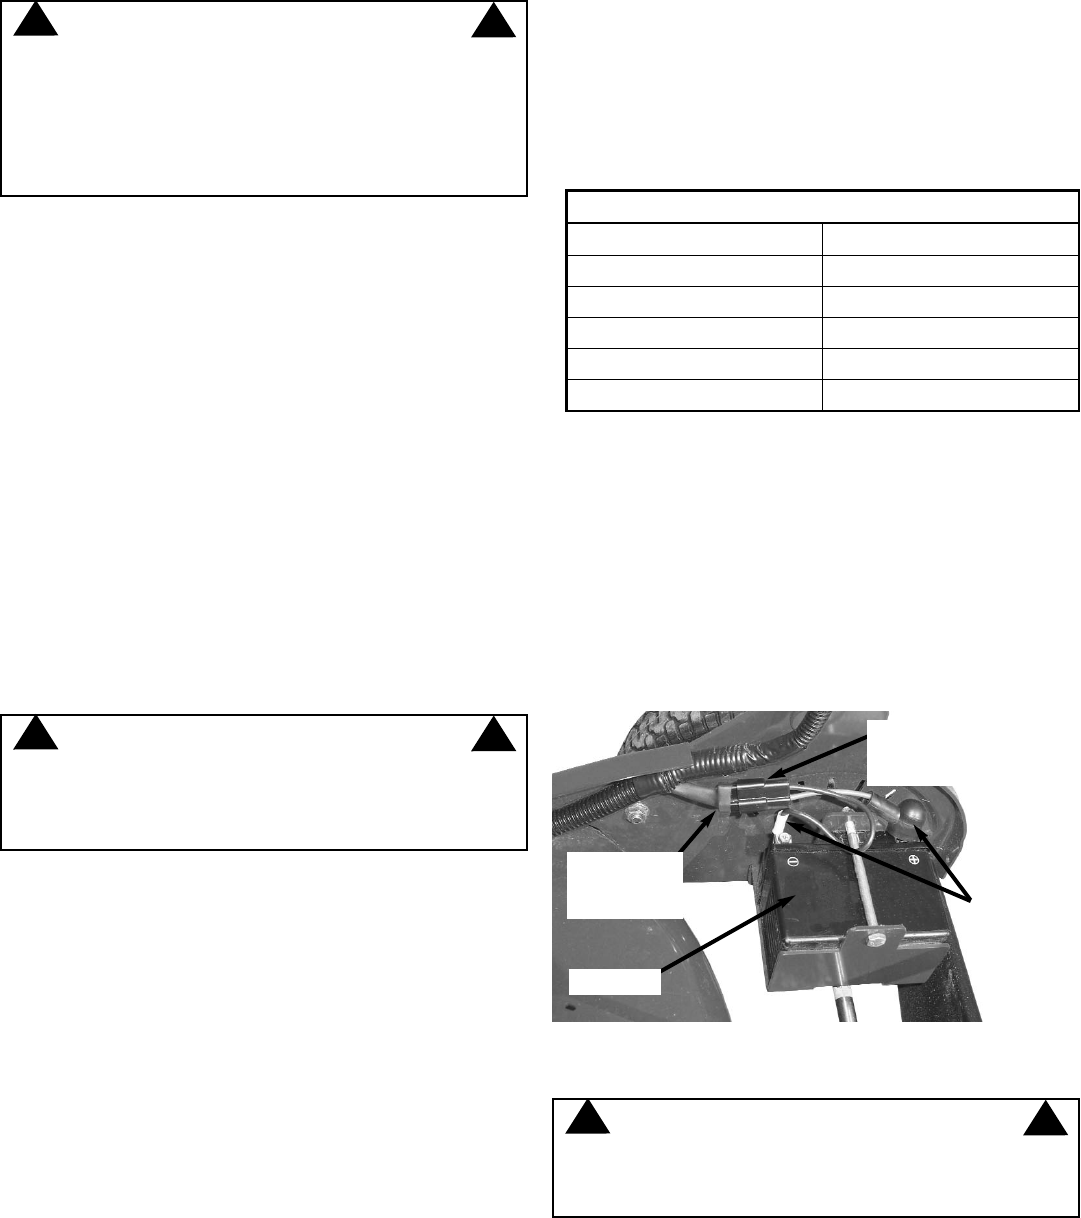
4.5.5. BATTERY CHARGING
Supplied DC charger. Plug charger connector into
battery harness connector. See Figure 4.10. Plug
charger into wall outlet and charge battery for 48
hours. (Longer periods will not damage battery.)
Automotive-type charger. Connect battery charg-
er to battery terminals; RED to positive (+) and BLACK
to negative (-) terminal. Slow charge battery at 0.4
amps for 5-10 hours. For quick charge, charge battery
at 4.0 amps for 30 minutes.
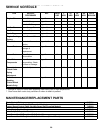
Battery Condition
State of Charge Digital Voltmeter
100% Charged 12.80v
75% Charged 12.40v
50% Charged 12.10v
25% Charged 11.90v
0% Charged Less than 11.80v
Section 4 - REPAIR & ADJUSTMENTS
WARNING
DO NOT attempt any maintenance, adjustments or
service with engine and blade running. STOP engine
and blade. Disconnect spark plug wire and secure
away from spark plug. Engine and components are
HOT. Avoid serious burns, allow sufficient time for all
components to cool.
!
!
WARNING
Shield the positive terminal with terminal cover
located on battery harness. This prevents metal from
touching the positive terminal, which could cause
sparks.
!
!
WARNING
Keep all sparks, flame and fire away from area when
charging battery or when handling battery. Never use
“BOOST” chargers on the battery.
!
!
FIGURE 4.10
MAIN
HARNESS
CONNECTOR
BATTERY
HARNESS
LEADS
BATTERY HARNESS
CONNECTOR (CHARGER
CONNECTS HERE)
BATTERY