


Inspect/Sharpen Chipping Knives
This unit’s high-quality chipping knives are manufactured
from a high-quality precision tempered steel, and are
designed to provide positive feeding of tree limbs and
branches, as well as exceptionally long service life.
Normal chipping operations will gradually wear the cut-
ting edges of these blades, but the rugged design and
tough material used allows them to be quickly and easily
resharpened for long-lasting, like-new performance.
When tree limbs and branches begin to require addition-
al pressure to feed into the chipping knives, it may be
time to sharpen the cutting edges to return them to their
original performance.
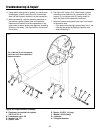
Sharpening the cutting knives requires the following
major steps:
1. Removal of the shredder hopper
2. Removal of the chipper cone
3. Removal of an access plug
4. Removal of the cutting knives
5. Careful, low-speed, wet grinding of a new edge
6. Reassembly of the cutting knives to the oval chipping
block
7. Reassembly of the chipper cone and shredder hop-
per to the unit
Consult the Troubleshooting and Repair Section of this
manual for complete disassembly, inspection, and
replacement instructions.
Your local authorized dealer can provide this service to
you if you do not wish to disassemble the unit and
inspect/repair it yourself.
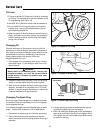
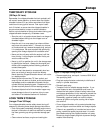
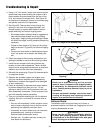
Lubricate Wheel Axles
The low profile and excellent balance of the unit makes
transporting it easy, but constant exposure to dirt, debris,
and chipper/shredder materials requires routine lubrica-
tion of the wheels.
To lubricate, squirt 3-5 drops of SAE 30 oil on each
wheel axle. Wipe up any run-off and spin wheels briefly
to work oil around entire axle.
Check Safety Labels
The safety labels located in various positions on the
chipper/ shredder have been placed to help remind you
of important safety rules while you are running the chip-
per/shredder unit.
While these labels are extremely durable, constant abra-
sion from tree limbs and branches can eventually affect
their readability. Check each label to make sure it is still
properly affixed to the chipper/shredder, and is still com-
pletely legible.
18
Normal Care
If any label can’t be read or is missing, contact your local
dealer for an immediate replacement. If you must use the
unit without the label, review the label information in the
“Safety Labels” section of this manual.
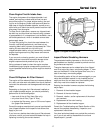
Inspect Starter Rope/Handle
The recoil starter rope and handle should be inspected for
signs of abrasion or wear that could result in breakage.
Don’t use worn out parts, since they could break while
tension is applied to the rope, throwing you off balance.
Contact your local authorized dealer for replacement if
these parts need to be replaced.
Inspect Chipper Cone & Shredder Hopper
The chipper cone and shredder hopper are made of a
highly durable polyethylene material that can withstand
repeated abrasion and impact from normal
chipper/shredder waste material processing.
Check these parts to make sure that they haven’t been
damaged or worn excessively by constant use, and
replace them if they are cracked, worn out, or no longer
fit securely on the chipper/shredder unit.
Cracks, worn areas, and loose attachment points can
cause material to jam or clog when feeding it into the
machine, and may result in kick-back or other hazard to
the operator.
Contact your local dealer for replacement parts if your
unit shows any evidence of these problems, and discon-
tinue use of the unit until the appropriate repairs can be
made.
Never try to make temporary repairs yourself, as the
repairs could give way during chipper/shredder opera-
tion, and expose you and bystanders in the area to risk
of injury.
Never attempt to install non-factory parts on your chip-
per/shredder unit. These parts could appear to fit, but
could cause operating and safety problems that might
lead to equipment damage and/or injury.
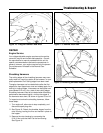
Inspect Hopper Guards
The hopper guards are made of a tough, flexible material
that permits easy loading of the hopper, while preventing
shredded pieces from being ejected out toward the oper-
ator.
The hopper guards must always be intact and properly
installed to provide protection from ejected pieces.
If a hopper guard becomes damaged in use, do not
operate the chipper/shredder until the hopper guard
can be replaced.
Contact your local authorized dealer for replacement
parts.