


9.
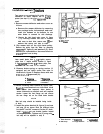
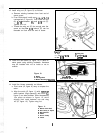
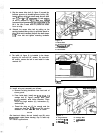
Slip the mower drive belt (A, figure 5) around the
bottom groove of double-groove pulley (B).
Install pulley with hub down and secure with
new
7/l
6-14 x 2-l
/4”
capscrew (C) and washers
(D and E) removed in step 5. Make sure splines
arecorrectlyalignedand torquecapscrewto55-
60 ft. Ibs. Use a wood block to prevent the blade
from turning.
10. Reinstall the mower drive belt by pulling on the
spring-loaded idler pulley to provide slack in
belt. With belt installed, adjust the belt stops
l/18”
from belt and tighten mounting hardware.
Figure 5.
A. Mower Belt
B. Double-Groove Pulley
C.
Capscrew,
Z-114”
D. Lockwasher ,
E. Flat Washer
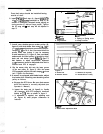
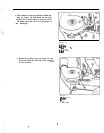
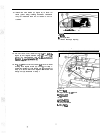
11. The baffle (A, figure 6) is installed in the blower
housing for use with 42” mower. For use with
48” mower, remove the baff le and install in holes
marked 48”.
-
I
Figure
6.
A. Baffle
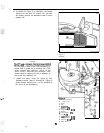
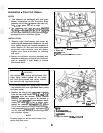
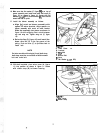
12. Install wing nut assembly as follows:
a. Remove existing hardware from front end of
stone guard.
b. From inside deck, install new
5/16-18x
2-l/4
carriage bolt (E, figure7) through deck, stone
.guard,
washer, and roller bracket. Then
install the large washer (A), lockwasher (F),
and nut (B).
c. Thread the wing nut (C) far enough onto the
screw so that the 5/16 locknut (D) can be
threaded on flush with the end of screw.
NOTE
On front-cut riders, do not install cup (G) onto
capscrew to retain blower housing. Cup is used only
for tractor applications.
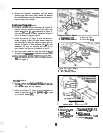
Figure 7.
A. Large Washer
E. Carriage Bolt
B. Jam Nut,
5/16
F.
Lockwasher
C.
Wing
Nut
G. Cup
IO
D. Locknut,
5116