


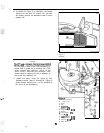
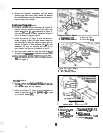


6.
Remove the capscrew, lockwasher, and flat washer
securing right hand arbor pulley. Retain the washers
for reinstallation (step 9). Use a wood block to
prevent blade from turning.
SunRunnerNanguard
Models
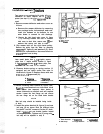
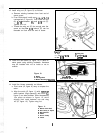
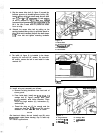
6. On early models without bet stop (A, figure 3)
remove two self-tapping screws from arbor and
install two
.5/l
6-18
x
l-1/2”
capscrews (A, figure 3).
Parts will be installed on these capscrews in steps 7
and 8 as shown in figures 3 and 4.
7. Install the bracket (F, figure 4) with hardware as
shown in figures 3 and 4. On early models, install the
rear belt stop (C) facing the inside of mower deck as
shown in figure 4. Use washers (B
&
D) and
lo&washer (H) only for securing belt stop (C) on
early models. Use jam nut at locations A and E.
8.
On early models, install the front belt stop (D, figure
3) onto front
capscrew
(installed in step 6) with
washer,lockwasher,andnut.Tightensnugonly.The
beL
stop should face the inside of mower deck as
shown in figure 3.
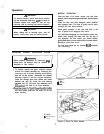
Figure 3. (Early Model)
A.
capscrews,
l-112’
C. Rear Belt Stop
B. Rear Mounting Bracket
D. Front Belt
Stop
FCll3OO Models
6. On later models with
factoty-installed belt stop (A,
figure
3A), it is not necessary to change capscrews
as new belt stops are not required.
7. install the bracket (F, figure 4) with hardware as
shown in figure 3A and 4. Use
jamnuts (A & E, figure
4) to secure bracket (F).
Figure 3A. (Later Model)
A. Ben Stop (Existing)
B. Rear Mounting Bracket
(A,
figure
3A).
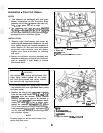
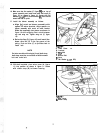
Figure 4.
A. Jam Locknut,
5/16
B. Washer,
5116
c.
Beit
stop
G.
Capecrew,
6116-18
x
l-112
H. Lockwasher, 5/16
I.
spacer
D. Washer,
5116
J.
Washer,
spaal
E. Jam Locknuf
5116
K. Screw, Self-Tapping, I/4-20
F. Arbor Bracket
L. Left-Hand
Mtg.
Hole
9