16
40/50 Hour Maintenance
Spark plug: replace the spark plug ■
with an NGK BPMR7A (or equivalent),
gapped to 0.024” (0.6 mm).
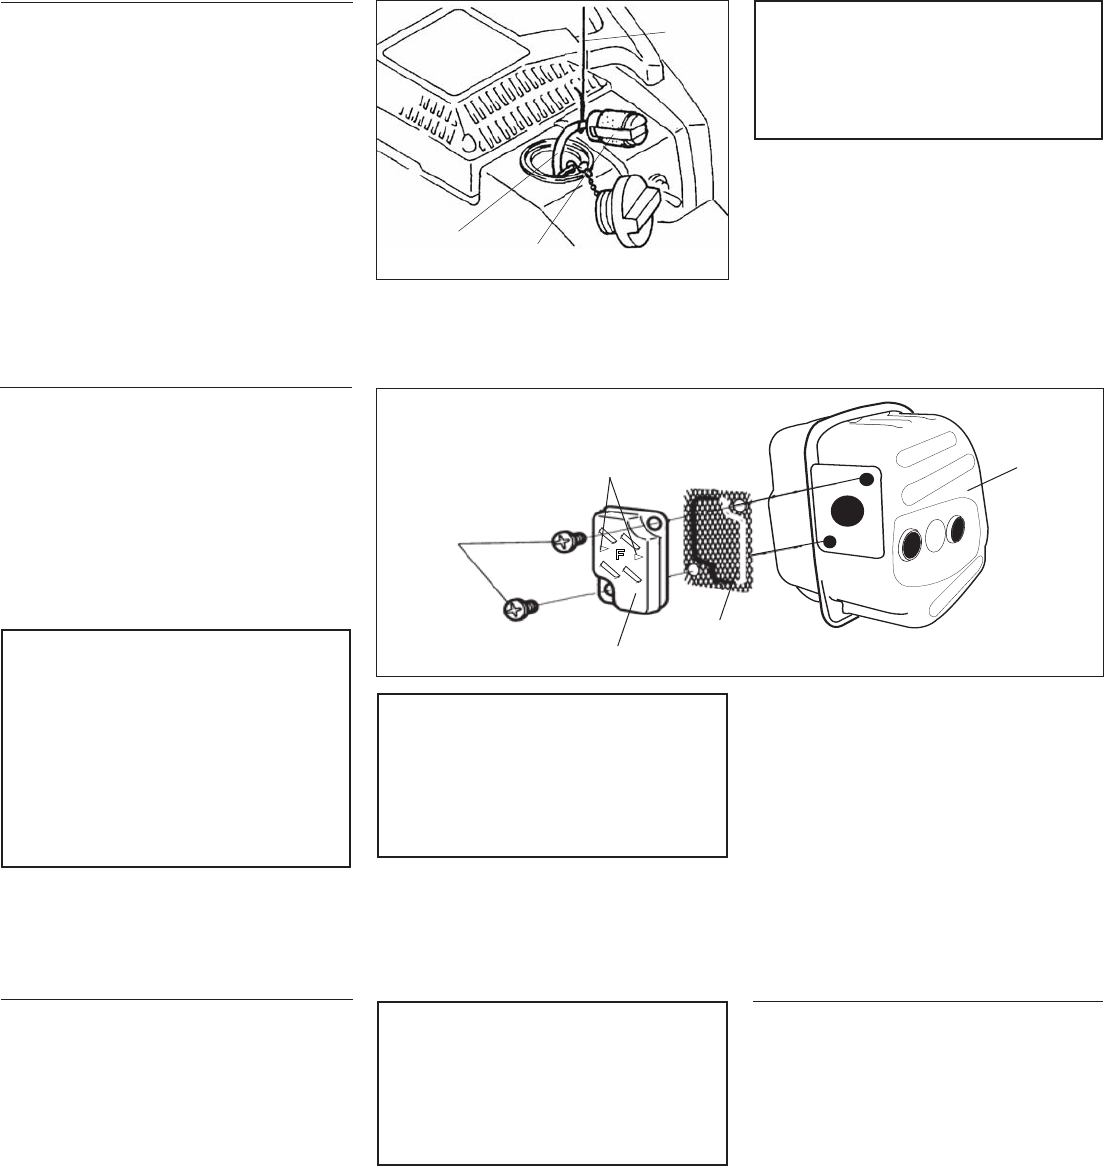
Fuel filter: use a hooked wire to
■
extract the fuel filter from inside the
fuel tank, and then remove and replace
the filter element. Before replacing the
filter, inspect the condition of the fuel
line. If damage or deterioration are
noted, the saw must be removed from
service until it can be inspected by a
Shindaiwa-trained service technician.
CAUTION!
Make sure you do not pierce the
fuel line with the end of the hooked
wire. The line is delicate and can be
damaged easily.
Fuel Line
Fuel Filter
Hooked
Wire
Oil filter: extract the oil filter from ■
inside the oil tank, and then wash the
filter element in an approved solvent.
If damage or deterioration are noted
on the oil suction line, the saw must
be removed from service until it can
be inspected by a Shindaiwa-trained
service technician.
(over 30 days)
Thoroughly clean the saw exterior. ■
Remove all chips and other debris from
the cylinder fins and cooling passages.
Drain the fuel tank, and then clear the ■
carburetor and lines by running the
saw until it stops from lack of fuel.
Drain any remaining bar oil from the
■
oil reservoir.
CAUTION!
Never store the saw with any fuel
remaining in the tank, fuel lines, or
carburetor! Your Shindaiwa warranty
does not include coverage for damage
caused by “stale” or contaminated fuels!
Long Term Storage
Remove, clean, and reinstall the air fil- ■
ter element as described under “Daily
Maintenance.”
Repair or replace any damaged compo-
■
nents as required, and then store the
unit in a clean, dry, dust-free area.
Protect the chain by using a chain ■
cover.
Remove the spark plug, and then pour ■
1/4 ounces (5 ml) of 2-cycle mixing
oil into the cylinder through the spark
plug hole. Before reinstalling the spark
plug, slowly pull the recoil starter 2-3
times to distribute the oil over the cyl-
inder walls.
Hard starting or a gradual loss of perfor-
mance can be caused by carbon deposits
lodged in the muffler’s spark arrester screen.
To service or replace the spark arrester,
remove the two cover screws and cover, then
remove the screen. Clean the screen with a
small wire brush. Replace if damaged. Rein-
stall the screen and cover with the arrows
directed to the front of the muffler.
Spark Arrester Maintenance
CAUTION!
Carbon deposits in the combustion
chamber or exhaust port cannot
be removed in the eld. For decar-
bon- ization, return the unit to your
Shindaiwa dealer.
CAUTION!
When installing the spark arrester
cover make sure the arrows are
directed to the front of the mufer. If
the spark arrester cover is installed
incorrectly, the hot exhaust gases
will be directed into the chain saw
and may cause heat damage to sur-
rounding parts.
Cover
Screws
Direction
Arrows
Cover
Front of
Mufer
Arrester
Screen
Maintenance (continued)


