


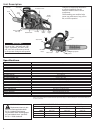


14
WARNING!
Failure to leave a proper
wooden hinge during the felling or
“back cut” can cause the tree to
pinch the saw’s guide bar and may
also change the direction of fall!
WARNING!
Always make your falling cut
parallel to the bottom cut! An angled
falling cut may cause the tree to split,
possibly changing the direction of fall!
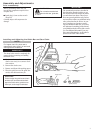
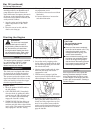
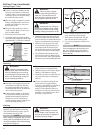
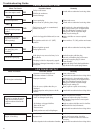
Working from the same side of the tree 3.
and at a 45˚ angle to the first cut, make
your second cut in an upward direction to
remove a notch from the tree as shown.
Working on the opposite side of the
4.
tree and starting approximately 2” (5
mm) higher than the bottom of the
notch created in steps 1-3. Set the bum-
per spike just behind the felling hinge.
Use full throttle and bring the bar and 5.
chain slowly into the tree. Make sure the
tree does not start to move in the opposite
direction to your intended felling direction.
Bumper
Spike
Wooden
Hinge
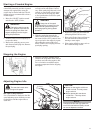
If a tree is otherwise healthy and not ■
seriously out of balance, its direction
of fall can often be encouraged by first
“notching” the tree on the side facing
the desired direction of fall.
After the notch is completed, start the
■
felling cut slightly higher and on the
opposite side of the tree, away from
the direction of fall.
The goal of the method is to leave a
■
sturdy wooden “hinge” for the tree to
pivot on while falling.
Determine the direction of fall.
1.
On the side of the tree facing the direc-2.
tion of fall, make a single 90˚ cut through
approximately 1/3 of the tree’s diameter.
Escape
Path
Direction Of
Fall
45°
45°
NOTE:
If the cut appears to be closing on the
bar, use a mallet to drive one or two
plastic or wooden wedges into the cut
behind the bar.
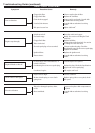
Drive a wedge or breaker bar into the
6.
cut as soon as it is deep enough.
When the tree begins to fall, stop the
7.
saw, and put it down on the ground.
Use your retreat path to exit the area
8.
quickly.
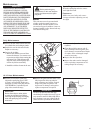
(Over 6” (15 cm) diameter)
Wooden
Hinge
Direction of
Fall
Felling
Cut
Notch
Felling Trees (continued)
Felling Larger Trees
Bucking
WARNING!
Always cut downed timber
from the uphill side of the wood! Be
alert for potential injury from rolling
or shifting logs! Downed timber may
shift or roll unpredictably during cut-
ting or handling operations!
Techniques
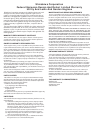
I ■ f the log is well supported, start your
cut from the top of the log. Keeping
the guide bar parallel to the ground,
cut straight down but do not allow the
saw to cut into the ground.
Cutting downed timber, or “bucking,”
■
increases the possibility of the wood
settling and pinching the guide bar.
Driving one or more soft plastic or
wooden bucking wedges can help pre-
vent bar-pinching during a cut.
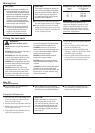
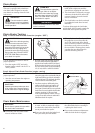
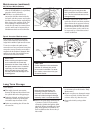
CS_Bucking1_all models
First Cut
Second Cut
CS_Bucking2_undercut_all models
First Cut (underbuck) About
1/3 of Tree Diameter
Second Cut (overbuck)
Use two cuts when bucking near the ■
inboard end of an unsupported log.
Make the first cut as an overbuck approx-1.
imately 1/3 the diameter of the log.
Finish the job with an underbuck com-2.
ing up from beneath and joining the
first cut.
Use two cuts when bucking the out-
■
board end of an unsupported log.
Your first cut should be an underbuck,
cutting upward through approxi-
mately 1/3 the diameter of the tree.
Finally, move to the top of the log and
finish the cut by bucking down (over-
bucking) to your first cut.
WARNING!
Kickback danger increases
in over-height or out of position cut-
ting! Do not overreach or attempt to
cut above shoulder height!
3
2
1
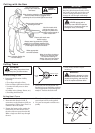
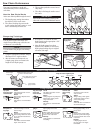
Limbing a standing tree is usually accom-
plished in the same manner as bucking,
with a third and final cut used to remove
the remaining stub of the limb.
NOTE:
When cutting unsupported logs or limbs,
starting with an underbuck cut will mini-
mize the possibility of the wood splitting
during the bucking cut.
Limbing