


24
AIR CLEANER
Checking Dirt Level : Check the dirt level of filter
element daily or every 10 hours,
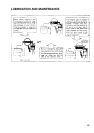
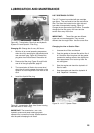
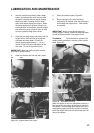
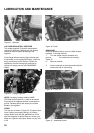
Figure 27 - Air Cleaner - Disassembled
Clean the element every 25 hours of service.
1. Loosen the mounting bolt, Figure 27.
2. Remove the filter element from the body.
3. Pat the sides of the element with the palm of
the hand to remove dust trapped in the pleats.
IMPORTANT: Tapping the element against a hard
surface or with hard objects may dent or break the
element end cap seals.
4. Using low air pressure (not over 30 psi, 207
kPa), blow out remaining dust from the inside
out opposite normal air flow through the
element.
IMPORTANT: Be careful not to rupture the filter
element. Maintain d reasonable distance between
the air nozzle and the filter element when directing
air up and down the clean air side of the element
pleats.
5. Clean the fins and the inside of the air cleaner
body with a dry cloth.
6. Check with a light bulb inside the element for
leaks in the paper or bonding of paper to end
plate. Replace element if any leaks are found.
7. Reassemble the air cleaner using the
mounting bolt and gasket.
WASHING ELEMENT
1. Washing may be necessary to remove soot or
oily materials
2. Agitate the element in warm water containing
a small amount of non sudsing type
detergent.
IMPORTANT: Do not use water hotter than the
hand can stand, as the element will be damaged.
Never wash the element with fuel oil, gas or solvent.
Do not oil the element.
3. Rinse the element with clean water. Shake
excess water from the element and allow it to
air dry.
IMPORTANT: Do not dry the element with
compressed air, as the air will rupture a wet
element. Also, do not install a wet element as the
tractor engine will not start.
4. After drying, check for damage by holding a
light bulb inside the element. If an even, fine
pattern of light is seen, the element is clean
and undamaged. A bright spot of light
indicates the element is damaged, and a new
element must be installed.
Change the element after six cleanings or
once a year.
TRANSMISSION, REAR AXLE AND
HYDRAULIC SYSTEM
Checking Oil Level: Check the oil level every 25
hours
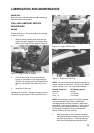
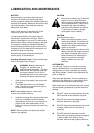
1 With the tractor standing level and the engine
off, check the oil level with the dipstick located
below the tractor seat, Figure 29.
2. The oil is at the correct level when the oil level
is between the marks on the dipstick. If low,
add new oil of the type specified, page 35,
through the combined dipstick/filler plug. Do
not fill beyond the full mark on the stick.
3. Install the dipstick/filler plug.