


3_
E.
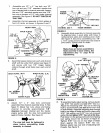
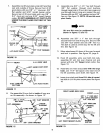
Re-install suspension arms removed on
page 4. See figure 5 on page 4.
CAUTION: If the suspension arms
are ever removed from tractor
(which may be necessary for
mounting other attachments) the
lift link on the LEFT side of the trac-
tor must be removed from tractor
if it is not needed or used with the
attachment. Refer also to tractor
manual. Failure to do so will allow
the lift link to interfere with tractor
steering which could cause loss of
control while driving resulting in
property damage and/or personal
injury.
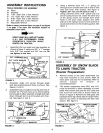
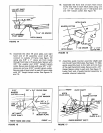
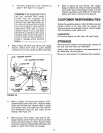
Refer to figure 24 below and remove t/8" (large)
hairpin cotters from ends of guide bracket
assembly and remove guide bracket assembly.
r32"" HAIRPIN COTTER
1/8" HAIRPIN COTTERS
CLEVIS PIN
.
Refer to figure 24 and remove 1/8" (large)
hairpin cotters from ends of channel assembly
pivot shaft and remove keeper plates. Lift the
channel assembly pivot shaft out of the hitch
plates and lower channel to the ground.
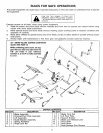
CUSTOMER RESPONSIBILITIES
During the operating season, check all bolts, nuts and
hairpin cotters to be sure they are secure. For
improved snow removal performance, coat the blade
with automotive type paste wax.
LUBRICATION
Oil all pivot points so that they will work freely.
STORAGE
When the snow blade is not being used, remove all
dirt and rust and touch up with paint.
Apply a light coat of grease or rust preventative to
the blade and oil pivot points.
Store in an area where it is protected from weather.
(R.H.)
HITCH
PLATE
/
KEEPER
PLATE CHANNEL
ASS'Y. GUIDE
1/8" HAIRPIN PIVOT SHAFT BRACKET
COTTER ASS'Y.
FIGURE 24
.
Refer to figure 24 above and remove 3/32"
(small) hairpin cotter from 3/8" clevis pin which
holds end of blade lock release cable to blade
lock release lever. Pull cable free from tractor
and reassemble clevis pin and cotter pin for
storage. See figure 24.
.
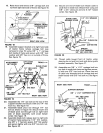
Refer to figure 16 on page 7 and remove 1/8"
(large) hairpin cotter from each clevis pin that
holds each hitch brace in place. Remove hitch
braces and spacers. Reassemble clevis pin and
spacer to each hitch brace for storage.
11