


9
ASSEMBLY
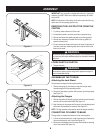
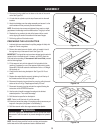
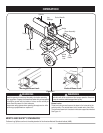
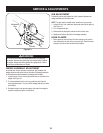
3. Disconnect the log cradle from the beam on the side of the control
valve. See Figure 3-5.
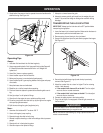
4. Lift and slide the cylinder up to the top of beam and into the weld
brackets.
5. Attach the dislodger over the wedge assembly and secure it to the
weld brackets with the previously removed hardware.
NOTE:Oncethesixhexscrewsaretightened,theremaybeaslight
gap between the dislodger and the weld brackets. This gap is normal.
6. Reattach the log cradle to the side of the beam with the control
valve, aligning the ends of the cradle with the beam flanges.
7. Roll the log splitter off the bottom crate.
PREPARING THE LOG SPLITTER
1. Lubricate the beam area (where the splitting wedge will slide) with
engine oil. Do not use grease.
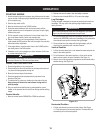
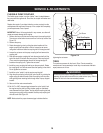
2. Remove the vented reservoir dipstick, which is located in front of
the engine on top of the reservoir tank. See Figure 3-6.
IMPORTANT: The log splitter may have been shipped and primed with
hydraulic fluid in the reservoir tank. However, you MUST check the
fluid level before operating. If the reservoir tank is not filled, proceed
with the following steps:
3. Fill the reservoir tank with the hydraulic fluid included with this
machine (if equipped) or one of the approved fluids which include
Dexron®III/Mercon®automatictransmissionfluidora10Weight
AW hydraulic oil.
4. Check the fluid level using the dipstick. See Figure 3-6. Do not
overfill.
5. Replace the vented dipstick securely, tightening it until the top of
the threads are flush with top of the pipe.
6. Disconnect the spark plug and prime the pump by pulling the recoil
starterasfarasitwillgo.Repeatapproximately10times.
7. Reconnect the spark plug wire and start the engine following the
instructions in the OPERATION section.
8. Use the control handle to engage the wedge to the farthest
extendedposition.Thenretractthewedge.
9. Refill the tank as specified on the dipstick.
NOTE: Failure to refill the tank will void the warranty.
10.Extendandretractthewedge12completecyclestoremoveanyair
trapped in the system (the system is “self-bleeding”).
11. Refill the reservoir within the range marked on the dipstick.
WARNING
Much of the original fluid has been drawn into the cylinder and hoses.
Make certain to refill the reservoir to prevent damage to the hydraulic
pump.
NOTE: Some fluid may overflow from the vent plug as the system
buildsheatandthefluidexpandsandseeksabalancedlevel.
Figure 3-6
Figure 3-4
Figure 3-5