


8
101241
EXTENSION CORDS
Use proper extension cord with this chain saw. Use only
extension cords marked for outdoor use. Use an extension cord
no less than 1.5 mm
2
(14SWG) at distances up to 30 meters
(100 feet). The cord must be marked with suffix W-A follow-
ing the cord type marking.
Example
: SJTW-A
Use an extension cord heavy enough to carry the current your
saw will draw. An undersized cord will cause a voltage drop at
the saw, loss of power, and overheating.
Keep cord away from cutting area. Make sure cord does not
catch on branches or logs during cutting. Inspect cords often.
Replace damaged cords.
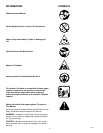
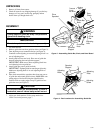
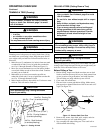
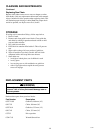
The extension cord may come undone from the power cord
during use. To avoid this, make a knot with the two cords as
shown in Figure 7 below.
!
WARNING ICON G 001
WARNING
Read and understand this owner’s manual
before operating this saw. Make certain you read
and understand all Safety Warnings. Improper
use of this chain saw can cause severe injury or
death from fire, electrical shock, or body contact
with moving chain, or falling wood.
OPERATING CHAIN SAW
4. Make sure your footing is firm. Keep feet apart. Divide
your weight evenly on both feet. Stand slightly to left side
of saw. This keeps your body from being in direct line
with chain.
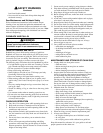
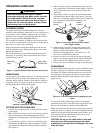
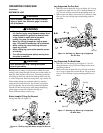
5. When ready to make a cut, press in switch lockout with
right thumb and squeeze trigger (see Figure 9). This will
turn saw on. Releasing trigger will turn saw off. Make sure
saw is running at full speed before starting a cut.
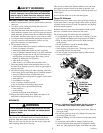
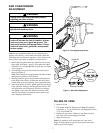
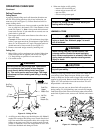
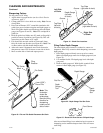
Figure 8 - Pressing Oil Cap to Oil Chain
6. When starting a cut, place moving chain against wood.
Hold saw firmly in place to avoid possible bouncing or
skating (sideways movement) of saw.
7. Guide saw using light pressure. Do not force saw. The
motor will overload and can burn out.
8. Remove saw from a cut with saw running at full speed.
Stop saw by releasing trigger. Do not use the chain brake.
Make sure chain has stopped before setting saw down.
9. Practice until you can maintain a steady, even cutting rate.
OILING CHAIN
Always check oil level before using saw. To oil chain, press oil
cap. Oil will feed onto guide bar and chain. Press oil cap at
least once before each cut. Check oil level often by looking at
oil sight level hole. Oil sight level hole is on left side of saw,
between front handle and front hand guard.
Figure 7 - Tying Extension Cord and Power Cord in Knot
To reset chain brake, release trigger and move front hand
guard back into position. You must release trigger first. If not,
the saw will start when you reset the front hand guard.
Note:
Test chain brake before each use. Firmly grip saw with
both hands. With saw running, move front hand guard forward
with back of left hand. Keep both hands on the handles. Saw
chain should stop. If chain brake does not work, have saw
repaired by authorized service person.
CAUTION: Do not use the chain brake to stop and
start your saw. Quick repeated stops may cause
overheating of the chain brake. Damage to the chain
brake will occur.
CUTTING WITH THE CHAIN SAW
1. Connect saw to extension cord. Connect extension cord to
power supply.
2. Make sure section of log to be cut is not laying on ground.
This will keep chain from touching ground as it cuts
through log. Touching ground with moving chain will dull
chain.
3. Use both hands to grip saw. Always use left hand to grip
front handle and right hand to grip rear handle. Use firm
grip. Thumbs and fingers must wrap around saw handles
(see Figure 9).
Trigger
Figure 9 - Front Hand Guard, Switch Lockout,
and Trigger Location
Front Hand
Guard
Switch
Lockout
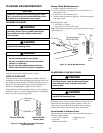
CHAIN BRAKE
The chain brake quickly stops the saw chain. Kickback causes
the back of operator’s left hand to contact front hand guard
(see Figure 10). When front hand guard moves forward, the
saw chain stops. This reduces the chance of serious injury
during kickback. When the chain brake activates, release
trigger at once.
STOP
Figure 10 - The chain brake quickly stopping the saw
chain
Extension
Cord
Chain Saw
Power Cord