


8 1-800-732-2677
Additional Boundary Wire
Extra direct burial Boundary Wire can be purchased in 500 foot spools
at the store where you purchased the kit or through the Customer
Care Center at 1-800-732-2677.
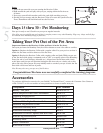
Note: When adding Boundary Wire, it must act as a continuous loop.
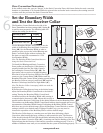
The table at right indicates the approximate length of Boundary Wire
needed for a square, Single Loop layout. Length will vary due to the
amount of twisted wire and layout used.
Acres Feet of Wire Needed
1/4 415
1/3 480
1/2 590
1 835
2 1180
5 1870
10 2800
__________________________________________________
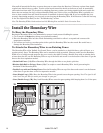
Connect the Wires to the Fence Transmitter
Boundary Wire (4A)
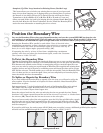
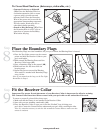
1. Run the Boundary Wire to the Fence Transmitter through a window, under
a door, through a crawl space vent, or any other appropriate available access.
You can also drill a hole through your wall.
2. Strip the ends of the Boundary Wire approximately one-half inch.
3. Insert the Boundary Wires into the Boundary Wire Terminals on the Fence
Transmitter. Make sure the wires do not touch each other at the terminals.
4. Turn the Boundary Width Control knob to 10. This will set the Warning Zone
at the maximum width.
5. Plug the Power Adapter into the Power Jack and a 120-volt outlet.
6. The Power Light and Loop Indicator Lights should come on. If this does not
happen, see the “Troubleshooting” section.
Lightning Protection
Lightning strikes within 1-2 miles of your installation can create power current
}
Boundary Width
Control
Power Light
Loop Indicator
Light
Boundary Wire
Terminals
Power
Jack
4A
surges or spikes which may damage your unprotected electronic pet containment system. The LP-4100-1 Lightning
Protector is designed to protect your In-Ground Fence
™
from surges or spikes that can reach it via your AC power
connection and/or your buried Boundary Wire.
You may purchase a Lightning Protection Kit through the Customer Care Center at 1-800-732-2677. The
Lightning Protection Kit protects the system against surges that travel through the power source and/or the
Boundary Wire.
__________________________________________________
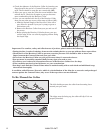
Prepare the Receiver Collar
Your Receiver Collar comes with short Contact Points. Long Contact Points for pets with
long or thick hair are available through our Customer Care Center at 1-800-732-2677.
Tighten the Contact Points using Test Light Tool (5A) one-half turn beyond finger tight.
Check the tightness weekly.
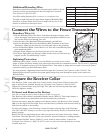
To Insert and Remove the Battery
Note: Do not install the battery while the Receiver Collar is on your pet.
This Receiver Collar utilizes a replaceable PetSafe
®
battery (RFA-67). This unique battery is
designed to make battery replacement easier and increase water protection.
To insert the battery, align the symbols on the battery (arrow) and Receiver Collar (triangle)
(5B). Use the edge of the Test Light Tool to turn the battery clockwise until the arrow lines up
with the lock symbol on the housing.
To remove the battery, turn the battery counter-clockwise using the edge of the Test Light
Tool (5C). DO NOT attempt to cut into or pry open the battery. Be sure to discard the used
battery properly.
Battery life will vary depending on how often your pet tests the system and receives a Static
Correction. Check the Receiver Collar every month to ensure the battery is working properly.
A replacement PetSafe
®
battery (RFA-67) can be found at many retailers. Contact the
Customer Care Center at 1-800-732-2677 or visit our web site at www.petsafe.net to locate
a retailer near you.
Step
4
Step
5