9
OPERATION
WARNING: Be sure to read the fuel
information in the safety rules before you be-
gin. Ifyou d onot understandthe safety rules,
do not attempt to fuel your unit. Contact an
authorized service dealer.
FUELING ENGINE
WARNING: Remove fuel cap slowly
when refueling.
This engine is certified to operate on un-
leaded petrol. Before operation, petrol must
be mixed with a good quality 2-cycle air-
cooled engine oil. We recommend using a
good qualityfully synthetic oilmixed a t aratio
of40:1(2.5%).A 40:1ratioisobtainedbymix-
ing5litersofunleadedpetrolwith0,125literof
oil. DO NOT USE a utom otive oil or bo at oil.
These oils will cause engine damage. When
mixing fuel, followinstructions printedon oilcon-
tainer. Once oilis addedtogasoline, shakecon-
tainer momentarily to assurethat thefuelis thor-
oughly mixed. Alwaysread andfollow thesafety
rules relating to fuel before fueling your unit.
IMPORTANT
Experience indicates that alcohol b lended fuels
(called gasohol or using ethanol or methanol)
can attract moisture which leads to separation
and f ormatio n of acids duri ng storage . A cidic
gas can damage the fuel system of an engine
while in storage. To avoid engine problems,
empty the fuel system before storage for 30
days or longer . Drain the gas tank, start the en-
gine andlet itrun untilthefuellines andcarbure-
tor are empty. Use fresh fuel next season. Nev-
er use engine or carburetor cleaner products in
the fuel tank or permanent damage may occur .
HOW TO STOP YOUR UNIT
S To stop the engine, move the ON/OFF
switch to the OFF position.
ON/OFF Switch
HOW TO START YOUR UNIT
WARNING: Avoid any contact with
the muffler. A hot muffler can cause serious
burns.
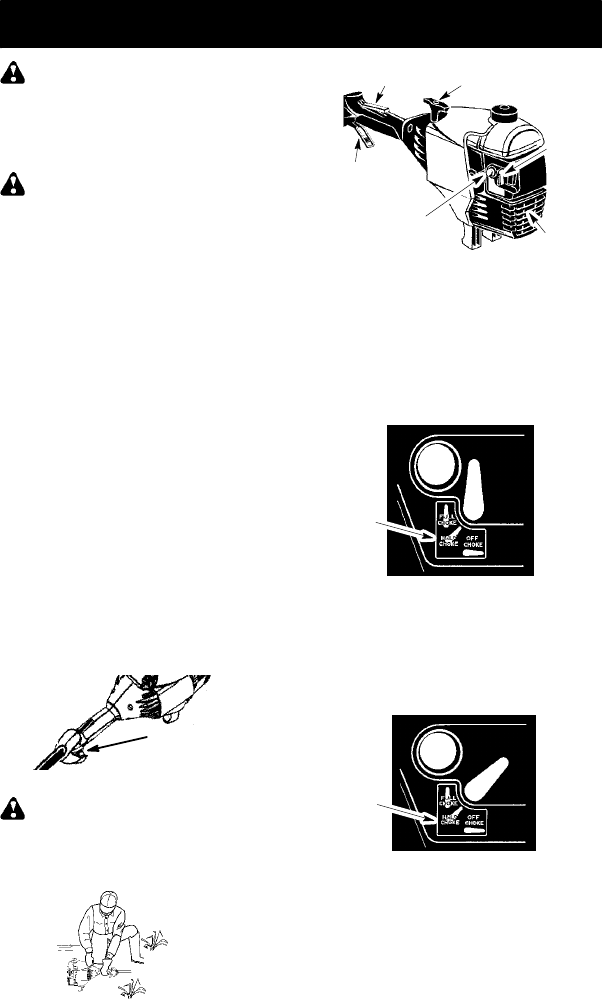
STAR TI NG A COLD ENGINE (or a
war m engine aft er runni ng out of fuel)
Starting Position
Muffler
Choke
Lever
Starter Handle
Primer Bulb
Throttle
Trigger
Throttle
Lock--out
NOTE: The throttle lock--out is designed to
prevent unintentional use of the throttle trig-
ger. The lock--out must be pressed with the
palmofyourhandas yougripthethrottlehan-
dle before the trigger can be used.
1. Set unit on a flat surface.
2. Move ON/OFF switch to the ON position.
3. Slowly press the primer bulb 6 times.
4. Move choke lever toFULL CHOKEposition
by aligning lever with position shown on de-
cal (see illustration below).
Choke
position
decal
5. Squeeze and hold trigger through all re-
maining steps.
6. Pull starter rope handle sharply until en-
gine soundsas ifit istrying tostart, butdo
not pull rope more than 6 times.
7. As soon asengine sounds as if it is trying
to start, move choke lever to HALF
CHOKE by aligning lever with position
shown on decal (see illustration below).
Choke
position
decal
8. Pullstarterrope sharplyuntil engineruns,
but no more than 6 pulls. If the engine
doesn’t start after 6 pulls (at the HALF
CHOKE position), move the choke lever
to the FULL CHOKE position and press
theprimerbulb6times.Squeezeandhold
thethrottle triggerandpullthestarterrope
2moretimes.Movethechokelever tothe
HALF CHOKE position andpull the start-
er rope until the engine runs, but n omore


