


16
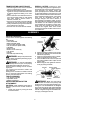
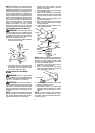
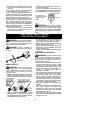
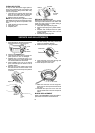
CLEAN AIR FILTER
A dirty air filter decreases engine per form-
ance and increases fuel consumption and
harmful emissions. Always clean after e very
5 hours of operation.
1. Clean the cover and the area around it to
keep dirt from falling into the carburetor
chamber when the cover is removed.
2. Remove parts as illustrated.
NOTE: Donotcleanfilteringasolineorother
flammablesolventtoavoidcreatingafirehaz-
ard or producing harmful evaporative emis-
sions.
3. Wash the filter in soap and water.
4. Allow filter to dry.
5. Replace parts.
Air F ilter
Air Filter
Cover
Button
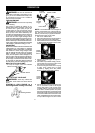
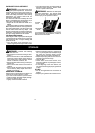
REPLACE SPARK PLUG
Replace the spark plug each year to ensure
the engine starts easier and runs better. Set
spark plug gap at 0,6 mm. Ignition timing is
fixed and nonadjustable.
1. Twist, then pull off spark plug boot.
2. Removespark plugfromcylinderanddis-
card.
3. Replace with Champion RCJ-6Y spark
plug and tighten securely with a 19 mm
socket wrench.
4. Reinstall the spark plug boot.
SERVICE AND ADJUSTMENTS
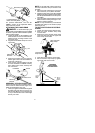
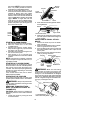
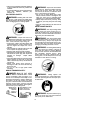
REPLACING THE LINE
1. Press the tabs on the side of the trimmer
head and remove cover and spool.
Tab
Cover
Tap Button
2. Remove any remaining line.
3. Clean dirt and debris from all parts. Re-
place spool if it is worn or dam aged.
4. Replace w ith a pre-wound spool, or re-
place lineusing a4,5 m eters lengthof2,4
mm diameter Partner® brand line.
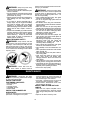
5. When installing new line on an existing
spool, hold the spool as shown in the il-
lustration below.
6. Bend the line at the midpoint and insert
the bend into the slot in the center rim of
the spool. Ensure line snaps into position
in the slot.
Slot
Spool
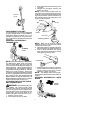
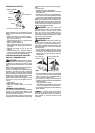
7. With your finger between the lines, wrap
the lines evenly and firmly around the
spool in a clockwise direction.
8. Position the lines in the guide slots.
Guide
Slot
Guide Slot
9. Insert the ends of the lines through exit
holes in the sides of the cover .
10. Place the spool in the cover.
Spool
Cover
11. Make sure the lines are not caught be-
tween the rim of thespool andthe wall of
the cover.
12. Reinstall the spool and cover onto the
trimmerhead.Push untilcover snaps into
place.
BLADE REPLACEMENT
Refer to theASSEMBLY section for bladere-
placement instructions and illustrations.