


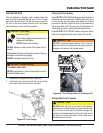


PAGE34 — SP7060 PAVEMENT SAW • OPERATION MANUAL — REV. #0 (02/13/09)
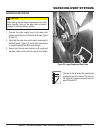
RAISE-LOWER CONTROLS
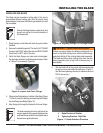
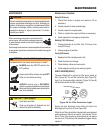
Figure 27. Raise-Lower Control Toggle Switch
IN
C
H
INCH
M
M
MM
0
2
5
25
5
0
50
0
1
2
3
7
5
75
1
0
0
100
1
2
5
125
1
5
0
150
1
7
5
175
2
0
0
200
2
3
0
230
2
5
5
255
2
8
0
280
3
0
5
305
3
3
0
330
3
5
5
355
3
8
0
380
1
5
15
9
1
0
10
1
1
11
1
2
12
1
3
13
1
4
14
4
5
6
7
8
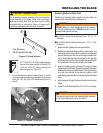
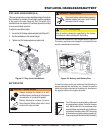
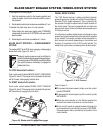
Figure 28. Depth Indicator
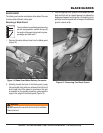
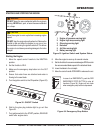
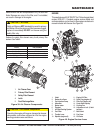
Figure 29. Setting Depth Gauge and Depth Stop
3
5
1
4
6
Raises
Lowers
2
1
1. Depth Control Knob
2. Raise/Lower Toggle Switch
3. Adjuster Bracket
4. Adjuster Cable/Spring assy.
5. Adjuster Nut
6. Depth Control Housing
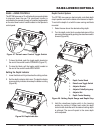
RAISE - LOWER CONTROLS
The SP7060 saw uses a 12-volt hydraulic pump and cylinder
to raise and lower the saw. The raise-lower function is
controlled by the operator through a 3-position toggle switch
on the raise-lower control handle located on the operator’s
control panel.
1. To lower the blade, push the toggle switch located on
the end of the control handle FORWARD (Figure 27).
2. To raise the blade, pull the toggle switch located on
the end of the control handle BACKWARD.
Setting the Depth Indicator
1. Lower the blade until it just touches the cutting surface.
2. Set the depth indicator dial to zero. The depth indicator
now accurately indicates how deep the blade is cutting
(Figure 28).
Depth Control System
The SP7060 saw uses an electronically controlled depth
stop to position and lock the blade at the desired cut depth.
To control the depth of cut with the saw running and blade
mounted:
1. Raise the saw above the desired cutting depth.
2. Turn the depth control knob
counterclockwise
until the
saw cannot be lowered by pushing the raise/lower switch
forward (Figure 29).
3. Hold the raise/lower toggle switch in the lowering
position by pushing it forward and rotate the depth
control knob
clockwise
until the desired cutting depth
is achieved. The saw will repeat to the same depth
until readjusted.