


PAGE 14 — DCA-400SSK — PARTS AND OPERATION MANUAL (STD)— REV. #3 (09/17/01)
DCA-400SSK — TRAILER SAFETY GUIDELINES
Brakes
If your trailer has a braking system, the brakes should be
inspected the first 200 miles of operation. This will allow the
brake shoes and drums to seat properly. After the first 200
mile interval, inspect the brakes every 3,000 miles. If driving
over rough terrain, inspect the brakes more frequently.
Electric Brakes
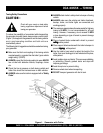
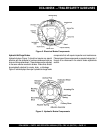
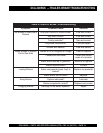
Electrically actuated brakes (Figure 2) are similar to hydraulic
brakes. The basic difference is that hydraulic brakes are
actuated by an electromagnet.
Listed below are some of the advantages that electric brakes
have over hydraulic brakes:
Brake system can be manually adjusted to provide the
corrected braking capability for varying road and load
conditions
Brake system can be modulated to provide more or less
braking force, thus easing the brake load on the towing
vehicle
Brake system has very little lag time between the time
the vehicle’s brakes are actuated and the trailer’s brakes
are actuated
Brake system can provide an independent emergency
brake system
Remember in order to properly synchronize the tow vehicle’s
braking to the trailer’s braking, can only be accomplished by
road testing. Brake lockup, grabbiness or harshness is due
to lack of synchronization between the tow vehicle and the
trailer being towed or under-adjusted brakes.
Before any brake synchronizations adjustments can be made,
the trailer brakes should be burnished-in by applying the
brakes 20-30 times with approximately a 20 m.p.h. decrease
in speed, e.g. 40 m.p.h. to 20 m.p.h. Allow ample time for
brakes to cool between application. This allows the brake
shoes to slightly be seated into the brake drum surface.
Figure 2 displays the major electric brake components that
will require inspection and maintenance. Please inspect these
components as required.
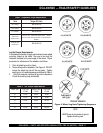
Electric Brake Adjustment
1. Place the trailer on jack stands. Make sure the jack
stands are placed on secure level ground.
2. Check the wheel and drum for free rotation.
3. Remove the adjusting hole cover from the adjusting slot
at the bottom brake backing plate.
4. With a screwdriver or standard adjusting tool, rotate the
star wheel of the adjuster assembly to expand the brake
shoes.
5. Adjust the brake shoes outward until the pressure of the
lining against the wheel drum makes the wheel difficult
to turn.
6. Rotate the star wheel in the opposite direction until the
wheel rotates freely with slight lining drag.
7. Replace the adjusting hole cover and lower the trailer to
the ground.
8. Repeat steps 1 through 6 on the remaining brakes.