


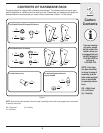

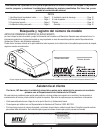

6
3
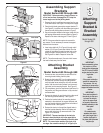
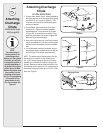
Attaching
Bracket
Assembly
Model Series 600
through 619
IMPORTANT:
Before assembly, place
the tractor on a firm,
level surface, disengage
the PTO, stop the tractor
engine and set the park-
ing brake.
NOTE:
There are two holes in
the clevis pin. Be sure
to insert the hairpin
clip in the upper hole
to properly secure the
bracket assembly to the
hitch plate.
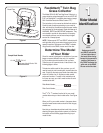
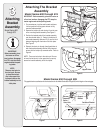
Attaching The Bracket
Assembly
Model Series 600 through 619
IMPORTANT: Before assembly, place the tractor on
a firm, level surface, disengage the PTO, stop the
tractor engine and set the parking brake.
1. For convenience, pivot the seat forward and leave
it in that position until the grass collector is fully
mounted and assembled.
2. Remove the hairpin clip and clevis pin from the rear
of the mounting bracket assembly. See Figure 5.
3. Position the hooked ends of the bracket assembly
over the shoulder bolts (1). Swing in the bottom of
the bracket assembly down and in (2) over the hitch
plate and aligning with the hole on the hitch plate.
See Figure 5.
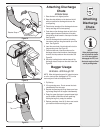
4. Reinsert the clevis pin through the aligned holes in
both the bracket assembly and the hitch plate and
secure with the hairpin clip removed earlier. Refer to
Figure 6.
NOTE: There are two holes in the clevis pin. Be sure
to insert the hairpin clip in the upper hole to properly
secure the bracket assembly to the hitch plate.
Figure 5
Figure 6
Figure 7
Figure 8
Upper Hole
Hitch Plate
Outside of Bracket
Outer Hole
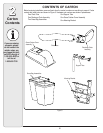
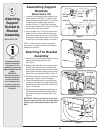
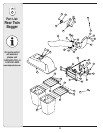
Model Series 650 through 699
This graphic below coordinates with the instructions for the Model Series 650 through 699, which begin on the next page.
Support
Bracket
Screws
Removed
Earlier
Remove
Pin