


1
1
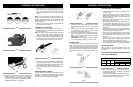
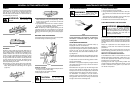
2. Holding the nose of the bar up, use the screwdriver or
scrench if provided in your User’s Kit to turn the guide
bar adjustment screw (E) (Fig. 6) clockwise to tighten
the chain. Turning the screw COUNTERCLOCKWISE
LOOSENS THE CHAIN on the guide bar.
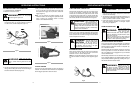
3. After adjustment and while wearing heavy duty work
gloves, move the saw chain back and forth on the guide
bar to be sure the chain moves freely and is in proper
mesh with sprocket. Do not move chain with bare
hands.
NOTE:
IF the chain is difficult to rotate or if it binds on the
guide bar, too much tension has been applied and must be
adjusted. To decrease tension, turn the adjustment screw
counterclockwise slowly. Move the chain back and forth
until it moves freely.
4. Holding the nose in upper position, securely tighten the
bar retaining nuts (70 inch lbs.)
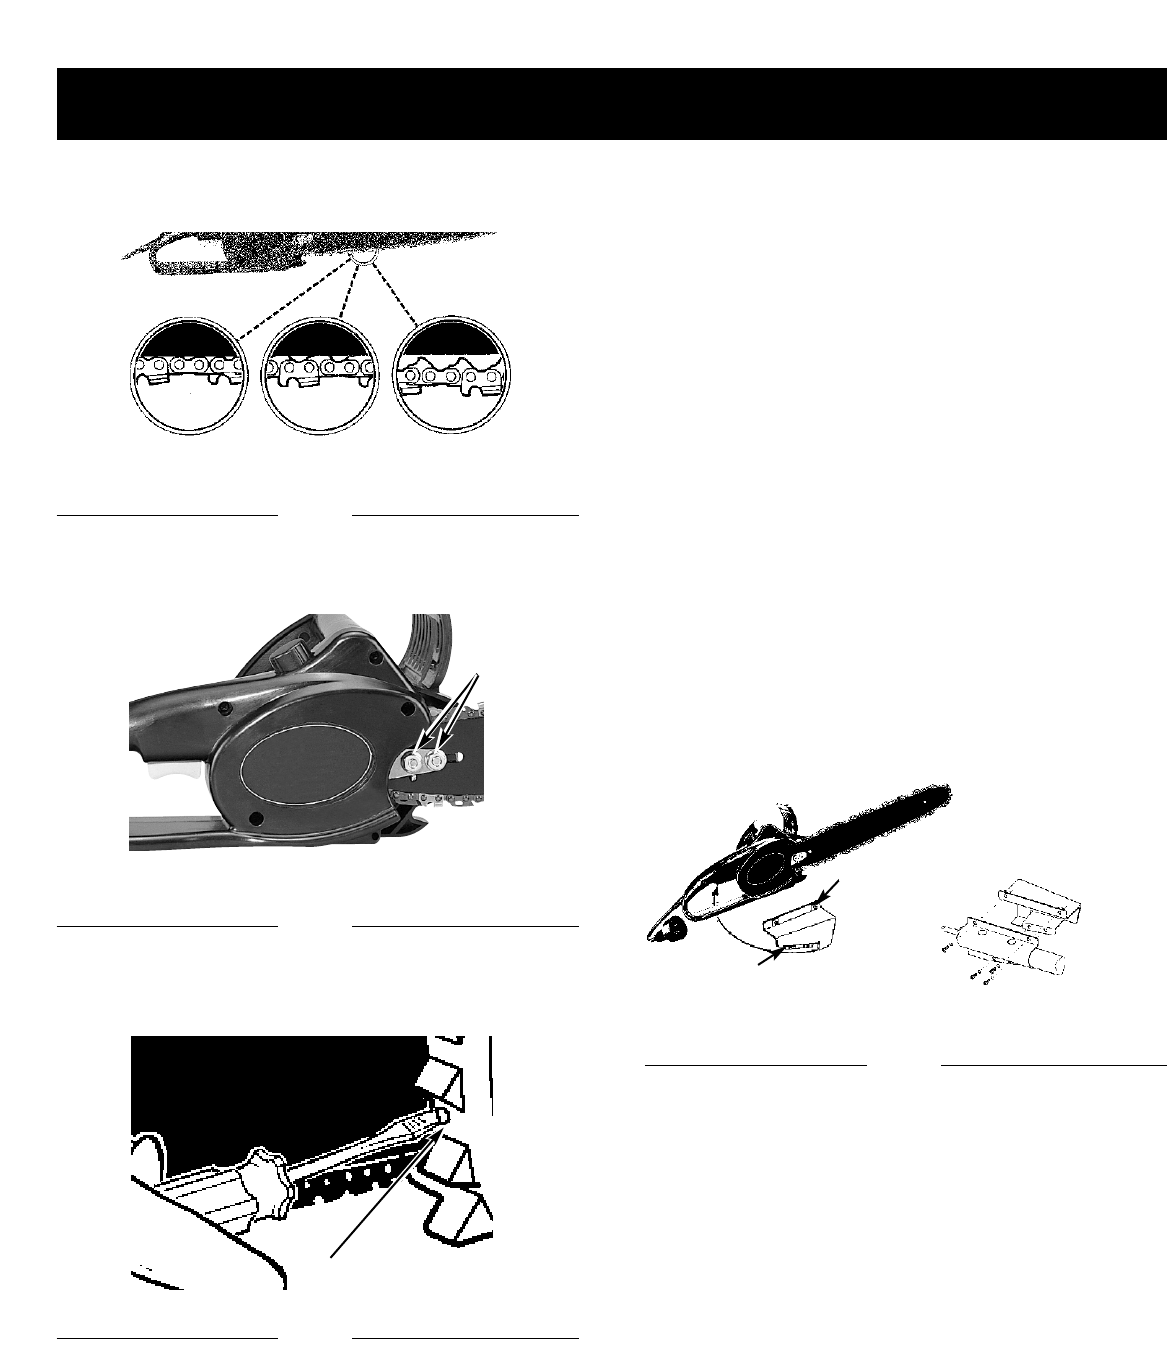
ASSEMBLY OF POLE SAW
1. Make sure the unit is unplugged from power source.
2. Slip handle bracket (A) over chain saw handle from the
right side (See Fig. 7).
NOTE:
The trigger must be depressed before the bracket
will go onto the handle. Push the lock-off button and
depress the trigger. While holding the trigger in, place
the trigger support portion of the bracket under the trig-
ger and slide the bracket onto the chain saw handle.
The bracket will keep the trigger in the “ON” position.
3. Align holes in pole bracket with holes in handle bracket.
Install Phillips head screws with lock washers through
pole bracket from left side and thread into the weld nuts
on the handle bracket. Tighten screws securely.
4. Plug the saw power cord into receptacle cord at end of
inner pole.
ADJUSTING POLE LENGTH
The pole saw has a telescoping pole assembly that will
extend from 57 inches (fully retracted) to 96 inches (fully
extended). A threaded compression coupling is used to
hold the pole in position at any extended length.
ASSEMBLY INSTRUCTIONS
E
B
A
1. To extend the pole, loosen coupling by turning coupling
nut counterclockwise as shown in Fig. 8. Pole will slide
freely.
2. Pull inner pole section out to desired length of exten-
sion.
Note: Only extend pole to minimum length
required to reach limb that is being cut.
3. To lock pole in position, tighten coupling by turning cou-
pling nut clockwise (See Fig. 8) until firmly hand tight.
Make sure saw handle is aligned with pole handle
before tightening coupling nut.
IMPORTANT: Do not use wrench or pliers to overtight-
en coupling. Damage to coupling or pole may result.
OILING CHAIN
To oil chain, press oil cap. Oil will feed onto guide bar and
chain. Press oil cap at least once before each cut. Always
check oil level before using pole saw. check oil level often
by looking at oil sight level hole. Oil sight level hole is on left
side of saw, between front handle and front hand guard. Do
not attempt to operate the oiler while cutting with the pole
saw.
CUTTING WITH THE POLE SAW
1.
Connect saw to extension cord. Connect extension cord
to power supply.
2. Use both hands to grip pole saw. Use only designated
grip areas when operating pole saw (See Fig. 9). Use
firm grip. Thumbs and fingers must wrap around pole
saw handle and pole.
3. Make sure your footing is firm. Keep feet apart. Divide
your weight evenly on both feet.
4. When ready to make a cut, press in trigger switch lock-
off and squeeze trigger switch (see Fig. 10) This will
turn pole saw on. Releasing trigger switch will turn pole
saw off. Make sure saw is running at full speed before
starting a cut.
5. When starting a cut, place moving chain against wood.
Hold pole saw firmly in place to avoid possible bouncing
or skating (sideways movement) of saw.
6. Guide pole saw using light pressure. Do not force pole
saw. The motor will overload and can burn out. It will do
the job better and safer at the rate for which it was
intended.
7. Remove pole saw from a cut with saw running at full
speed. Stop pole saw by releasing trigger. Make sure
chain has stopped before setting pole saw down.
8. Never stand directly under the limb you are trimming.
Always position yourself out of the path of falling debris.
FILLING OIL TANK
Using a funnel, fill oil tank with MTD Chain, Bar and
Sprocket oil. Wipe up any spills. Make sure no dirt gets into
the oil tank.
SELECTING THE PROPER EXTENSION CORD
FOR YOUR SAW MODEL
1. When using the appliance, an extension cord of ade-
quate size must be used for safety and to prevent loss
of power and overheating.
2. The extension cord must be specifically intended for out-
door use and marked SW-A, SOW-A, STOW-A, SJW-A,
SJOW-A SJTOW-A, SJTW-A, OR SJTW.
Minimum Gauge Wire
Saw Model
Ampere
Rating
MTD PS
8
Volts AC
Length of Power Cord
25 ft. / 7.5m 50 ft. / 15m
100 ft. / 30m
110 / 120
18 Gauge 16 Gauge
14 Gauge
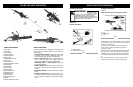
Grip Area
Zone de Poignée
Área del Apretón
Lock-Off Switch
Gâchette de Contact
Fijador del Interruptor
T
rigger Switch
Interrupteur de Gachette
Interruptor de Gatillo
Fig.6
Fig.7
Fig.8
Fig.9
Fig.10
ASSEMBLY INSTRUCTIONS
Fig.11
UNLOCK
D
ÉVERROUILLEZ
ABRA
LOCK
SERRURE
BLOQUEO
A
B
C
D
Fig.4
Fig.5
12