


26
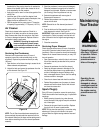
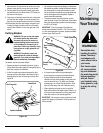
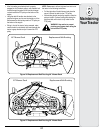
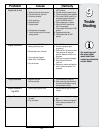
• Remove the spindle covers by removing the self-tap-
ping screws that fasten them to the deck. Refer to
Figure 25.
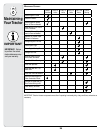
• 46" Mower Deck ONLY - Remove the old belt from
the deck. Install the new belt around the spindle and
idler pulleys as shown in Figure 26.
•
50" Mower Deck ONLY
Loosen the hex screw fastening the idler pulley
to the idler arm as necessary to slide the belt
from between the idler pulley and idler arm. See
Figure 25.
Place the new belt between the idler pulley and
idler arm. The backside of the ‘V’ belt should be
against the idler pulley. Tighten the hex screw to
secure the idler pulley.
Route the deck belt around the spindle pulleys
and idler pulleys as shown in Figure 27.
• Reinstall the spindle covers on the deck using the
self-tapping screws. Do not overtighten the screws.
Reinstalling the Cutting Deck
There are two methods for reinstalling the mower deck on
the tractor. One method involves rotating the deck idler
arm to relieve enough belt tension to allow the belt to be
placed in either the PTO pulley or the deck idler pulley.
Because that method is difficult, we recommend using
the second method of rolling the belt onto the PTO pulley.
Install the cutting deck as follows:
• From the right side of the tractor, slide the deck under
the tractor and align the read deck hanger bracket
with the deck lift arms.
• Slide the deck forward and place the deck front
hanger rod into the slots of the deck front hanger
bracket. Then slide the deck rearward so that the
hanger rod is at the front of the slots.
• Using the deck lift lever, lower the deck lift arms. From
either side of the tractor, pull the support pin in the
deck rear hanger bracket outward, align the deck lift
arm hole with the deck support pin and release the pin
so that it goes through the deck lift arm. Repeat on the
other side of the tractor to secure the deck.
1.
2.
3.
IMPORTANT: Always
use a fuse with the
same amperage capac-
ity for replacement.
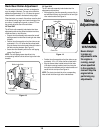
Fuses
• A 20 amp fuse is installed in your tractor’s wiring
harness to protect the tractor’s electrical system from
damage caused by excessive amperage.
• If the electrical system does not function, or your
tractor’s engine will not crank, first check to be
certain that the fuse has not blown.
• The fuse can be found inside of the dash panel
behind the battery tray. You may need to remove the
battery to gain access to the fuse.
• A five amp fuse can also be found inside the dash
panel. This fuse is for the 12 volt power outlet.
Always use a fuse with the same amperage capacity
for replacement.
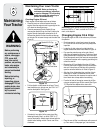
Changing Transmission Drive Belt
NOTE: Several components must be removed, includ-
ing transmission steering linkage which will have to be
readjusted, in order to change the tractor’s transmission
drive belt. Contact your Cub Cadet dealer to have your
transmission drive belt replaced.
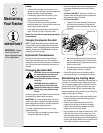
Hydrostatic Transmission
Keep the area around the transmission cooling fan
free of grass and debris at all times. The hydrostatic
transmission is sealed at the factory and is maintenance
free. The fluid level cannot be checked and cannot be
changed.
Changing the Deck Belt
WARNING: Be sure to shut the engine
off, remove ignition key, disconnect
the spark plug wire(s) to prevent
unintended starting before removing
the belt(s).
WARNING: Avoid the possibility of
a pinching injury. Do not place your
fingers on the idler spring or between
the belt and a pulley while removing
the belt.
All belts on your tractor are subject to wear and should
be replaced if any signs of wear are present.
IMPORTANT: Do not use substitute belts. The V-belt
found on your tractor is specially designed for optimal
performance and service life for your deck application.
Use only OEM original replacement belts.
To change or replace the deck belt on your tractor,
proceed as follows:
• Remove the deck from beneath the tractor (refer to
Cutting Deck Removal on page 24)
Figure 25
6
Maintaining
Your Tractor
IMPORTANT
Hex Screw
Spindle Cover
Idler Pulley