


15
NOTE: The unit uses Advanced Starting Technology™,
which significantly reduces the effort required to
start the engine. You must pull the starter rope out
far enough to hear the engine attempt to start.
There is no need to pull the rope briskly-- there is
no harsh resistance when pulling. Be aware that
this starting method is vastly different from (and
much easier than) what you may be used to.
8. If the engine does not start, repeat steps 3 through 7.
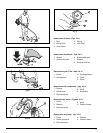
9. Keep throttle trigger depressed to warm up engine.
After the engine warms up for 10 to 15 seconds,
place the choke lever in Position 3 (Fig. 18).
NOTE: If the engine floods while attempting to start,
place the choke lever in the Position 3, squeeze
the throttle trigger, and pull the starter rope
briskly. The engine should start within three (3) to
eight (8) pulls.
NOTE: Choking is not required when starting a warm
engine. Start a warm engine with the ignition
switch in the ON position and the choke lever in
Position 2.
STOPPING INSTRUCTIONS
1. Release your finger from the throttle trigger (Fig. 4).
Allow the engine to cool down by idling.
2. Put the ignition switch in the OFF (O) position (Fig. 4).
ADJUSTING TRIMMING LINE LENGTH
The Bump Head cutting attachment allows you to release
trimming line without stopping the engine. To release
more line, lightly tap the cutting attachment on the
ground (Fig. 8) while operating the trimmer at high speed.
NOTE: Always keep the trimming line fully extended.
Line release becomes more difficult as cutting
line becomes shorter.
A blade in the cutting attachment guard will cut the line to
the proper length if excess line is released. For best
results, tap the Bump Head on bare ground or hard soil. If
line release is attempted in tall grass, the engine may stall.
Some line breakage will occur from:
• Normal line fatigue
• Forcing the line into objects such as walls or fence
posts
TIPS FOR BEST TRIMMING RESULTS
• Keep the cutting attachment parallel to the ground.
• Do not force the cutting attachment. Allow the tip of
the line to do the cutting, especially along walls.
Cutting with more than the tip will reduce cutting
efficiency and may overload the engine.
• Cut grass over 200 mm (8 in.) by working from top to
bottom in small increments to avoid premature line
wear or engine drag.
• Cut from left to right whenever possible. Cutting to the
right improves the unit's cutting efficiency. Clippings
are thrown away from the operator.
• Slowly move the trimmer into and out of the cutting
area at the desired height. Move either in a forward-
backward or side-to-side motion. Cutting shorter
lengths produces the best results.
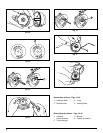
DECORATIVE TRIMMING
Decorative trimming is accomplished by removing all
vegetation around trees, posts, fences, etc.
Rotate the whole unit so that the cutting attachment is at
a 30° angle to the ground (Fig. 9).
OPERATING INSTRUCTIONS
MAINTENANCE AND REPAIR INSTRUCTIONS
LINE INSTALLATION
This section covers both Split-Line™ and standard
single line installation.
Always use 2.0 mm. (0.080 in.) replacement line. The
engine may overheat or fail if you use a line size other than
specified.
There are two methods to replace the trimming line.
• Wind the inner reel with new line
• Install a prewound inner reel
Winding the Existing Inner Reel
1. Hold the outer spool with one hand and unscrew the
Bump Knob counterclockwise (Fig. 10). Inspect the
bolt inside the Bump Knob to make sure it moves
freely. Replace the Bump Knob if damaged.
2. Remove the inner reel from the outer spool (Fig. 11).
3. Remove spring from the inner reel (Fig. 11).
4. Use a clean cloth to clean the the inner reel, spring,
shaft, and inner surface of the outer spool
5. Check the indexing teeth on the inner reel and outer
spool for wear (Fig. 12). If necessary, remove burrs
or replace the reel and spool.
NOTE: Split-Line™ can only be used with the inner reel
with the slotted holes. Single line can be used on
either type of inner reel. Use figure 13 to identify
the inner reel you have.
NOTE: Always use the correct line length when installing
trimming line on the unit. The line may not release
properly if the line is too long.