


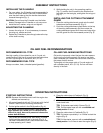


14
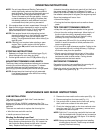
ASSEMBLY INSTRUCTIONS
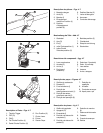
INSTALLING THE D-HANDLE
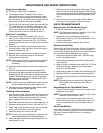
1. For your safety, the D-Handle must be assembled in
front of the limiter sleeve. Push the D-Handle down
over the shaft tube so that the handle slants back
towards the engine (Fig. 1).
CAUTION: Do not force the D-handle over the limiter
sleeve. Damage to the D-handle or unit may occur.
3. Install the bolt, washer, wing nut and tighten.
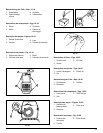
ADJUSTING THE D-HANDLE
1. Loosen the wing nut. It is not necessary to remove
the wing nut, washer and bolt.
2. Rotate the D-handle to place the grip above the top
of the shaft housing.
3. While holding the unit in the operating position
(Fig. 7), position the D-handle to the location that
provides you the best grip, and tighten the wing nut
(Fig. 1).
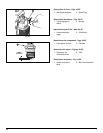
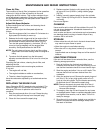
INSTALLING THE CUTTING ATTACHMENT
GUARD
1. Place the cutting attachment guard onto the shaft
tube above the clamp assembly (Fig. 2).
2. Push the cutting attachment guard down to the top
of the string head assembly and then rotate the
cutting attachment guard until the screw holes align
and the guard fits into the recessed pocket (Fig. 3).
OIL AND FUEL RECOMMENDATIONS
RECOMMENDED OIL TYPE
Use high quality oil formulated for use in 2-cycle, air-
cooled engines. Mix the oil according to the instructions
on the 2-cycle engine oil container, 40:1 (2.5 %).
RECOMMENDED FUEL TYPE
Always use clean, fresh, unleaded petrol (gasoline).
OIL AND FUEL MIXING INSTRUCTIONS
Old and/or improperly mixed fuel are the main reasons
for the unit not running properly. Be sure to use fresh,
clean unleaded fuel. Follow the instructions carefully for
the proper fuel/oil mixture.
Thoroughly mix the proper ratio of 2-cycle engine oil
with unleaded petrol, 40:1 (2.5 %). Do not mix them
directly in the tank.
OPERATING INSTRUCTIONS
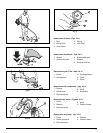
STARTING INSTRUCTIONS
NOTE: Squeeze the throttle control until the engine has
started and warmed up.
1. Mix petrol (gasoline) with oil. Fill fuel tank with fuel/oil
mixture. See Oil and Fuel Mixing Instructions.
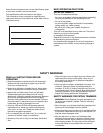
2. Put the ignition switch in the ON (I) position (Fig. 4).
3. TIP: When you are trying to start a unit that has
been dormant for a while (or if it is brand new or
difficult to start), be sure to press and release the
primer bulb 20 times.
Fully press and release primer bulb slowly 10 times.
You should feel and see fuel in the bulb (Fig. 5). If
fuel hasn't entered the bulb, press three more times,
or keep pressing until it does.
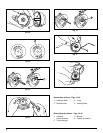
4. Place the choke lever in Position 1 (Fig. 5).
TIP: Make sure choke lever locks into (1) position.
5. With the unit on the ground, squeeze the throttle
control and hold.
700: Pull starter rope briskly 3 times (Fig. 6).
710: Pull the starter rope out with a controlled and
steady motion 3 times.
6. Place the choke lever in Position 2 (Fig. 5).
7. 700: Pull starter rope briskly 1 to 3 times to start the
engine (Fig. 6).
710: Pull the starter rope out with a controlled and
steady motion 1 to 5 times to start the engine (Fig. 6).