


12
• With the engine running in the FAST position and
the auger control lever in the disengaged “up”
position, walk to the front of the machine.
• Confirm that the auger has completely stopped
rotating and shows NO signs of motion.
IMPORTANT:
If the auger shows ANY signs of rotating,
immediately return to the operator’s position and shut
off the engine. Wait for ALL moving parts to stop before
re-adjusting the auger control.
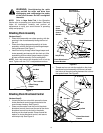
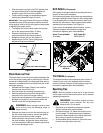
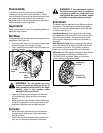
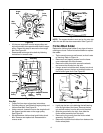
• To readjust the control cable, loosen the hex jam
nut on the auger control cable “Z” fitting.
• Rotate the coupling end of the cable
counterclockwise to provide more slack.
• Retighten the hex jam nut. See Figure 12.
• Repeat Auger Control Test to verify proper
adjustment has been achieved.
Figure 12
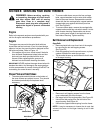
Chute Clean-out Tool
The chute clean-out tool is conveniently fastened to the
rear of the auger housing with a mounting clip. Should
snow and ice lodge itself in the discharge chute during
operation, proceed as follows to safely clean the chute
and chute opening:
• Release both the Auger Control Lever and the
Traction/Auger Control Lock Lever.
• Stop the engine by removing the ignition key.
• Remove the clean-out tool from the clip which
secures it to the rear of the auger housing.
• Use the shovel-shaped end of the clean-out tool to
dislodge and scoop any snow and ice which has
formed in and near the discharge chute.
WARNING: Never use your hands to clean
snow and ice from the discharge chute or
auger housing
• Refasten the clean-out tool to the mounting clip on
the rear of the auger housing, reinsert the ignition
key and start the snow thrower’s engine.
• While standing in the operator’s position (behind
the snow thrower), engage the auger clutch lever
for a few seconds to clear any remaining snow and
ice from the discharge chute.
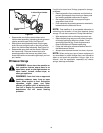
Drift Cutters (If Equipped)
Drift cutters should be used when operating the snow
thrower in heavy drift conditions.
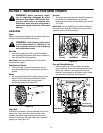
On models so equipped, drift cutters are assembled to
the auger housing inverted. Remove the carriage bolts
by unthreading the hex nuts which secure them, and
reinstall the drift cutters in their proper position before
operating the snow thrower. See Figure 13.
If your unit is not equipped with drift cutters, contact
Customer Support as instructed on page 2 for
information regarding price and availability.
Snow Thrower Model Drift Cutter Kit
All models OEM-390-679
Figure 13
Tire Chains (If Equipped)
Tire chains should be used whenever extra traction is
needed. If your unit is not equipped with tire chains,
contact Customer Support as instructed on page 2 for
information regarding price and availability.
Operating Tips
NOTE: Allow the engine to warm up for a few minutes
as the engine will not develop full power until it reaches
operating temperature.
WARNING: The muffler, engine, and their
surrounding areas become hot and can
cause a burn. Do not touch.
• Discharge snow downwind whenever possible.
Slightly overlap each previous swath.
• Set the skid shoes 1/4" below the scraper bar for
normal usage. The skid shoes may be adjusted
upward for hard-packed snow. Adjust downward
when using on gravel or crushed rock.
• Avoid possible starter freeze-up. Clean the snow
thrower thoroughly after each use.
“Z” Fitting
Hex Bolt
Cable
Make sure cable is straight
Carriage Screws /
Hex Nuts
Drift
Cutter