


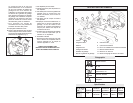

14 15
MAINTENANCE
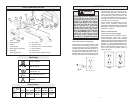
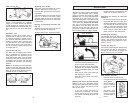
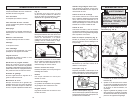
Bucking a log
When bucking a log, (cutting it into lengths)
it is important to make sure your footing is
firm and your weight is evenly distributed.
In general, try to have the log raised and
supported near the cut. Having the log
raised and supported near the cut will re-
duce binding and kickback.
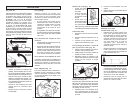
If bucking log on hill (Fig. 27)
The operator should be on the uphill side
of the cut so when the cut off piece rolls,
it rolls away from the operator. Do not let
the chain come into contact with the
ground. Toward the end of the cut reduce
cutting pressure, maintain firm grip, and be
prepared for log to roll away from the saw
and the operator.
Fig. 27
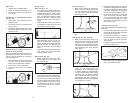
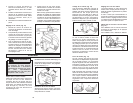
Fig. 28
A
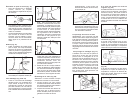
If log supported on one end (Fig. 29)
If log supported on one end cut 1/3 of the
way through the log from the bottom (A)
and finish the cut from the top (B). Cutting
this way will make the cut off portion fall
away cleanly and easily.
If log supported along entire length
(Fig. 28)
If log supported along entire length, such
as on the ground, cut from the top (A) roll
log over and finish the cut. Rolling the log
over and finishing the cut from the top will
prevent the cutting into the ground where
the dirt and stones will dull the chain.
Fig. 29
B
A
Fig. 30
B
A
If log supported on both ends (Fig. 30)
If log supported on both ends cut 1/3 of the
way through the log from the top (A) and
finish the cut from the bottom (B). Use ex-
tra caution to make sure that the chain saw
does not bind up in the cut.
After completing the cut, wait for the saw
chain to stop before moving the saw. Al-
ways stop the motor before continuing to
another tree.
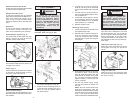
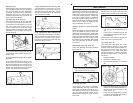
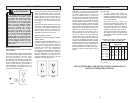
Setting the Depth (Fig. 33)
The front part (A) of the cutter link is de-
signed to limit the depth of cut of the tooth.
Fig. 33
A
If the tooth is limited too much, the chain
saw will not cut as effectively as it
can.
If the tooth is not limited enough, the
tooth will take too big a bite and contrib-
ute to kickback.
File the front of the cutter link so that it is
.025" lower than the cutting tooth.
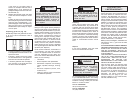
The Clutch (Fig. 34)
This chain saw is equipped with a disc
clutch designed to protect the motor from
overload. It has been preset at the factory.
The clutch should slip when the saw is
bogged down in a cut. If the clutch slips
during a normal cut, or does not slip when
the saw is bogged down in a cut, adjust it
as follows.
1. Engage the brake.
2. Remove the sprocket cover.
3. Note the stamped mark on the flange
(B).
Under normal usage, your chain saw will
require regular inspection and maintenance.
Examine the saw for dirt and debris that
might prevent safety and anti-kickback de-
vices from working properly. Inspect the
saw and its safety devices to determine
that it will operate properly. Failure to fol-
low the maintenance procedures indicated
below or the removal of safety devices
may increase the risk of injury.
Cleaning guide bar, chain and chain
brake
Remove the guide bar and chain after each
use or as needed to clean out chips and
debris from the sprocket area. Clean guide
bar groove, soak in light oil and wipe clean.
Clean out chips and debris from the chain
brake after each use or as needed. Check
the brake for normal operation before each
use. See "Cleaning" for further cleaning
instructions.
Sharpening chain (Fig. 31 & 32)
Use a 5/32" diameter round file to sharpen
cutter links (A).
Fig. B shows the link from the front.
Fig. C shows the link from the top.
Fig. 31
A
A
B
90°
30°
C
Fig. 32
Fig. 34
B
A
E
D
C
Replacing the chain
To replace the chain, refer to instructions
under Assembly. Use only Low-Kickback
saw chains that meet the ANSI B175.1-
2000 kickback requirements, other chains
may not reduce kickback. Refer to your
MILWAUKEE catalog for proper replace-
ment parts.
4. Rotate the adjusting bolt flange (A) so
that the mark on the flange (B) lines up
with the next reference mark on the
thrust washer (C).
If the clutch is slipping during a normal
cut, tighten the adjusting bolt flange to
the next mark clockwise (E).