


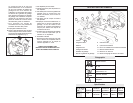
12 13
Basic cuts
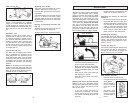
1. Support log in a stable position.
2. Check for adequate clearance for cut.
3. Allow saw to come to full speed be-
fore cutting.
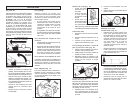
Overbucking, or cutting down through
log (Fig. 19)
1. Place lower end of spiked bumper
against the log.
2. Pivot saw into the cut and allow it to cut
its way down.
3. Reposition spiked bumper lower down
and repeat working down the log until
through the cut.
Fig. 20
Felling a Tree
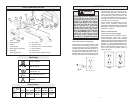
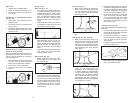
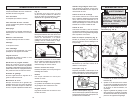
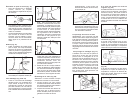
Work area (Fig. 21)
Do not fell trees by roads, power lines,
or buildings without permission from
appropriate authorities. Traffic control
or other preparations may be neces-
sary. If a felled tree contacts a power
line do not go near it. Notify the power
company and provide a warning for
others.
Keep bystanders, coworkers, pets etc.
at a distance at least twice the height
of the tallest tree being felled.
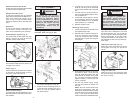
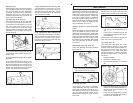
Notching (Fig. 23)
1. Make a lower horizontal notching cut
about 1/3 of the way through the tree
(A). This will help to avoid pinching of
the saw chain or guide bar when the
second cut is made.
2. Make an angled cut to finish the notch
(B).
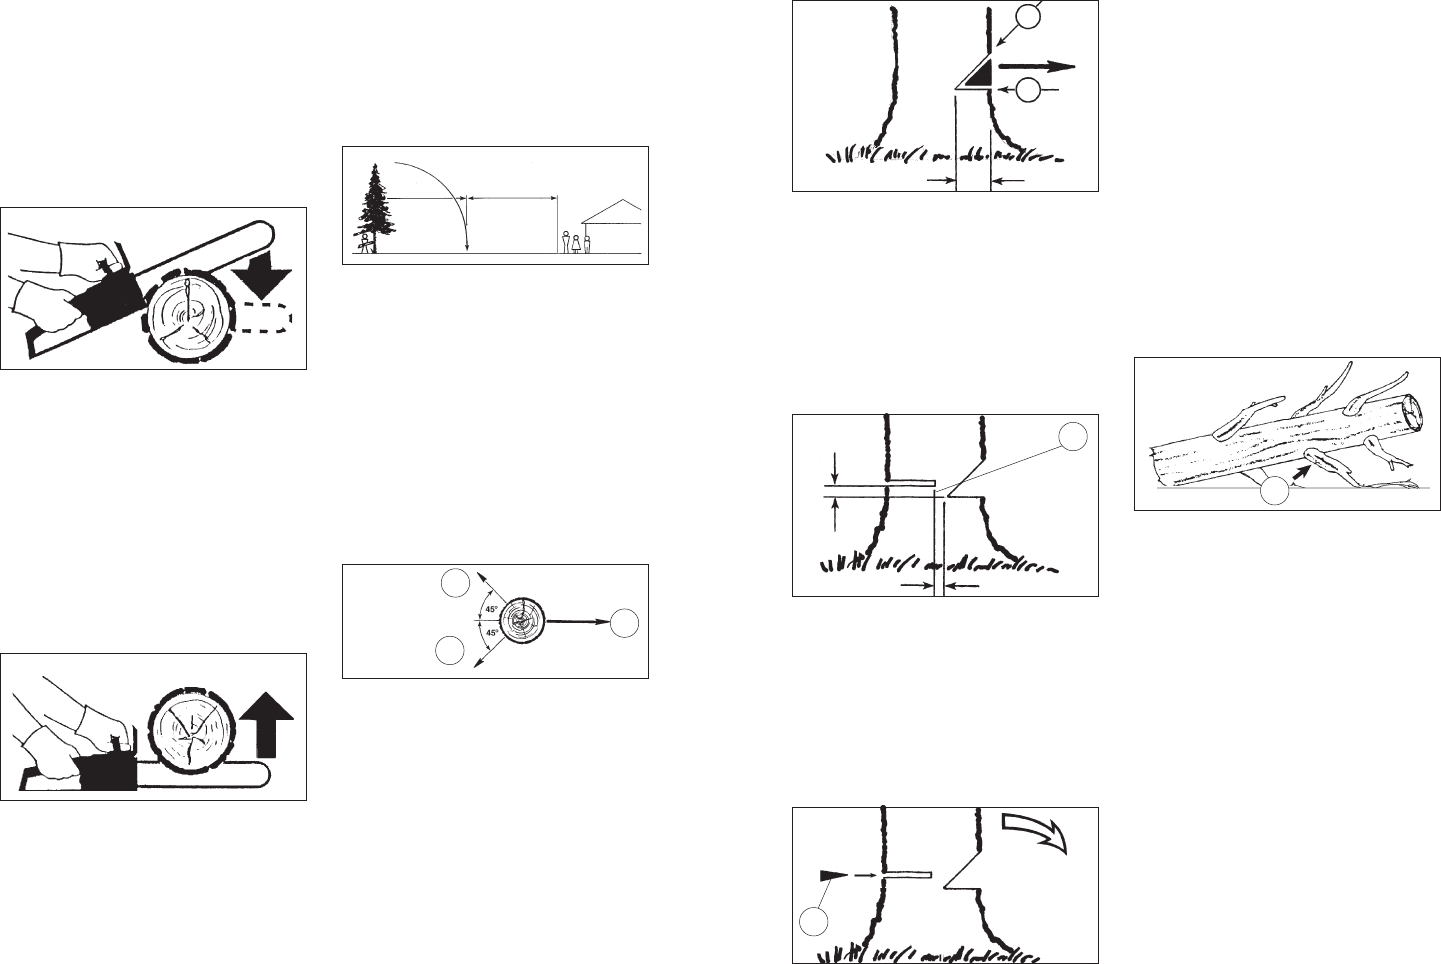
Felling back cut (Fig. 24 & 25)
1. Make a horizontal felling back cut 2"
above the initial notching cut so that
there will be a 2" "hinge" (A) created in
the tree. Do not cut through the hinge.
The hinge prevents the tree from twist-
ing and falling in the wrong direction
when felled.
Fig. 21
B.
A.
Fig. 23
Fig. 26
A
Fig. 19
Underbucking, or cutting up from the
bottom of a log (Fig. 20)
Most cuts should be made according to the
overbucking instructions. But, in some situ-
ations, it may be necessary to cut with the
top of the guide bar.
1. Be prepared for a "pushing" action from
the saw. Keep in mind instructions
listed under "preparing for kickback".
2. Allow saw to come to full speed.
3. Lift the saw into the cut in a controlled
motion.
When bucking and felling operations are
being performed by two or more per-
sons at the same time, the felling op-
eration should be separated from the
bucking operation by a distance of at
least twice the height of the tree being
felled.
Check intended cut area for nails, fence
wire, stones etc. and remove these
materials before cutting.
Retreat path (Fig. 22)
Before beginning to fell a tree, clear
retreat paths (A) at 45º angles to the
line of the fall (B).
B
A
A
Fig. 22
The operator should be on the uphill
side of the terrain when felling a tree.
Toward the end of the cut, be prepared
for the tree to roll or slide down the hill.
The wind speed and direction and the
shape of the tree and its limbs will af-
fect the direction of the fall. If unsure
of any this information, call a profes-
sional for help.
NOTE: When cutting larger diameter
trees, as the felling back cut
progresses, drive nonmetallic (wood
or plastic) wedges into the felling back
cut (B). These wedges help to keep
the felling back cut open and reduce
the risk of the tree "leaning back" onto
the guide bar and chain. Continue to
add wedges as needed until felling back
cut creates the 2" "hinge".
2. Usually the tree will begin to fall as you
complete the felling back cut. However
if it does not, remove the saw and drive
nonmetallic wedges (B) into the felling
back cut until the tree begins to fall.
3. Remove the saw from the cut, stop the
motor and put the saw down. Watch
out for falling limbs and move away
from falling tree following the retreat
path. Watch your footing as you move
away from the tree.
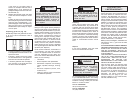
Limbing a tree (Fig. 26)
"Limbing" is removing the branches from a
fallen tree.
1. Cut the smaller upper limbs of the tree
first and let the larger lower limbs hold
the tree off of the ground.
2. Cut limbs under tension in a direction
so that the tension causes the cut to
open up rather than pinch the chain
and guide bar.
Usually this means cut limbs under ten-
sion from the bottom (A).
3. Do not remove the larger supporting
limbs until the tree is bucked into shorter
logs. See directions below.
2"
2"
A
Fig. 24
B
Fig. 25