


21
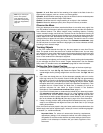
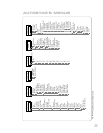
15. "Drive Setup: For this...." begins to scroll across the display. This is another
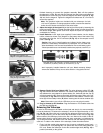
reminder to point your telescope at a terrestrial object. Loosen the R.A. and Dec.
locks (17 and 33, Fig. 1d) and point the telescope at an object. Then re-tighten
the locks. Press ENTER when the telescope is pointing at the desired terrestrial
object.
16. "Center reference object" displays. Center your target object using the Arrow
keys. When centered, press ENTER.
17. The telescope slews and "Press until it is centered" displays. Press the Up
Arrow key until the target is centered again. Then press ENTER.
18. The telescope slews and "Press V until it is centered" displays. Press the Down
Arrow key until the target is centered again. Then press ENTER. "Train Drive:
Alt/Dec Train" displays again. You have now completed this procedure. Continue
onto the next procedure,
EASY ALIGNMENT.
Easy Alignment (Autostar Models Only)
After completing the "Train the Drive" procedure, align your telescope using Autostar.
The fastest and easiest way to start observing with Autostar's Go To capabilities is to
align your telescope using the Easy Alignment.
1. Keep pressing MODE until "Select Item: Setup" is displayed. Press ENTER.
2. "Setup: Align" displays. Press ENTER. "Align: Easy" displays. Press ENTER.
3. "German North" displays and a scrolling message prompts you to set your tele-
scope in the polar home position. See
SETTING THE POLAR HOME POSITION, page
17, for a description of this procedure. Press ENTER after you finish the proce-
dure.
4. Autostar then chooses two stars from its database to align upon. When the tele-
scope slews to the star for alignment, it may not appear in the field of view in the
eyepiece. Use the Arrow keys to move the telescope until the star is visible and
centered in the eyepiece. The alignment star should be easily recognized and be
the brightest star in the area of the sky where the telescope is pointing. See
WHICH
ONE'S THE ALIGNMENT STAR, page 18, for more information. When the star is cen-
tered, press ENTER. Repeat the procedure for the second alignment star.
Note: Autostar locates alignment stars based on the date, time, and loca-
tion entered. The alignment stars may change from night to night. All that
is required is for the observer to center the selected star in the eyepiece
when prompted.
Go To Saturn (Autostar Models Only)
After performing the Train the Drive and the Easy Alignment procedures, the motor
drive begins operating and the telescope is aligned for a night of viewing. Objects in
the eyepiece should maintain (
i.e., track) their position even though the Earth is rotat-
ing beneath the stars.
Important Note: Once aligned, only use the Autostar menus or Arrow
keys to move the telescope. Do not loosen the telescope locks, or move
the base manually, or alignment will be lost.
This exercise demonstrates how to select an object for viewing from Autostar’s data-
base,
i.e., Saturn. Note that Saturn is not visible all year long and it may be necessary
for you to choose another object from Autostar's database. However, the procedure
will be identical to the one used for observing Saturn.
1. After the telescope is aligned, “Select Item: Object” displays. Press ENTER. If
“Select Item: Object” is not currently displayed, press MODE repeatedly until it
displays, then press ENTER.
2. “Object: Solar System” displays. Press ENTER.
3. “Solar System: Mercury” displays. Use the Scroll Down key until “Solar System:
Saturn” displays.
4. Press ENTER. “Calculating” displays. Then “Saturn” and a set of coordinates dis-
plays. Saturn’s (and other planets’) coordinates change throughout the year.
Tip:
The GO TO key also
allows you to perform a
"spiral search." A spiral
search is useful when the
telescope slews to an
object, but that object is
not visible in the eyepiece
after the telescope finishes
its search. (This some-
times occurs during an
alignment procedure.)
Press GO TO when the
telescope stops slewing.
The telescope begins to
move in a spiral pattern at
a very slow speed (you
may change the slew
speed if you wish—see
SLEW SPEEDS, page 16)
around the search area.
Look through the eyepiece
and when the object does
become visible, press
MODE to stop the spiral
search. Then use the
Arrow keys to center the
object.
V
Note: Three other align-
ment methods, One-Star,
Two-Star and Three-Star
Polar alignment, are
available as options in the
"Setup: Align" menu. See
page 51 and page 55 for
more information.