


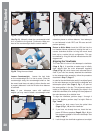
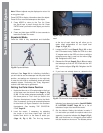

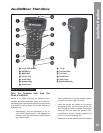

stars to align upon. When the telescope slews to
the fi rst star for alignment, it may not appear in the
fi eld of view of the eyepiece. The alignment star
should be easily recognized and be the brightest
star in that area of the sky where the telescope is
pointing. While looking through the viewfi nder, use
the Arrow keys to move the telescope centering
the star in the viewfi nder. Now look through the
eyepiece and use the Arrow keys to move the
star to the center of the eyepiece fi eld. Press
ENTER. Repeat this procedure for the second
alignment star.
Note: If that area of the sky is obscured, you can
prompt AudioStar to choose an alternate star by
pressing either one of the two Scroll keys
When the procedure is performed correctly, “Alignment
Successful” displays. If AudioStar does not display this
message, perform this procedure again.
Note: AudioStar locates alignment stars based
on the date, time and location entered. Using this
information and the Home Position as its starting
point, the alignment stars should easily be placed
within the viewfi nder. Note the alignment stars may
change from night to night. All that is required is for the
observer to center the selected stars in the eyepiece
when prompted.
Note: The GoTo key also allows you to perform a
“spiral search”. A spiral search is useful when the
telescope slews to an object, but that object is not
visible in the eyepiece after the telescope fi nishes its
search. (This sometimes occurs during an alignment
procedure.) Press GoTo when the slew is fi nished and
the telescope starts slewing in a spiral pattern at a very
slow speed around the search area. Look through the
eyepiece and when the object does become visible,
press MODE to stop the spiral search. Then use the
Arrow keys to center the object.
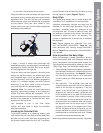
Go To Saturn
After performing the Easy Alignment procedure, the
motor drive begins operating and the telescope is
aligned for a night of viewing. Objects in the eyepiece
should maintain their position even though the Earth is
rotating beneath the stars.
Important Note: Once aligned, only use the GoTo or
Arrow keys to move the telescope. Do not move the
telescope manually, or unlock the vertical or horizontal
locks, or alignment will be lost.
Once the telescope is aligned, you may choose and
“Go To” any object listed in AudioStar’s Object menu.
This exercise demonstrates how to select one such
celestial object, the planet Saturn, for viewing from the
Object menu.
Note: Saturn is not visible the entire year and you
may need to choose another object from AudioStar’s
database; however, the procedure, as described
below, remains the same.
1 After the telescope is aligned, “Select Item: Object”
displays. Press ENTER.
2. “Object: Solar System” displays. Press ENTER.
3. “Solar System: Mercury” displays. Keep pressing
the Scroll Down key until “Solar System: Saturn”
displays.
4. Press ENTER. “Calculating” displays. Then
“Saturn” and a set of coordinates displays. Note
that Saturn’s (and other planets’) coordinates
change throughout the year.
5 Press GoTo. “Saturn: Slewing...” displays and the
telescope slews until it fi nds Saturn. You may need
to use the Arrow keys to center Saturn precisely
in the eyepiece. AudioStar then automatically
moves the telescope so that it “tracks” Saturn (or
whatever other object you may have chosen); i.e.,
Saturn remains centered in the eyepiece.
For further direction how to use your aligned telescope
please go to the AudioStar Operation section (Page
37) for details.
Using the Guided Tour
This example demonstrates using “Tonight’s Best”
Guided Tour.
1. After observing Saturn, keep pressing mode until
“Select Item: Object” displays again.
2. Press the Scroll Down key twice. “Select Item:
Guided Tour” displays.
3. Press ENTER. “Guided Tour: Tonight’s Best”
displays. Press ENTER.
Note: If you wish to try out other Guided Tours, press
the Scroll Down key to scroll through other tour
choices. When the tour you wish to select displays,
press ENTER.
4. “Tonight’s Best: Searching...” displays. After
calculating, “Tonight’s Best: Jupiter” displays.
27
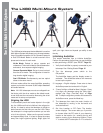
The LX80 Multi-Mount System